Operating Instructions for the G1 Sub-Bass System REL Acoustics Limited North Road, Bridgend industrial Estate Bridgend, CF31 3TP United Kingdom Telephone: +44 (0)1 656 768 777 Fax: +44 (0) 1 656 766 093 Web: www.REL.
Important Safeguards 1 Read all of these instructions. 2 Save these instructions for future use. 3 Unplug from the wall socket before cleaning. Do not use liquid cleaners or aerosol cleaners. Use a damp cloth for cleaning. 4 Do not use near water. 5 Do not place on a stand or table; it may fall causing injury to a child or adult, and damage to the unit. 6 The unit should only be operated from the power source indicated on the panel of the amplifier. 7 Only use the power cord supplied.
About the G1 Sub-Bass System Many or most loudspeakers emphasize the mid-bass. This is the range from 50 to 90 Hz. We at REL believe this is an incomplete approach and that loudspeakers need to be supplemented in the lower frequencies for true full range reproduction. All of our designs are true Sub-Bass Systems, meaning they are designed to reproduce very low frequencies (below 30 Hz) that are felt rather than heard.
Introduction to the Design of the REL Gibraltar Sub-Bass Systems Any design process is a journey. Please follow along as we share lessons gleaned from our three-year journey culminating in the birth of a new ultra high performance range for REL Acoustics, GIBRALTAR™. The REL design team’s goals for Gibraltar are a simple attempt to replicate the extraordinary performance of the much costlier REL Studio III while reducing size and upgrading appearance.
Power Corrupts Or so the saying goes. Actually, a lack of power is frequently what corrupts or limits the pure pistonic performance of a sub. REL employ an expensive but, in our vast experience, ultimate circuit topology for Gibraltar. A linear, Class AB power amplifier using 6 MOS-FETS for the G1 and 4 for the G2 backed by state of the art power supply and a power transformer with vast over-specification. Expensive? Yes, unabashedly so.
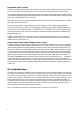
REL G1 Back Panel Connection Legend 1 1 2 4 3 3 2 9 10 5 6 7 4 8 5 1 .1/LFE Phono Input: Used to connect to the .1/LFE output of a surround-sound processor. 2 .1/LFE Phono Output: Used to connect or “daisy chain” another REL G-Series in tandem. 3 Left & Right Channel Low-Level Phono Input: Used to connect low-level signals to the sub-bass system from the output of a preamplifier, integrated amplifier or receiver. (For home cinema use, use .1/LFE input).
Digital Amplifier Compatibility HI Level Inputs on the REL G1 incorporate proprietary REL-D™ circuitry to allow the use of amplifiers using Class D topology without grounding issues. LED Display An LED display is located on the lower front of the G1. All functions that are user adjustable via the remote control can be seen here. The display reverts to off a few seconds after adjustment. Remote Control Battery Installation The G1 Remote Control Unit requires two AAA batteries.
Connecting to the Power Amplifier Using the Neutrik High Level Input To engage the Neutrik Speakon plug, insert fully into socket and rotate clockwise until locked. To remove the Neutrik Speakon plug, grip body of plug, place thumb on chrome lever, move lever backwards rotate plug anti-clockwise quarter turn and withdraw. The high-level input is designed to accept the stereo (two-channel) signals from the speaker terminals of your receiver, integrated amplifier, and basic amplifiers.
Using Multiple Sub-Bass Systems For higher levels of low-frequency output, you may want to use multiple sub-bass systems. To facilitate this the REL G1 uses a rear panel high-level connector to “daisy chain” units when stacked vertically or placed next to each other. This connectivity allows for the same amplifier output signal to be designated to each sub-bass system individually.
Two Things Before You Begin 1 It is helpful to know that you will almost always connect the REL to the input on the rear panel labelled “HIGH LEVEL INPUT.” This connection is made using the supplied 34’ 10” (10 meters) cable, the bare leads of which connect to the speaker output terminals of the power amplifier. The easy and foolproof connection at the REL is done with a Neutrik Speakon connector. The purpose of connecting to the speaker output terminals is one of the unique secrets of REL’s success.
3 Phase Orientation: Once in the corner we need to adjust for phase. This may be the single most critical step, and because it really is quite simple, it is often over-thought. Keep in mind; the right phase is whichever position is the loudest or fullest. While playing music with true low bass, adjust the crossover to a point where the REL and the speaker are sure to share frequencies (about halfway up or slightly higher for smaller speakers).
Technical The G1 model uses an unusual method of bass loading. It is designed to operate below normal system resonance. This has been achieved without the normal form of bass boost or electronic equalization.
G1 Specifications Type: Drive Unit: Lower Frequency Response in Room: Input Connectors: Input Impedance: Gain Control Range: Power Output: Phase Switch: Amplifier Type: Protection System Fully Electronic with SET-SAFE: D.C. Fault: Output Short: Mains Input Voltage: Fuses: Closed box, front firing woofer 12 in., 300mm long throw, carbon fiber cone 23 Hz at -6 dB Hi Level Neutrik Speakon, Lo Level stereo phono, LFE phono Hi Level: 150k, Lo Level: 10k, .