
Use and Care Guide


PROPER DOOR INSTALLATION
PRODUCT GUIDE
Interior and Exterior Doors
6
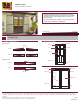
FRAME TWISTS
Attach two pieces of
string to frame, corner to
corner. If there is a gap
between strings at center
point larger than 1/8", the
frame is not at. Repeat
by switching strings and
re-measuring.
PROPER SHIMMING
Measure width of frame at
top, center, and bottom.
If any two measurements
differ more than 1/16",
the frame is over or under
shimmed. Repeat process
and measure height
offrame.
LEVEL AND PLUMB
For plumb, place level
against each side jamb or
use a plumb bob. For level,
place level against head
jamb and sill.
SQUARE
Measure frame from
top left to bottom right
corner and from top right
to bottom left corner. If
measurements differ by
1/8", unit is out-of-square.
LEVEL INDICATOR
Accurate measurements are essential in determining level and plumb.
Most carpenters' levels have several bubble level indicators, making it
possible to measure all parts of the door.
Examine the horizontal indicator. If the bubble is centered between the
lines of the indicator, it is level.
If the bubble is not exactly centered, measure how far “out of level” or
“out of plumb” by maneuvering the end of the level until the bubble is
exactly centered. Measure the farthest gap between the level and the
surface. On a 4' level (or longer), the gap must not exceed 1/4", or the
surface is out of level/plumb.
Side jamb
Head jamb
Head jamb
Measure here
• Proper installation is essential for keeping doors operating smoothly.
If a door fails to operate properly, an inspection is necessary to
determine if it was installed correctly.
• A contractor or installer can assist in determining the cause of a
door being “out of specication” and possibly correct it. Door
problems due to improper installation are usually not covered by the
manufacturer’s warranty. For installation instructions, contact us or
your supplier.
• The specications and measurements referenced in this guide are
taken from ASTM E2112 Standard Practice for Installation of Exterior
Windows, Doors and Skylights.
Note: These instructions do not address inspection for proper “water
tightness” or ashing where the product integrates with the structure.
A “water tight” inspection requires removal of the exterior siding and
interior trim around the door. Seek professional assistance regarding
this issue.