
Installation Guide


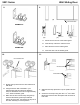

EXAMPLE A
EXAMPLE B
10.
A. Center the door in front of the bottom guide.
B. Insert the top of the door under the track.
C. Place the door over the bottom guide.
D. Lower the door over the bottom guide.
(A)
(B)
(C) (D)
BOTTOM GUIDE
A. Engage the top rollers into the roller brackets at
both ends.
B. Using the wrench that is included in your
hardware bag (Part # CH43-019) adjust the
rollers so the bottom of the door is approximately
1/16 above the bottom guide.
C. Make sure the door moves freely along the top
track and the bottom guide stays inside the
bottom rail of the door, then tighten the top nut on
the roller assembly to lock the position.
A. Slide the End Caps (Items # 3 & 4) into position at both
ends.
B. Secure the End Caps using four #6 X 1-¼ Pan Head
Machine Screws and four #6 Square Nuts as shown at
both ends.
ROLLER BRACKET
#6 SQUARE NUT
#6 PAN HEADS
8. 9.
11.
9851 Series Wall Sliding Door