
Use and Care Guide


Top Roll Framed Sliding Door
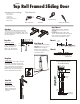
Included in this package:
8 Long Screws
6 Short Screws
1 Top Track
1 Bottom Track
2 Sliding Mirror Doors
Bumper Pads
Tools Required
Drill (optional)
Phillips Screwdriver
Hacksaw
Tape Measure
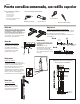
Step One
Trim Track to Fit Opening (if necessary)
Cut the Fascia Track and Bottom Track 1/16“
(2mm) shorter than the opening width with a
fine tooth hacksaw.
Step Two
Attach Top Track
Using the long screws,
screw in Fascia Track to
header, locating front
edge 1/16“ (2mm) back
from jamb face as shown.
1/16“
(2mm)
Step Three B
Attach Bottom Track (With
Carpet):
Place 2” wide x length of
bottom track x 1/8” thick
(min) strip of plywood on top
of carpet as shown.
Step Four
Install Doors
o
Tilt the door at a 20 angle; insert the
top wheels of the door into the rear
channel of fascia track and allow the
door to hang vertical. Snap bottom
guides into the rear groove of the
bottom track using a screwdriver as
shown. Repeat for the front door.
Step Five
Adjust Doors
For vertical
adjustment and
plumb doors, use a
Phillips screwdriver to
adjust the top rollers
as shown.
Cross Sectional Layout
of Installed Doors
3/8“ (10mm) min.
1 3/8“(35mm) max.
13/16“
(21mm)
4“ (100mm) min.
to shelving
1 3/16“ (30mm) min.
2 1/2“(64mm) max.
Bumper Pad
FRONTFRONT
88161
Step Three A
Attach Bottom Track (Without
Carpet):
Locate leading edge of floor track
13/16“ (21mm) back from front face of
jamb so doors hang plumb. Use the
short screws for the bottom track.
13/16“
(21mm)
Three B
Three A
Wood Strip