
Installation Guide

WINDOW INSTALLATION INSTRUCTIONS
STEP 3.
Fill the gaps, interior, exterior and around the perimeter
of the window between the mainframe and wall with an approved
polyurethane based sealant such as Vulkem
®
or 100% silicone
window and door caulk.
Caution, over use of expansion foam can make the window too
tight in the opening and can negatively impact the operation of
the window.
Insulated Slider Window
Installation Instructions
Replacement/New Construction
application for Insulated Slider Window
with installation/sealing flange
NOTE: Sealing flange can be scored and removed if needed
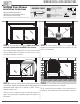
STEP 1.
Center window in the opening. Make sure that the
sash lock is positioned to the INSIDE of the structure.
Note: In tight installation applications the screen can be removed
from the window before installation for easier access to the
pre-drilled installation screw holes
STEP 2.
Secure window using 2-1/4” screws fastened
through the pre-punched installation holes located on the side
walls (as shown above).
SEALANT
(not included)
TAPE MEASURE
DRILL
DRIVER
REQUIRED TOOLS
1/4 X 2-1/4” SCREWS FOR
MASONRY INSTALLATION
(not included)
OR
8 X 2” SCREWS FOR
WOOD BUCK INSTALLATION
(not included)
STEP 4.
To insure proper water drainage keep weep holes
clear and free from obstruction (see above).
Fit the screen back into the window if it was removed prior to
installation. Trim and finish the interior and exterior as desired.