Iron Maven ™ J490A Home Ironing System With CSS™ Instructi o n Manual
CONGRATULATIONS We would like to thank you, and congratulate you for purchasing the ultimate home ironing system from Reliable Corporation. A professional home ironing system, starting with the J490A and using a high quality-ironing table (preferably with vacuum and blowing functions) is the surest way of achieving professional results at home. The excellent steam quality of this product will allow you to save time while ironing.
ELECTRICAL INSTRUCTIONS To avoid a circuit overload, do not operate another high-wattage appliance on the same circuit simultaneously with the steam iron. If an extension cord is necessary, a 15-amp rated cord with a polarized plug should be used. Cords rated for less may overheat and cause damage. Polarized Plug: This steam iron system uses a polarized plug (one blade is wider than the other). As a safety feature, this plug will fit into a polarized outlet only one way.
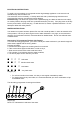
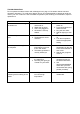
PROGRAMMING INSTRUCTIONS 1 There are 4 red L.E.D. lights, each one representing a different level of water hardness. One red L.E.D. light is for the softest water, four red L.E.D. lights is for the hardest water. 2 To set the programme, hold the button “R” (Diagram B - #6) button down while at the same time turning the boiler on/off switch (Diagram C - #5) on. 3 The green led (5) will start to flash. 4 “Push” and “release” the “R” button until you have the correct number of red L.E.D.
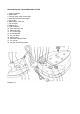
DESCRIPTION OF THE STEAM IRON SYSTEM: 1. Steam regulation 2. Boiler switch 3. Orange steam ready control light 4. Red water finished control light 5. Iron switch 6. Boiler safety valve cap 7. Iron rest pad 8. Release clip 9. Cold water tank 10. Cold water tank cap 11. Electrical cable 12. Iron control light 13. Thermostat dial 14. Iron sole plate 15. Steam button 16. Continuous steam button 17. Iron handle 18.
HOW TO USE YOUR IRONING SYSTEM 1. Unscrew the water fill cap (10). 2. Using a bottle or any other container, fill the tank (9) up to a maximum of .7 quarts of water (0.65L or 2.75 cups) or remove the tank by pushing the lever (8) outwards while simultaneously lifting the water tank out, take it to a faucet and fill it as well to the maximum amount. Put the cap back on the boiler when done, and place the water container back into its original position. 3. Connect the electrical cord to the main power outlet.
How to iron? Everyone has their own idea on the best way to iron, and really there is no one right way. The most important thing to remember is to set the temperature dial on the iron (13) to the temperature that most closely matches the fabric that you are pressing. Some people will naturally use more steam, some people less steam, some prefer to pass over the fabric a few times, others prefer less times.
TROUBLESHOOTING Do not operate the steam cleaner with a damaged cord, plug or if the steam cleaner has been dropped or damaged. To avoid risk of electric shock, do not disassemble or attempt to repair the unit on your own. Return the unit to Reliable Corporation (see warranty) for examination, repair or replacement. PROBLEM No steam is released through the steam iron. POSSIBLE CAUSES 1. Steam on/off switch is not turned on. 2. Water tank is empty. 3. Unit is not plugged in. 4.
www.reliablecorporation.