
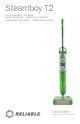
Instruction manual


8
INSTRUCTIONS FOR USE
The Sweeper is designed to sweep dry spills, dust, and general light debris from
hard floor surfaces (not carpet).
We recommend that you first sweep the floor and then steam it. However, you can
turn the sweeper on and utilize the steam function simultaneously for small tidy ups.
The Steamer is designed to thoroughly clean floor surfaces, such as marble,
ceramic, stone, linoleum, sealed hard wood floors and parquet.
WARNING: on surfaces that have been treated with wax, the wax may be
removed by the heat and steam action. Do not use on unsealed wood floors
or let unit stand on any wood floor for an extended period of time. This could
cause the wood grain to rise. It is therefore recommended that a test cleansing
be carried out on an isolated area of the floor. It is also recommended that you
check the use and care instructions of the surface from the floor manufacturer
to ensure suitability to steam cleaning.
For first time use of the machine, please hold onto the switch to allow the water
to get pumped to the steam chamber. The pump will make a louder noise during
this initial operation.
To disinfect a specific area, position the steamer over the area
for a minimum of five seconds. The steam temperature will reach
approximately 120°C (248°F). Use this procedure to disinfect
floors near toilets, kitchen counters, pet sleeping quarters, etc.
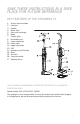
HOW TO ASSEMBLE AND USE
• Attach sweeper/steamer base to the body.
• Secure base with a small Phillips head screwdriver until is fully tightened.
• Insert long silver-colored handle down into the sweeper/steamer body.
• Screw the large Phillips head screw through the opening at the back of
steamer body into the rear of the steamer handle and tighten until secure.
• Place the steamer head onto the microfiber pad. It will adhere with the Velcro
®
backing. NOTE: Do not operate without a floor pad in place.
• Remove the water tank by lifting it straight up and away from the unit, unscrew
cap from the water tank and remove it then fill the tank with cool tap water.
Replace and tighten the cap. Put the water tank back into the unit.
• Twist the quick release cord wrap peg clockwise to unwrap the power cord
completely and plug into a grounded electrical outlet.