
User Manual


36 BK Radio
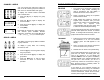
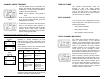
CHANNEL LABELS
You can program the radio with a label for
each of the 25 channel groups and a label for
each of the 16 channels within each group.
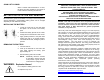
To display the channel number associated
with a channel label:
1. Press the [#] key to display the group
number.
2. Press the [#] key again to display the
channel number.
3. Press and hold the [#] key to display the
channel label.
4. Press [ENT].
Each label can include up to eight characters,
with decimal points available between
characters. Characters can include A–Z, 0–9,
-, *, $, /, +, %, \, |, _, <, >, h, or a blank space.
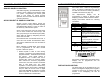
GROUP LABELS
The display can show group labels in addition
to group numbers.
To display a group label, turn scanning
functions off, then:
1. Press the [#] key on the keypad to display
the group number.
2. Press and hold the [#] key to display the
group label.
3. Press the [ENT] key or wait for about
5 seconds to revert to normal radio
operation.
F
I
R
E
NE
T
Channel Label
C
H
1
2
Channel Number
1
2
3
4
5
6
7
8
9
0
*
#
CLR
FCN
PRI
ENT
1
2
3
4
5
6
7
8
9
0
*
#
CLR
FCN
PRI
ENT
DPH Owner’s Manual 9
BASIC OPERATION
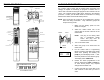
RECEIVE 1. Turn power on by turning the Volume knob
clockwise. A beep sounds, indicating the
radio is operational. The LCD display, if
installed, shows the current channel.
2. Select a channel
by turning the 16-position
Channel Selector knob.
3. Adjust squelch and volume
by turning the
Squelch knob clockwise until you hear
noise. Set the volume to a comfortable level.
Then turn the Squelch knob
counterclockwise until the noise stops. This
is called the Threshold Squelch setting.
Turning the Squelch knob fully counterclockwise
past the detent places the receiver in Channel
Guard. A message will be heard only when the
proper Channel Guard value is received.
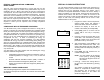
TRANSMIT 1. Press the PTT (Push-To-Talk) switch. When
the transmitter is on, the red Transmit
Indicator glows and TX appears in the
display.
2. Talk in a normal voice with the microphone
one to two inches from your mouth.
3. Release the PTT switch to stop transmitting.
If the Transmit Indicator does not glow when you
press the PTT switch, the battery pack may
need to be charged. If so, the display will
indicate LOBATT, and the yellow Low-Battery
Indicator will flash. If the Transmit Indicator does
not glow and a tone sounds, you are on a
receive-only channel or the channel is busy (if
Busy Channel lockout is enabled). Select an
authorized transmit channel.
If the length of your message exceeds the
preset Time-Out-Timer setting, the transmitter
automatically shuts off and a tone sounds. To
continue transmission, release the PTT switch,
and then press it again and continue talking.
Microphone
PTT