DEUTSCH Seite 02-27 ENGLISH page 28-53 FRANÇAIS page 54-79 DIGITAL JOCKEY CONTROLLER EDITION Professioneller MIDI-Controller Professional MIDI controller Contrôleur MIDI professionnel Bedienungsanleitung ACHTUNG! Lesen Sie sich vor der ersten Inbetriebnahme zur eigenen Sicherheit diese Bedienungsanleitung sorgfältig durch! Alle Personen, die mit der Aufstellung, Inbetriebnahme, Bedienung, Wartung und Instandhaltung dieses Gerätes zu tun haben, müssen entsprechend qualifiziert sein und diese Betriebsanle
BEDIENUNGSANLEITUNG DEUTSCH Wir gratulieren Ihnen zum Kauf des Reloop Digital Jockey Controller Edition. Vielen Dank, dass Sie unserer Diskjockey-Technologie Ihr Vertrauen schenken. Vor Inbetriebnahme bitten wir Sie, alle Anweisungen sorgfältig zu studieren und zu befolgen. Nehmen Sie den Reloop Digital Jockey aus der Verpackung. Bitte überprüfen Sie vor der ersten Inbetriebnahme, ob kein offensichtlicher Transportschaden vorliegt.
- - - - - - - - BESTIMMUNGSGEMÄßE VERWENDUNG - - - - DEUTSCH - Stellen Sie keine Flüssigkeitsbehälter, die leicht umfallen können, auf dem Gerät oder in dessen Nähe ab. Falls doch einmal Flüssigkeit in das Geräteinnere gelangen sollte, sofort den Netzstecker ziehen. Lassen Sie das Gerät von einem qualifizierten Servicetechniker prüfen, bevor es erneut genutzt wird. Beschädigungen, die durch Flüssigkeiten im Gerät hervorgerufen wurden, sind von der Gewährleistung ausgeschlossen.
WARTUNG - - - Überprüfen Sie regelmäßig die technische Sicherheit des Gerätes auf Beschädigungen des Netzkabels oder des Gehäuses, sowie auf die Abnutzung von Verschleißteilen wie Dreh- und Schiebereglern. Wenn anzunehmen ist, dass ein gefahrloser Betrieb nicht mehr möglich ist, so ist das Gerät außer Betrieb zu setzten und gegen unbeabsichtigten Betrieb zu sichern.
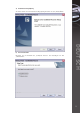
a) Installations-Begrüßung Als erstes sehen Sie die Installations-Begrüßung. Drücken Sie auf „Weiter/Next“. Belassen Sie die Auswahl bei „Complete Version“ und bestätigen Sie mit „Weiter/Next“.
c) Kundeninformation Fügen Sie Ihre Daten, Name, Firma und die Seriennummer ein. HINWEIS! Ihre persönliche Seriennummer finden Sie auf der Rückseite der CD Hülle. DEUTSCH Bestätigen Sie Ihre Eingaben mit „Weiter/Next“. 6 d) Installationspfad Hier wird der Installationspfad angezeigt. Bei Bedarf können Sie diesen manuell ändern. Bestätigen Sie den Pfad mit „Weiter/Next“.
e) Installationsbestätigung Bestätigen Sie die Installation indem Sie auf „Install“ drücken. Nun wird die Installation ausgeführt, eventuell muss nach der Installation Ihr Computer neu gestartet werden. Schließen Sie die Installation mittels der „Finish“ Taste ab. DEUTSCH f) Installation abgeschlossen HINWEIS! Falls Sie zu einem Neustart aufgefordert werden, so führen Sie diesen aus.
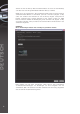
Starten Sie nun die Reloop Attack Software mittels des Icons auf dem Desktop oder über das Start Programm Menü im Ordner Reloop Software. Gehen Sie in die „Preferences“. Die Schaltfläche dafür finden Sie oben rechts im Software-Fenster. Öffnen Sie den Reiter „Devices“. Der Reloop Digital Jockey sollte dort sichtbar sein. Drücken Sie auf das Reloop Digital Jockey Bild im Fenster „Availabe Type“. Danach drücken Sie auf „Digital Jockey“ im „MIDI Devices“ Fenster darüber.
1.3. Traktor 3 LE Softwarekonfiguration Führen Sie die Autorun.exe auf der beiliegenden CD aus und warten Sie bis das Installationsmenü erscheint. Drücken Sie hier auf „Traktor 3 LE“ um das Setup auszuführen. Das Traktor 3 LE Setup startet nun; bitte folgen Sie den Anweisungen auf dem Bildschirm, um die Installation auszuführen. HINWEIS! Ihre Traktor 3 LE Version wurde optimal auf den Digital Jockey angepasst. Achten Sie darauf, dass Ihr Controller bei der Installation ausgewählt ist.
ÜBERSICHT CONTROLLER & SOFTWARE 33S 32S 9S 40S 39S 42S 43S 44S 11S 35S 12S 36S 34S 29S 10S 31S 17S 22S 16S 24S 14S 28S 25S 27S 26S 15S 19S 37S 20S 13S 21S 38S DEUTSCH 18S 4S 8S 5S 41S 6S 7S 3S 17H 22H 23H 10H 24H 2H 9H 1H 11H 12H 13H 16H 49H 30H 29H 14H 28H 27H 15H 26H 25H 19H 20H 21H 18H 8H 4H 10 5H 6H 7H HINWEIS! Elemente mit gleicher Funktion auf gegenüberliegenden Seiten sind nur einmal gekennzeichnet.
46H 48H 47H 45H 2. BEZEICHNUNGEN DEUTSCH 1 H: . . . . . . . . . . Trax Encoder 2 H: . . . . . . . . . . Load Funktion 3 S: . . . . . . . . . . Attack Library 4 H / S: . . . . . .Cue 5 H / S: . . . . . .Pause 6 H / S: . . . . . .Play 7 H / S: . . . . . .Crossfader 8 H / S: . . . . . .Linefader 9 H / S: . . . . . .3-Band Equalizer 10 H / S: . . . . . .Gain 11 H / S: . . . . . .Master Volume 12 H / S: . . . . . .Cue Volume 13 H / S: . . . . . .Cue Mix 14 H / S: . . . . . .Pitch Fader 15 H / S: . . . . . .
3. BEDIENUNG Nachdem Sie die ersten Schritte befolgt haben und den Controller angeschlossen und die Software richtig konfiguriert haben, können Sie nun, wie folgend erklärt, Ihren Controller und Ihre Software bedienen: 3.1. Library Die Attack Library ist Ihre Datenbank für Ihre gesamte Musik. In der Library können Sie nach Musik suchen, browsen und Informationen, wie beispielsweise BPM-Werte oder Titellänge, einsehen.
3.1.4. iTunes Playlist -LIVHier werden automatisch Ihre iTunes Playlisten angezeigt. Auch diese können in zuvor beschriebener Weise editiert und angepasst werden. HINWEIS! Mit Hilfe der „Import iTunes Library File To Database“-Funktion -L VIIkönnen Sie Ihre komplette iTunes Library mit einem Klick der Database hinzufügen (xml-Format). 3.1.5. Shortcuts Definitionen -LV- „Add New Playlist“ Hiermit fügen Sie eine Playlist hinzu.
HINWEIS! Durch Rechtsklick auf die Rubrikleiste der List View können Sie einzelne Rubriken ein- bzw. ausblenden lassen. 3.1.6. Waveform-Displays Ihnen stehen zwei detailierte Waveform-Displays zur Verfügung: a) Complete View -32 S-: Die Complete View zeigt den Wellenverlauf des kompletten Tracks an. So können Sie die Dynamik des Tracks, beispielsweise Intros oder Breaks eines Tracks, gut erkennen. Der bereits abgelaufene Teil des aktuellen Tracks wird dabei in der Complete View dunkler dargestellt.
DIV: Auto Cue-Anzeige Zeigt an, ob die Auto Cue-Funktion aktiviert ist. Sie können Auto Cue in dem Voreinstellungesmenü -43 S- im Reiter „Audio Einstellungen“ (Audio System Settings) beim Punkt „Auto Cue aktivieren“ (Enable Auto Cue) (de-)aktivieren. DV: Auto BPM-Anzeige Zeigt an, ob die automatische BPM-Analyse (de-)aktiviert ist. DVI: Cue-Anzeige Diese Anzeige blinkt beim Setzen eines Cue-Punktes und leuchtet im Cue-Modus.
3.3. Transport Controls Unter dem Jog Wheel -18 H- finden Sie drei Tasten zum Abspielen, Cuen und Pausieren eines Tracks. Mittels der Play-Taste -6 H- können Sie den zuvor geladenen Track abspielen. Erneutes Drücken der Play-Taste -6 H- bewirkt, dass der Track Stutter-artig vom zuletzt gesetzten Cue-Punkt abgespielt wird (Bop-Funktion). Um den Track zu pausieren, drücken Sie die Pause-Taste -5 H-. Mit der Cue-Taste -4 H- gelangen Sie im Wiedergabemodus zum letzt gesetzten Cue-Punkt zurück.
HINWEIS! Die Sync-Funktion wird anhand analysierter BPM-Werte ausgeführt, ist aber keine Garantie dafür, dass diese Funktion perfekt für jeden Musikstil und jede Songart ist. Es sollte also immer vor dem Mixen vorgehört und evtl. angepasst werden. Bei Tracks, bei denen der BPM-Wert nicht korrekt angezeigt wird, z.B. wenn der BPM-Wert viel zu hoch oder niedrig erscheint, (dies kann bei Breakbeats oder Drum & Bass der Fall sein) kann der BPM-Wert manuell analysiert werden.
Sie haben zwei Möglichkeiten, um manuell den BPM-Wert zu setzen: a) Tap-Funktion: Tappen Sie mit der Maus im Takt auf die Tap-Taste, um den BPM-Wert manuell zu ermitteln. HINWEIS! Sie können dies auch direkt im Informations-Display auf der BPM-Anzeige durchführen. (-DXI-) b) BPM Set-Funktion: Sie können auch den BPM-Wert direkt eingeben und mittels der Set-Taste bestätigen. Mit den Tasten „x 2“ und „/ 2“ können Sie den BPM-Wert per Knopfdruck verdoppeln bzw. halbieren.
e) FX/Reverse-Funktion -21 H / SDrücken Sie zunächst die FX/Reverse-Taste -21 H / S-, um diesen Modus zu aktivieren. Hier stehen Ihnen 3 Optionen zur Auswahl: • Reverse-Effekt: Ist Reverse im Auswahlmenü ausgewählt, aktivieren Sie mit der FX/ReverseTaste -21 H / S- den Rückwärtslauf. • Effekt 1-Funktion: Ist Effekt 1 im Auswahlmenü ausgewählt, so wird der Effekt aus der EffektSektion -29 S- aktiviert.
DEUTSCH Die Effekt-Parameter können im Effekt-Voreinstellungsmenü eingestellt werden. Das Effekt-Voreinstellungsmenü können Sie entweder mit der Schaltfläche -44 S- aufrufen oder mittels der Tastenkombination Shift -23 H- plus einmaliges Drücken eines der Effekt-Encoders -30 H-. Die Effekt-Voreinstellungen sind in Deck A und Deck B eingeteilt. Die oben aufgelisteten Effekt-Parameter können hier pro Effekt eingestellt werden.
Jog Wheel Effektmodulation: Sie haben auch die Möglichkeit mit dem Jog Wheel -18 H- die Effektparameter zu modulieren. Stellen Sie den gewünschten Effekt ein und stellen Sie den FX/Reverse-Modus -21 S- auf Effekt 1 oder 2. HINWEIS! Um den FX/Reverse-Modus mit dem Controller zu wechseln, halten Sie Shift -23 H- und drücken Sie FX/Reverse -21 H-. Nun können Sie je nach eingestelltem Effekt den Parameter Ratio stufenlos mit dem Jog Wheel -18 H- einstellen.
HINWEIS! Um den Beat-Takt vorher einzustellen, halten Sie Shift -23 H- gedrückt und drücken die Beat Tact-Taste -25 H-. 3.9.3. Sample-Funktion Sie haben auch die Möglichkeit einen erstellten Loop auf zwei Samplebänke abzuspeichern. Nachdem ein Loop erstellt wurde, drücken Sie die Save To-Taste -26 H / S- und wählen die Sample-Bank 1 oder 2 -27 H / S- aus. Der Loop ist nun auf der entsprechenden Sample-Bank gespeichert.
PI: Enable Auto Cue Ist diese Funktion aktiviert, wird ein Cue-Punkt automatisch beim ersten Beat des Tracks gesetzt. PII: Save Data When Program Exits Ist diese Funktion aktiviert, so werden Ihre Daten (beispielsweise Cue-Punkte, Samples oder Fader- und Pitch-Werte) beim Beenden des Programms gespeichert. PIII / PIV: Replay Gain Mit diesem Regler -PIV- können Sie den Pegel der Vorverstärkung, beispielsweise für einen angeschlossenen Plattenspieler, einstellen.
PVII: 1st Audio Device Hier stellen Sie im Auswahlmenü Ihre entsprechende Soundkarte ein. PVIII / PIX / PX: 2nd Audio Device Sofern Sie eine Soundkarte mit mindestens vier Kanälen oder eine zweite haben, können Sie diese hier auswählen und aktivieren. Falls Sie bei der zweiten Audiokarte zur Optimierung die Latenz einstellen wollen, aktivieren Sie „Device Parameter“ -PIX- und stellen Sie die Latenz mit dem Regler -PX- ein.
• Keyboard Shortcuts P XX P XXI P XXII P XXIV P XXV P XXIII In den Shortcut-Einstellungen können Sie nach Wunsch verschiedene Funktionen einer Taste Ihrer Tastatur zuweisen. Wählen Sie mit dem Auswahlmenü -PXX- das entsprechende Deck aus. Wählen Sie die zu belegende Funktion aus dem Auswahlmenü -PXXI- aus. Die aktuelle Zuweisung wird im Feld -PXXII- angezeigt. Die Funktionsbeschreibung wird im Feld -PXIII- angezeigt.
5.
TRAKTOR 3 LE MAPPING EQ with Kill Master Effect Select Sync Gain Cue/Monitor Load A/B Loop In/Out Track Master Browser Phones Mix Phones Volume Keylock Only mapped in Traktor 3 Studio FX Parameter 3 Pitchfader FX Parameter 2 FX Amount FX TAP FX ON Pitchbend Auto Loop Scratch Set Cue Jog Wheel (Pitch Bend/Scratch) Line Fader Cue Play Cue Pause Play/Stop Crossfader TRAKTOR 3 STUDIO MAPPING Push Knob: Loop smaller DEUTSCH Reverse Play Push Knob: Loop bigger FX Parameter 2 Knob FX Parameter 1
OPERATION MANUAL ENGLISH Congratulations on purchasing your Digital Jockey Controller Edition. Thank you for placing your trust in our disc jockey technology. Before operating this equipment we ask you to carefully study and observe all instructions. Please remove the Digital Jockey from its packaging. Check before initial operation to make sure that the device has not been visibly damaged during transport. If you detect any damage to the power cable or the casing, do not operate the device.
- - - - - - APPLICATION IN ACCORDANCE WITH REGULATIONS - - This device is a professional DJ MIDI controller that can control software. The device should be connected via USB cable to a computer. This product is authorised for connection to 240 V, 50 Hz AC and is designed exclusively for indoor application. If the device is used for any other purposes than those described in the operation manual, damage can be caused to the product, leading to exclusion of warranty rights.
MAINTENANCE - - - Check the technical safety of the device regularly for damage to the mains line or the casing, as well as for wearout of wear parts such as rotary and sliding switches. If it is to be assumed that a safe operation is no longer feasible then the device must be disconnected and secured against accidental use.
a) Installation address of welcome First you will see the address of welcome. Click „next“. Leave the „complete version“ as it is and confirm by clicking „next“.
c) Customer information Enter your data such as name, company and serial number. NOTE! Your personal serial number can be found on the backside of the CD cover. ENGLISH Confirm your entries by clicking „next“. 32 d) Installation path The installation path is shown here. If required you can change it manually. Confirm the path by clicking „next“.
e) Installation confirmation Confirm the installation by clicking „install“. Now the installation will be carried out, possibly your computer has to be rebooted after installation. Complete the installation by clicking „finish“. ENGLISH f) Installation completed NOTE! If you are asked to reboot your computer please do so.
Please start the Reloop Attack software by clicking on the icon on your desktop or via the start programm menu in the Reloop Software folder. Go to „preferences“. The according button can be found on the upper right software window. Open the rider „devices“. The Reloop Digital Jockey should be visible there. Click on the Reloop Digital Jockey image in the window „available type“. Afterwards click on „Digital Jockey“ in the window above „MIDI devices“.
1.3. Traktor 3 LE software configuration Carry out the „Autorun.exe“ on the provided CD and wait until the installation menu pops up. Click on „Traktor 3 LE“ in order to carry out the setup. The Traktor 3 LE setup will start now; please follow the instrucions on screen in order to carry out the installation. NOTE! Your Traktor 3 LE version is optimally adapted to the Digital Jockey. Make sure that your controller is selected during installation. ENGLISH Open Traktor 3 LE after the successful installation.
OVERVIEW CONTROLLER AND SOFTWARE 33S 32S 9S 40S 39S 42S 43S 44S 11S 35S 12S 36S 34S 29S 10S 31S 17S 22S 16S 24S 14S 28S 25S 27S 26S 15S 19S 37S 20S 13S 21S 38S ENGLISH 18S 4S 8S 5S 41S 6S 7S 3S 17H 22H 23H 10H 24H 2H 9H 1H 11H 12H 13H 16H 49H 30H 29H 14H 28H 27H 15H 26H 25H 19H 20H 21H 18H 8H 4H 36 5H 6H 7H NOTE! Elements with the same function on the opposite side have only been marked once.
46H 48H 47H 45H 2. DESIGNATIONS ENGLISH 1 H: . . . . . . .Trax Encoder 2 H: . . . . . . .Load function 3 S: . . . . . . .Library function 4 H / S: . . . .Cue function 5 H / S: . . . .Pause function 6 H / S: . . . .Play function 7 H / S: . . . .Crossfader function 8 H / S: . . . .Linefader function 9 H / S: . . . .3-band equalizer 10 H / S: . . .Gain function 11 H / S: . . . .Master volume function 12 H / S: . . .Cue volume function 13 H / S: . . .Cue mix function 14 H / S: . . .
3. OPERATION After having concluded the first steps, the controller being connected and the software being installed properly, you can now operate your controller and software as follows: 3.1. Library The Attack library is your data base for all of your music. You can search and browse the library for music and information such as BPM values or length of tracks. LI L II L III L IV LV L VII ENGLISH L VI L VIII L IX LX L XI L XIII L XIV L XII 3.1.1.
3.1.4. iTunes Playlist -LIVYour iTunes playlists will be displayed here automatically. They can also be adjusted as described above. NOTE! With one click you can add your complete iTunes library to the database via the “Import iTunes Library File To Database” function -LVII- (xml format). 3.1.5. Shortcut definitions -LV- “Add New Playlist” With this function you can add a playlist. -LVI- “Delete Playlist” It is possible to delete a selected playlist via this function.
NOTE! Via right mouse click on the list view's category task-bar you can fade in and fade out particular categories. 3.1.6. Waveform Displays Two detailed waveform displays are at your disposal: a) Complete View -32 S-: The Complete View displays the waveform of a whole track. This way it is easy to recognise a track's dynamic like for example intros or breaks. The elapsed part of the current track is displayed in a darker shade in Complete View.
DIV: Auto Cue display Here you can see if the auto cue function is enabled. It is possible to (de-)activate the auto cue function in the pre-settings menue -43 S-, rider “Audio System Settings”, item “Enable Auto Cue”. DV: Auto BPM display Shows if the automatic BPM analysis is enabled. DVI: Cue display This display will flash while setting a cue point and it shines in cue mode. DVII: Remain display Shows whether the remain or elapsed time display is enabled.
3.3. Transport Controls Below the jog wheel -18 H- you can find three buttons for the play, cue or pause functions of a track. Via the play button -6 H- you can play the previously selected track. By repeatedly pushing the play button -6 H- again the track will be played in a stutter style from the last set cue point (bop function). In order to pause a track push the pause button -5 H-. Via the cue button -4 H- you will return to the last set cue point while in play mode.
3.6. Speed control Use the pitch fader -14 H / S- in order to adjust the speed. If you push the fader upwards the speed will decrease. Push the fader downwards and the speed will increase. The currently set pitch value is shown in the info display -DXII-. The adjusted pitch is shown in the software on the left and right side respectively of the pitch fader. The range can be adjusted to +/-4%, +/-8%, +/-16%, +/-100%.
There are to possibilities to manually determine the BPM value. a) Tap function: Tap the mouse button on the tap button on screen to the beat of the music in order to manually determine the BPM value. NOTE! You can also accomplish this in the information display on the display. b) BPM set function: You can also type in the BPM value and confirm it via the set button. Via the buttons “x 2” and “/ 2” you can double or halve the BPM value with the push of a button.
e) FX/Reverse function -21 H / SFirstly push the FX/Reverse button -21 H / S- in order to enable this mode. There are three possibilities at your disposal. • Reverse effect: If “Reverse” has been selected in the drop down menu you can activate the reverse play mode by by using the FX/Reverse button -21 H / S-. • Effect 1 function: If effect 1 has been selected in the drop down menu the effect from the effect section -29 S- will be enabled.
ENGLISH The effect parameters can be adjusted in the effect preferences. The effect preferences can be opened by clicking -44 S- or via the hot key combination shift -23 H- plus pushing the effect encoder -30 H-. The effect preferences are divided into deck A and deck B. Here the described effect parameters can be adjusted per effect. For a variation via mouse simply move the indicator to the left or right.
Jog wheel effect modulation: It is also possible to modulate the effect parameters via the jog wheel -18 H-. Select the desired effect and switch the FX/Reverse mode -21 S- to effect 1 or effect 2. NOTE! In order to change the FX/Reverse mode via controller push and hold the shift button -23 H- and push FX/Reverse -21 H-. Depending on the selected effect you can now steplessly adjust the ratio parameter via the jog wheel -18 H-.
NOTE! In order to adjust the bars beforehand hold the shift button -23 H- and push the beat tact button -25 H-. 3.9.3. Sample function You can also save a created loop to two sample banks. After having created a loop push the “Save To” button -26 H / S- and select sample bank 1 or 2 -27 H / S-. The loop has now been saved to the respective sample bank. NOTE! Depending on whether a cue point or loop has been set the sample bank can be used as hot key or loop memory.
PI: Enable auto cue If this function is enabled a cue point will be set automatically at the first beat of a track. PII: Save data when program exits If this function is enabled your data, such as cue points, samples or fader and pitch values, will be saved when exiting the software. PIII / PIV: Replay gain With this knob -PIV- you can adjust the pre-amplification level for example for an optionally connected turntable. The adjustable values go from 80 – 100 dB.
PVII: 1st audio device In the preferences you can set your respective sound card. PVIII / PIX / PX: 2nd audio device If you have a sound card with at least four channels or a second sound card you can select and enable it here . If you wish to adjust the latency for optimization enable the “Device Parameter” -PIX- and adjust the latency via the knob -PX-. NOTE! Should you notice any clicking noise or if the music fails completely due to low latency you must increase the latency via the knob -PX-.
• Keyboard Shortcuts P XX P XXI P XXII P XXIV P XXV P XXIII P XXVI NOTE! If a double assignment or overwriting occurs you will be notified. ENGLISH In the shortcut settings you can assign different functions to a key of your keyboard. Select the desired function from the preferences -PXXI-. The current assignment is shown in field -PXXII-. The function description is shown in field PXIII-.
5. SYSTEM REQUIREMENTS Minimum system requirements: • • • • • • • • Intel Pentium 4, 1 GHz processor, Intel Centrino Mobile Technology 1.6 GHz or above Intel Celeron Processor NOT recommended Microsoft Windows XP or Vista DirectX 9 or above Windows Media Player 9 or above 512 MB RAM 250 MB free hard disc drive (200 MB for cache) Microsoft DirectSound or ASIO compatible sound card Recommended requirements: ENGLISH • 52 • • • • • Intel Pentium 4, 2.4 GHz processor, Intel Centrino Mobile Technology 1.
TRAKTOR 3 LE MAPPING EQ with Kill Master Effect Select Sync Gain Cue/Monitor Load A/B Loop In/Out Track Master Browser Phones Mix Phones Volume Keylock Only mapped in Traktor 3 Studio FX Parameter 3 Pitchfader FX Parameter 2 FX Amount FX TAP FX ON Pitchbend Auto Loop Scratch Set Cue ENGLISH Reverse Play Jog Wheel (Pitch Bend/Scratch) Line Fader Cue Play Cue Pause Play/Stop Crossfader TRAKTOR 3 STUDIO MAPPING Push Knob: Loop smaller Push Knob: Loop bigger FX Parameter 2 Knob FX Parameter 1 Kn
MODE D’EMPLOI FRANÇAIS Nous vous félicitons d’avoir choisi la console Reloop Digital Jockey Controller Edition, preuve de la confiance que vous accordez à notre technologie pour Disc Jockey. Avant la mise en service, nous vous prions de lire attentivement ce mode d’emploi et de respecter les instructions pendant l’utilisation. Retirez la Reloop Digital Jockey de son emballage. Avant la première mise en service, vérifiez le bon état de l’appareil.
- - - - - - UTILISATION CONFORME - - - Cet appareil est un contrôlleur MIDI professionnel permettant de commander le logiciel. L’appareil doit pour cela être raccorder à un ordinateur par un câble USB. Ce produit est certifié pour le branchement sur secteur 230 V, 50 Hz tension alternative et est exclusivement conçu pour être utilisé en local fermé. Toute utilisation non conforme peut endommager le produit et annuler les droits de garantie.
ENTRETIEN - - Contrôlez régulièrement le bon état de l’appareil (boîtier, cordon) et l’usure éventuelle des molettes et curseurs. Si vous supposez que l’appareil ne peut plus être utilisé en toute sécurité, mettez l’appareil hors-service et assurez-le contre toute réutilisation involontaire.
a) Accueil de l'installation Le premier dialogue affiche l'accueil de l'installation. Cliquer sur „Suivant/Next“. Sélectionner „Complete Version“ et valider avec „Suivant/Next“.
c) Informations du client Entrez vos données, à savoir nom, société et numéro de série. NOTE Votre numéro de série personnel est écrit sur la face postérieure de la pochette du cédérom. FRANÇAIS Valider les entrées avec „Suivant/Next“. 58 d) Chemin d'installation Affiche le chemin d'installation. Le cas échéant, vous pouvez modifier le chemin. Valider la sélection avec „Suivant/Next“.
e) Confirmer l'installation Confirmer l'installation en cliquant sur „Install“. L'installation est alors exécutée et il faut ensuite éventuellement redémarrer l'ordinateur. Finaliser l'installation d'un clic sur le bouton „Finish“. NOTE! Si un message demande si vous désirez redémarrer le système, redémarrez l’ordinateur.
Lancer à présent le logiciel Reloop Attack en cliquant sur le symbole affiché sur le Bureau ou en sélectionnant le répertoire Reloop Software dans le menu Démarrer/Programmes. Sélectionner ensuite „Preferences“. Le bouton respectif est en haut à droite dans l'écran du logiciel. Ouvrir l'onglet „Devices“. Reloop Digital Jockey doit être affiché. Cliquer sur l'image Reloop Digital Jockey dans l'écran „Available Type“. Dans l'écran „MIDI Devices“ situé plus haut, cliquer ensuite sur „Digital Jockey“.
3. Configuration du logiciel Traktor 3 LE Exécuter le fichier Autorun.exe du cédérom ci-joint et attendre l'affichage du menu d'installation. Cliquer ensuite sur „Traktor 3 LE“ pour exécuter le Setup. Après le démarrage de Traktor 3 LE Setup, procéder selon les instructions affichées sur l'écran pour effectuer l'installation. NOTE Votre version de Traktor 3 LE est parfaitement adaptée au Digital Jockey. Veiller à sélectionner votre contrôleur lors de l'installation.
VUE D’ENSEMBLE CONTRÔLEUR ET LOGICIEL 33S 32S 9S 40S 39S 42S 43S 44S 11S 35S 12S 36S 34S 29S 10S 31S 17S 22S 16S 24S 14S 28S 25S 27S 26S 15S 19S 37S 20S 13S 21S 38S FRANÇAIS 18S 4S 8S 5S 41S 6S 7S 3S 17H 22H 23H 10H 24H 2H 9H 1H 11H 12H 13H 16H 49H 30H 29H 14H 28H 27H 15H 26H 25H 19H 20H 21H 18H 8H 4H 62 5H 6H 7H NOTE! Les éléments possédant la même fonction sur le côté apposé ne sont signalés qu’une seule fois.
46H 48H 47H 45H 2. DESCRIPTIONS FRANÇAIS 1 H: ................Trax Encoder 2 H:................Fonction Load 3 S: ................Attack Library 4 H / S:.........Cue 5 H / S: .........Pause 6 H / S:.........Play 7 H / S: .........Crossfader 8 H / S:.........Curseur linéaire 9 H / S:.........Égaliseur 3 voies 10 H / S: .......Gain 11 H / S:.........Volume Master 12 H / S:........Volume Cue 13 H / S:........Cue Mix 14 H / S:........Pitch Fader 15 H / S:........Pitch Bend 16 H / S:........
3. UTILISATION Après avoir achevé les premiers pas et la configuration correcte du contrôleur et du logiciel, vous pouvez maintenant les utiliser comme décrit ci-dessous. 3.1. Library Attack Library désigne votre base de données pour toute votre musique. La librairie permet de rechercher des pistes et de naviguer dans celles-ci, ainsi que de consulter des informations telles que les BPM ou la durée du titre. LI L II L III L IV FRANÇAIS LV L VII L VI L VIII L IX LX L XI L XIII L XIV L XII 3.1.1.
3.1.4. iTunes Playlist -LIVAffiche automatiquement vos listes de lecture iTunes. Ces listes peuvent également être éditées et adaptées comme décrit plus haut. NOTE La fonction „Import iTunes Library File To Database“ -L VII- permet d'ajouter votre librairie iTunes entière à la base de données (format xml) d'un seul clic. 3.1.5. Raccourcis -LV- „Add New Playlist“ Créer une nouvelle liste de lecture. -LVI- „Delete Playlist“ Supprimer une liste de lecture sélectionnée.
NOTE Cliquer sur le bouton droit de la souris dans la barre d'infos de la List View pour afficher ou masquer différentes informations. 3.1.6. Waveform-Displays Vous disposez de deux oscillogrammes détaillés : a) Complete View -32 S-: Complete View affiche le tracé de l'onde de la piste entière. Vous pouvez clairement visualiser la dynamique de la piste, par exemple les intros ou les changements de rythme d'une piste. La partie écoulée de la piste actuelle est représentée plus sombre dans la Complete View.
DIV: Affichage Auto Cue Indique si la fonction Auto Cue est activée. Vous pouvez activer ou désactiver la fonction Auto Cue dans le menu des préréglages -43 S- de l'onglet „Préréglages audio“ (Audio System Settings), à l'option „Activer Auto Cue“ (Enable Auto Cue). DV: Affichage Auto BPM Indique si l'analyse automatique des BPM est activée ou non. DVI: Témoin Cue Ce témoin clignote lors de la définition d'un point Cue et en mode Cue.
3.3. Transport Controls Sous la Jog Wheel -18 H-, trois touches servent à exécuter les fonctions lecture, Cue et pause d'une piste. La touche Play -6 H- sert à lire la piste chargée auparavant. Appuyer de nouveau sur Play -6 H- pour lire la piste hachée (Stutter) depuis le dernier point Cue défini (fonction Bop). Pour pauser la piste, cliquer sur la touche Pause -5 H-. La touche Cue -4 H- permet d'accéder au dernier point Cue défini en mode Pause.
NOTE La fonction Sync se base sur une analyse des BPM, cependant, il n'est pas possible de garantir qu'elle soit adéquate pour tous les styles de musique et types de chanson. Il faut donc toujours pré écouter et ajuster avant le mixage. Si les BPM d'une piste ne sont pas affichés correctement (par ex. BPM excessif ou trop faible), ce qui peut se produire avec les styles Breakbeats ou Drum & Bass, vous pouvez analyser les BPM manuellement. Cliquer sur le bouton Edit FRANÇAIS 3.6.
Vous disposez de deux méthodes pour régler les BPM manuellement : a) Fonction Tap : frapper la touche Tap avec la souris au rythme du tempo pour régler les BPM manuellement. NOTE Vous pouvez aussi effectuer ceci directement dans l'écran d'informations sur l'affichage BPM. b) Fonction BPM Set : vous pouvez aussi directement entrer les BPM et valider avec la touche Set. Une pression sur les touches „x 2“ et „/ 2“ permet de doubler les BPM ou de les diviser par deux.
e) Fonction FX/Reverse -21 H / S-: appuyer d'abord sur la touche FX/Reverse -21 H / S- pour activer ce mode. Vous disposez de 3 options au choix. • Effet Reverse : si Reverse est marqué dans le menu de sélection, la touche FX/Reverse -21 H / S- active l'inversion. • Fonction effet 1 : si Effet 1 est marqué dans le menu de sélection, l'effet est activé depuis la section Effets -29 S-. La Jog Wheel -18 H / S- sert alors à moduler un paramètre de l'effet respectif.
FRANÇAIS Les paramètres d'effet peuvent être réglés dans le menu de préréglage des effets. Pour accéder au menu de préréglage des effets, vous pouvez cliquer sur le bouton -44 S- ou utiliser le raccourci Shift -23 H- et une pression sur un des Encoders -30 H-. Les préréglages d'effets sont divisés en Deck A et Deck B. Les paramètres d'effet plus haut cités peuvent ici être réglés individuellement pour chaque effet. Ajuster l'effet en déplaçant l'indicateur avec la souris vers la gauche ou la droite.
Modulation d'effet avec Jog Wheel Vous pouvez aussi moduler le paramètre d'effet avec la Jog Wheel -18 H-. Régler l'effet désiré et activer le mode FX/Reverse -21 S- sur Effet 1 ou Effet 2. NOTE Pour commuter le mode FX/Reverse avec le contrôleur, enfoncer la touche Shift -23 H- et cliquer sur FX/Reverse -21 H-. Vous pouvez alors, selon l'effet sélectionné, régler progressivement le paramètre Ratio de l'effet avec la Jog Wheel -18 H-.
NOTE Pour prérégler le Beat Tact, enfoncer la touche Shift -23 H- et cliquer sur Beat Tact -25 H-. 3.9.3. Fonction Sample Vous pouvez également enregistrer une boucle créée sur deux bancs d'échantillons. Après avoir défini la boucle, cliquer sur la touche Save To -26 H / S- et sélectionner le banc d'échantillon 1 ou 2 -27 H / S-. La boucle est à présent enregistrée sur le banc d'échantillon respectif.
PI: Enable Auto Cue Si cette fonction est activée, un point Cue est défini automatiquement au premier battement de la piste. PII: Save Data When Program Exits Si cette fonction est activée, vos données (par ex. points Cue, échantillons ou valeurs Fader et Pitch) sont enregistrées à la fermeture du programme. PIII / PIV: Replay Gain Ce régleur -P IV- vous permet d'ajuster le niveau de la préamplification, par exemple pour une platine vinyle connectée. Les valeurs réglables vont de 80 à 100 dB.
PVII: 1st Audio Device Régler la carte son respective dans le menu de sélection. PVIII / PIX / PX: 2nd Audio Device Si votre carte son possède au moins quatre canaux ou si vous avez une deuxième carte, vous pouvez ici les sélectionner et les activer. Si vous désirez paramétrer la deuxième carte son pour optimiser la latence, activer „Device Parameter“ -PIX- et régler la latence avec le régleur -PX-.
• Keyboard Shortcuts P XX P XXI P XXII P XXIV P XXV P XXIII Dans les réglages des raccourcis, vous pouvez affecter au choix différentes fonctions à une touche de votre clavier. Sélectionner la platine respective dans le menu de sélection -PXX-. Sélectionner la fonction désirée dans le menu de sélection -PXXI-. L'affectation actuelle est affichée dans le champ -PXXII-. La description de la fonction est affichée dans le champ -P XIII-.
5.
TRAKTOR 3 LE MAPPING EQ with Kill Master Effect Select Sync Gain Cue/Monitor Load A/B Loop In/Out Track Master Browser Phones Mix Phones Volume Keylock Only mapped in Traktor 3 Studio FX Parameter 3 Pitchfader FX Parameter 2 FX Amount FX TAP FX ON Pitchbend Auto Loop Scratch Set Cue Jog Wheel (Pitch Bend/Scratch) Line Fader Cue Play Cue Pause Play/Stop Crossfader TRAKTOR 3 STUDIO MAPPING Push Knob: Loop smaller Push Knob: Loop bigger FX Parameter 2 Knob FX Parameter 1 Knob FX Parameter 2 Swit
Reloop Distribution Global Distribution GmbH, Schuckertstr. 28, 48153 Münster/Germany Fax +49.251.