Bedienungsanleitung ACHTUNG! Lesen Sie sich vor der ersten Inbetriebnahme zur eigenen Sicherheit diese Bedienungsanleitung sorgfältig durch! Alle Personen, die mit der Aufstellung, Inbetriebnahme, Bedienung, Wartung und Instandhaltung dieses Gerätes zu tun haben, müssen entsprechend qualifiziert sein und diese Betriebsanleitung genau beachten.
ACHTUNG! Lesen Sie sich vor der ersten Inbetriebnahme zur eigenen Sicherheit diese Bedienungsanleitung sorgfältig durch! Alle Personen, die mit der Aufstellung , Inbetriebnahme, Bedienung, Wartung und Instandhaltung dieses Gerätes zu tun haben, müssen entsprechend qualifiziert sein und diese Betriebsanleitung genau beachten.
DEUTSCH - Stellen Sie sicher, dass die Stromversorgung erst nach dem Aufbau des Gerätes erfolgt. Den Netzstecker immer als letztes einstecken. Vergewissern Sie sich, dass der Netzschalter auf „OFF“ steht, wenn Sie das Gerät ans Netz anschließen. - Benutzen Sie nur vorschriftsmäßige Kabel. Achten Sie darauf, dass alle Stecker und Buchsen fest angeschraubt und richtig angeschlossen sind. Bei Fragen wenden Sie sich bitte an Ihren Händler.
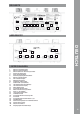
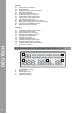
Bedienoberfläche 49 6 6 1 4 2 5 2 5 7 10 4 8 5 9 5 11 12 5 DEUTSCH 3 5 13 25 14 24 15 16 17 22 48 22 20 17 18 20 19 23 21 4 48 22
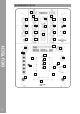
Rückseite 51 50 28 27 29 36 35 34 33 32 29 31 31 26 30 30 Vorderseite 46 39 40 41 42 1. Bezeichnungen 1. 2. 3. 4. 5. 6. 7. 8. 9. 10. 11. 12. 13. 14. 15. 16. 17. 18. 19. 20. 21. 22. 23. 24. 25. 48. 49.
Rückseite 26. 27. 28. 29. 30. 31. 32. 33. 34. 35. 36. 50. 51.
2. Peripherie Anschlüsse PC / MAC Bringen Sie den LN/PH2 Schalter in die PH2 Position. Bringen Sie den LN/PH1 Schalter in die PH1 Position. Plattenspieler Plattenspieler Stromversorgung CDPlayer Endstufe Effektgerät TapeDeck Stereoanlage Der Reloop IQ2 MIDI besitzt ein integriertes professionelles Audio-Interface mit 24-bit/96 kHz. Somit ist eine weitere externe oder integrierte PC-Soundkarte nicht nötig.
3. Bedienung 3.1 Strom einschalten Nachdem alle Anschlüssse vorgenommen wurden, schalten Sie das Gerät bitte mit dem EIN/AUSSchalter -27- ein. 3.2 Signal-Eingangswahl Mit dem Eingangssignal-Wahlschalter -6- kann jedes Eingangssignal des Reloop IQ2 MIDI beliebig auf Kanal A oder B zugewiesen werden. Die Eingangssignal-Auswahlanzeige -49- gibt Ihnen dabei Auskunft, welches Signal Sie gerade Kanal A oder B zugewiesen haben. 3.
3.8 DJ-Mic Mit dem Mikrofon Lautstärkeregler -1- wird der Ausgangspegel des DJ-Mic Kanals eingestellt. Mit dem 2-Band Equalizer für das Mikrofon -2- können Sie die Höhen und Tiefen des DJ-Mic Ausgangspegels einstellen. Befindet sich der Mikrofon-, Talkover-, Aktivierungsschalter -3- in der Position „OFF“, so ist der Mikrofon-Kanal ausgeschaltet. Steht der Mikrofon-, Talkover-, Aktivierungsschalter -3- auf „On“, dann ist der Mikrofon-Kanal eingeschaltet.
3.13 Beatcounter Das Reloop IQ2 MIDI Mischpult ist mit einem automatischen und einem manuellen Beatcounter ausgestattet. Wenn Sie das Mischpult einschalten, ist der automatische Beatcounter eingestellt. Wählen Sie mittels des Effekt–Kanalzuweisungsschalter -16- den Kanal dessen BPM-Wert ermittelt werden soll (Position A entspricht Kanal A; Position B entspricht Kanal B). Wenn Sie einen Track laufen lassen, wird der Mixer automatisch die BPM (Beats Per Minute) berechnen.
Je nach Effekt sind Art und Bereich des Zeitparameters und die durch den Taktzuweisungsschalter -24- vorgenommenen Veränderungen verschieden: > ECHO = Echo-Effekt Wiederholt einen bestimmten Intervall des Signals dauerhaft. Zeitparameter-Wert: 2 – 2000 mSec Direkt-Taktzuweisung: Intervalle von 125 – 2000 einstellbar Drehen des X Parameter-Drehregler -25- verändert den Wert in 1er Schritten. X Parameter-Drehreglers -25- gedrückt halten und drehen verändert den Wert in 100er Schritten.
3.15 Crossfader-Effekte Neben der DSP-Effekteinheit bietet Ihnen das Reloop IQ2 MIDI Mischpult außerdem drei neuartige Crossfader-Effekte -22-. Zur Bedienung der Effekte stehen Ihnen zwei Modi zur Verfügung: Fader-Modus: Bringen Sie zunächst den Crossfader-Effektschalter -15- in die „Fader“-Position. Der aktive Crossfader-Effekt -22 a, b oder c- leuchtet.
4. ASIO Installation Legen Sie die mitgelieferte Installions-CD in Ihr Laufwerk. Im Ordner ASIO-Drivers wählen Sie den für Ihr System passenden Treiber aus und installieren diesen. 4.1 Sie kommen ins Sprachen-Auswahlfenster 4.2 N achdem Sie Ihre Sprache gewählt haben, werden Ihnen die Installations-Optionen angezeigt. Wählen Sie „Install the driver“. 4.3 Sie werden nun aufgefordert den Reloop IQ2 MIDI mit Ihrem System zu verbinden.
5. MIDI-/USB-Audio-Modus Ihr Reloop IQ2 MIDI ist mehr als ein analoger DJ-Mixer. Mit einem professionellen, integrierten 24Bit/96 kHz Audio/MIDI-Interface wird er zu einem vollwertigen MIDI-Controller. 5.1 TRAKTOR MAPPING DEUTSCH Nach der Installation des für Ihr System bestimmten ASIO-Treibers stellen sie in Traktor in den Einstellungen (Preferences) unter dem Menüpunkt „Audio Setup“ den „Reloop IQ2 MIDI als Device ein. Zwei Modi sind für den IQ2 MIDI in Traktor vorgesehen: 5.1.
In diesem Modus sind Gain, 3-Band EQ und Linefader analog im Audio-Modus. Das heißt Sie können das virtuelle Traktor-Signal mit dem Mixer direkt manipulieren.
DEUTSCH 5.1.2 Internal Mixer-Mode (Stand Alone Mode) Öffnen Sie in den Traktor Einstellungen (Preferences) den Menüpunkt „Output Routing“ und nehmen Sie die Einstellungen wie auf dem Bild angegeben vor. 16 Am IQ2 MIDI stellen Sie mit dem Eingangssignal-Wahlschalter -6- Kanal A auf „MIDI1“ und Kanal B auf „MIDI2“ ein. Somit sind die kompletten Kanalzüge der Kanäle A + B im MIDI-Modus aktiv. Das heißt Gain, 3-Band EQ und Linefader beeinflussen das Audiosingal nicht mehr, sondern senden nur MIDI-Befehle.
MIDI MAPPING: IQ2 MIDI INTERNAL Decks AB/CD Gain A/C Gain B/D Filter A-D Cue Volume Key A-D 3-fold EQ BD Sync A-D Pan A-D Cue Mix 3-fold EQ A/C Channel Fader B/D Channel Fader A/C Cue A/C Cue B/D Beat phase monitor Crossfader DEUTSCH Deck Select A-D > AUDIO-ROUTING INTERNAL: In dem Internal-Modus (MIDI 1/2) stellt der Master-Output Ausgang 1/2 (Master) und der KopfhörerOutput Ausgang 3/4 dar (Monitor).
5.2 MIDI-BELEGUNG 5.2.1 XF MIDI Wenn „XF MIDI“ -37- aktiviert ist, so sendet der Crossfader MIDI-Daten DEUTSCH 5.2.2 FX MIDI Wenn „FX MIDI“ -46- aktiviert ist, so senden die Kontrollelemente der Effekteinheit MIDI-Daten. 18 HINWEISE! - Wenn „FX MIDI“ aktiv ist (ON), wird oben links im Display angezeigt, welches Traktor Deck kontrolliert werden kann (A, B, C, D). Mit dem Channel Select-Potentiometer kann zwischen den Decks gewechselt werden.
5.2.3 MIDI 1/2 Wenn „MIDI“ 1 bzw. „MIDI 2“ aktiviert ist, so sendet der entsprechende Kanalzug MIDI-Daten. DEUTSCH 5.3 MIDI CHANNEL-EINSTELLUNG Sie können den MIDI-Kanal einstellen auf dem der IQ2 MIDI senden soll. Dies ist insbesondere praktisch, wenn Sie mehrere IQ2 MIDI miteinander koppeln wollen oder sich andere Controller mit MIDIDaten überschneiden.
5.
Center DECK LEDs led on led off P1 09 9n 11 7F 09 9n 11 00 P2 09 9n 12 7F 09 9n 12 00 P3 09 9n 13 7F 09 9n 13 00 P4 09 9n 14 7F 09 9n 14 00 P5 09 9n 15 7F 09 9n 15 00 P6 09 9n 16 7F 09 9n 16 00 A1 09 9n 17 7F 09 9n 17 00 A2 09 9n 18 7F 09 9n 18 00 A3 09 9n 19 7F 09 9n 19 00 TAP 09 9n 1A 7F 09 9n 1A 00 FX_ON 09 9n 1B 7F 09 9n 1B 00 CFA 09 9n 1C 7F 09 9n 1C 00 CFB 09 9n 1D 7F 09 9n 1D 00 CUE1 09 9n 1E 7F 09 9n 1E 00 CUE2 09 9n 1F 7F 09 9n 1F 00 CUE_FX 09 9n 20
6. Technische Daten Folgende Daten des Herstellers werden von der Global Distribution GmbH nicht auf Plausibilität und Richtigkeit geprüft: 6.1 Eingangs/Ausgangsimpedanz & Empfindlichkeit (EQ Flat, Max. Gain, FX Off, Load = 100 kOhm): Eingangsimpedanz & Referenzlevel: CD, AUX: ................................................................... Line: .......................................................................... Phono: . ..................................................................... Mic: .
6.12 USB Sektion (EQ Flat, FX Off, mit 20 kHz LPF, Master Output, Load = 100 kOhm): Playback: (Sony Sound Forge 8.0) Output: . .................................................................... 0 dBV (1 V) +/-2 dB (TCD-782,96K/24Bit TRK. 16, Max. Gain) THD+N: ..................................................................... < 0,07% (TCD-782,96K/24Bit TRK. 2, Gain @ Master = 0 dBV Out, mit 20 kHz LPF, A-Weighted) Frequenzgang: .........................................................
DEUTSCH
CAUTION! For your own safety, please read this instruction manual carefully before initial operation! All persons involved in the installation, setting-up, operation, maintenance and service of this device must be appropriately qualified and observe this operation manual in detail. This product complies with the requirements of the applicable European and national regulations. Conformity has been proven. The respective statements and documents are deposited at the manufacturer. ENGLISH Contents 1. 2. 3.
Application in accordance with regulations ENGLISH - Only use cables that comply with regulations. Observe that all jacks and bushes are tightened and correctly hooked up. Refer to your dealer if you have any questions. - Ensure that when setting up the product the mains cable is not squashed or damaged by sharp edges. - Prevent the mains cable from coming into contact with other cables! Exercise great care when handling mains cables and connections.
Controls 49 6 6 1 4 2 5 2 5 7 10 4 8 5 9 5 11 12 5 3 5 ENGLISH 13 25 14 24 15 16 17 22 48 22 20 17 18 20 19 23 21 26 48 22
Rear Panel 51 50 28 27 29 36 35 34 33 32 29 31 31 26 30 30 Front Side 46 39 45 47 40 41 42 43 40 44 ENGLISH 37 38 1. Designations 1. 2. 3. 4. 5. 6. 7. 8. 9. 10. 11. 12. 13. 14. 15. 16. 17. 18. 19. 20. 21. 22. 23. 24. 25. 48. 49.
Rear Panel 26. 27. 28. 29. 30. 31. 32. 33. 34. 35. 36. 50. 51. Input for Mains Cord ON/OFF Switch Input for Fader Start Function GND Grounding Screws Phono/Line Assignment Channels A + B Audio Input for Channels A + B (RCA) Audio Input for Return Signal (RCA) Audio Output for Send Signal (RCA) Record Audio Output (RCA) Master Audio Output Asymmetrical (RCA) Master Audio Output Symmetrical (6.3 mm Jack) USB Port (Audio/MIDI Interface) Master Through (3.5 mm Jack) Front Panel ENGLISH 37. 38. 39. 40. 41.
2. Peripheral Connections PC / MAC The LN/PH2 switch has to be put in the PH2 position. The LN/PH1 switch has to be put in the PH1 position. Turntable Turntable Power Supply CDPlayer Final Amplifier Effect Device TapeDeck Sound System The Reloop IQ2 MIDI disposes of an integrated professional audio interface with 24 bit/96 kHz. Therefore a further external or integrated PC soundcard is not necessary.
3. Operation 3.1 Power On After having connected all necessary devices turn on the mixer via the ON/OFF switch -27-. 3.2. Signal Input Selection With the Channel Signal Input Selector -6- every input signal of the Reloop IQ2 MIDI can be assigned to channel A or B. The Input Signal Selection Display -49- informs you which signal is assigned to channel A or B. 3.3. Gain Via the Channel Volume -4- it is possible to adjust the input volume for channels A+B.
3.8 DJ Microphone Via the microphone volume knob -1- it is possible to adjust the DJ mic channel‘s output level. Using the 2-band equalizer for the microphone -2- it is possible to adjust the DJ mic volume level‘s high and low frequencies. If the microphone talkover activation switch -3- is in the “OFF” position the microphone channel is turned off. If the microphone talkover activation switch -3- is in the “ON” position the microphone channel is turned on.
3.13 Beatcounter The Reloop IQ2 MIDI mixer is equipped with an automatic and manual beatcounter. When you turn on the mixer the automatic beatcounter is active. By using the Effect Assignment knob -16- you can choose the channel whose BPM value has to be determined (position A corresponds to channel A; position B corresponds to channel B). If a track is playing the mixer will automatically calculate the BPM (Beats Per Minute).
Depending on the effect, the time parameter‘s type and interval and the adjustments according to the beat assignment buttons -24-, will differ. > ECHO = echo effect Continuously repeats a certain interval of the signal. Time parameter value: 2 – 2000 msec Direct bar assignment: Intervals adjustable from 125 – 2000 By turning the X parameter knob -25- the value will be changed in steps of 1. Push, hold and turn the X parameter knob -25- and the value will be changed in steps of 100.
3.15 Crossfader Effects Besides the DSP effect unit the Reloop IQ2 MIDI mixing console also offers three novel crossfader effects. In order to operate these effects there are two modes at one‘s disposal: Fader mode: First of all switch the Crossfader Effect Switch -15- to the “fader” position. The active crossfader effect -22 a, b or c- will be illuminated. The active channel is displayed by the crossfader-effect assignment LEDs -20-; additionally the active channel is shown on the LCD info display -13, I-.
4. ASIO Installation Insert the included installation CD in your drive. Select the driver that is appropriate for your system from the ASIO folder and install it. 4.1 You will enter the language selection window 4.2 A fter having selected the language the installation options will be displayed. Select “Install the Driver”. 4.3 Now you will be asked to connect the Reloop IQ2 MIDI to your system. Connect it to a free USB port of your computer via a USB cord ENGLISH 4.
5. MIDI/USB Audio Mode Your Reloop IQ2 MIDI is more than just an analogue DJ mixer. With a professional, integrated 24 bit/96 kHz audio/MIDI interface it becomes a full-fledged MIDI controller. 5.1 Traktor Mapping ENGLISH After the installation of the appropriate ASIO driver select the Reloop IQ2 MIDI as device in the Preferences of Traktor under the item “Audio Setup”. 36 Two modes are intended for the IQ2 MIDI: 5.1.
In this mode Gain, 3-band EQ and linefaders are analogue in audio mode. This means that the virtual Traktor signal can be directly manipulated with the mixer.
ENGLISH 5.1.2 Internal Mixer Mode (Stand Alone Mode) In the Traktor Preferences open the menu item “Output Routing” and set the outpts as shown below: 38 Put the IQ2 MIDI‘s Channel Signal Input Selector -6- channel A to the “MIDI1” position and channel B to the “MIDI2” position. This way the complete channels A+B are active in MIDI mode. This means Gain, 3-band EQ and linefaders do not influence the audio signal. They will just send MIDI messages.
MIDI-MAPPING: IQ2 MIDI INTERNAL Decks AB/CD Gain A/C Gain B/D Filter A-D Cue Volume Key A-D 3-fold EQ BD Sync A-D Pan A-D Cue Mix 3-fold EQ A/C Channel Fader B/D Channel Fader A/C Cue A/C Cue B/D Beat phase monitor Crossfader ENGLISH Deck Select A-D > AUDIO-ROUTING INTERNAL: In Internal Mode (MIDI 1 / 2) the Master Output represents output 1 / 2 (Master) and the Headphones Output represents output 3 / 4 (Monitor).
5.2 MIDI Assignment 5.2.1 XF MIDI If XF MIDI -37- is activated the crossfader sends MIDI messages. ENGLISH 5.2.2 FX MIDI If FX MIDI -46- is activated the effect unit‘s control elements sends MIDI messages. 40 NOTES! - If FX MIDI is active (On) the upper left part of the display shows which Traktor deck can be controlled (A, B, C, D). With the Channel Select Potentiometer it is possible to switch between decks.
5.2.3 MIDI 1 / 2 If MIDI1 or MIDI2 respectively is activated the corresponding channel duct sends MIDI messages. ENGLISH 5.3 MIDI Channel Adjustment You can determine the MIDI channel that the IQ2 MIDI should use in order to send MIDI messages. This is especially convenient if you would like to connect several IQ2 MIDI mixers or if other MIDI controllers interfere with MIDI messages.
5.
Center DECK LEDs led on led off P1 09 9n 11 7F 09 9n 11 00 P2 09 9n 12 7F 09 9n 12 00 P3 09 9n 13 7F 09 9n 13 00 P4 09 9n 14 7F 09 9n 14 00 P5 09 9n 15 7F 09 9n 15 00 P6 09 9n 16 7F 09 9n 16 00 A1 09 9n 17 7F 09 9n 17 00 A2 09 9n 18 7F 09 9n 18 00 A3 09 9n 19 7F 09 9n 19 00 TAP 09 9n 1A 7F 09 9n 1A 00 FX_ON 09 9n 1B 7F 09 9n 1B 00 CFA 09 9n 1C 7F 09 9n 1C 00 CFB 09 9n 1D 7F 09 9n 1D 00 CUE1 09 9n 1E 7F 09 9n 1E 00 CUE2 09 9n 1F 7F 09 9n 1F 00 CUE_FX 09 9n 20
6. Technical information Global Distribution GmbH did not test the following manufacturers’ specifications for plausibility and accuracy: 6.1 Input/Output Impedance & Sensitivity (EQ Flat, Max. Gain, FX Off, Load = 100 kOhm): Input Impedance & Reference Level: CD, AUX: ................................................................... Line: .......................................................................... Phono: . ..................................................................... Mic: .........
6.12 USB Section (EQ Flat, FX Off, with 20 kHz LPF, Master Output, Load = 100 kOhm): Playback: (Sony Sound Forge 8.0) Output: . .................................................................... 0 dBV (1 V) +/-2 dB (TCD-782,96K/24Bit TRK. 16, Max. Gain) THD+N:...................................................................... < 0.07% (TCD-782,96K/24Bit TRK. 2, Gain @ Master = 0 dBV Out, with 20 kHz LPF, A-Weighted) Frequency Response: .............................................
ATTENTION ! Pour votre propre sécurité, veuillez lire attentivement ce mode d’emploi avant la première utilisation ! Toutes les personnes chargées de l’installation, de la mise en service, de l’utilisation, de l’entretien et la maintenance de cet appareil doivent posséder les qualifications nécessaires et respecter les instructions de ce mode d’emploi.
FRANCAIS - Veillez à n’effectuer le raccordement secteur qu’une fois l’installation terminée. Branchez toujours la fiche secteur en dernier. Vérifiez que l’interrupteur principal soit sur „OFF“ avant de brancher l’appareil. - Utilisez uniquement des câbles conformes. Veillez à ce que toutes les fiches et douilles soient bien vissées et correctement connectées. Si vous avez des questions, contactez votre revendeur.
Interface de commande 49 6 6 1 4 2 5 2 5 7 10 4 8 5 9 5 11 12 5 FRANCAIS 3 5 13 25 14 24 15 16 17 22 48 22 20 17 18 20 19 23 21 48 48 22
Face arrière 51 50 28 27 29 36 35 34 33 32 29 31 31 26 30 30 Face avant 46 39 40 41 42 1. Descriptions 1. 2. 3. 4. 5. 6. 7. 8. 9. 10. 11. 12. 13. 14. 15. 16. 17. 18. 19. 20. 21. 22. 23. 24. 25. 48. 49.
Face arrière 26. 27. 28. 29. 30. 31. 32. 33. 34. 35. 36. 50. 51.
2. Connectique périphérique PC / MAC The LN/PH2 switch has to be put in the PH2 position. The LN/PH1 switch has to be put in the PH1 position. Turntable Turntable Power Supply CDPlayer Final Amplifier Effect Device TapeDeck Sound System La console Reloop IQ2 MIDI est équipée d‘une interface audio professionnelle intégrée avec 24 bits/96 kHz. L‘utilisation d‘une carte son PC externe ou intégrée n‘est donc pas nécessaire.
3. Utilisation 3.1 Mise sous tension [voir Descriptions, n° 27] Après avoir effectué tous les branchements, veuillez allumer l‘appareil avec l‘interrupteur MARCHE/ ARRÊT -27-. 3.2 Sélection d‘entrée du signal Le sélecteur du signal d‘entrée -6- permet d‘affecter librement chaque signal d‘entrée de la Reloop IQ2 MIDI au canal A ou B. L‘affichage de sélection du signal d‘entrée -49- indique quel signal est actuellement affecté au canal A ou B. 3.
3.8 DJ-Mic Le bouton de réglage du volume du microphone -1- sert à ajuster le niveau de sortie du canal DJ-Mic. L‘égaliseur à 2 voies du microphone -2- permet de régler les aigus et les graves du niveau de sortie du canal DJ-Mic. Si le commutateur microphone-Talkover -3- est sur la position „OFF“, le canal du microphone est désactivé. Pour activer le canal du microphone, le commutateur microphone -Talkover -3- doit être sur „On“.
3.13 Compteur de battements La console de mixage Reloop IQ2 MIDI est équipée d‘un compteur de battements automatique et d‘un compteur de battements manuel. Le compteur de battements automatique est le réglage par défaut à l‘allumage de la console. Sélectionner le canal dont les BPM doivent être comptés avec la touche d‘affectation de canal de l‘effet -16- (la position A correspond au canal A ; la position B au canal B).
Selon l‘effet, le type et la plage du paramétrage de temps et les modifications effectuées par la touche d‘affectation de tempo -24- diffèrent : > ECHO = effet Echo Répète plusieurs fois un intervalle déterminé du signal. Valeur de paramétrage de temps : 2 – 2000 mSec Affectation directe du tempo : intervalles de 125 – 2000 réglables Tourner le régleur rotatif du paramètre X -25- pour modifier la valeur par étapes de 1 unité.
3.15 Effets Crossfader Outre l‘unité d‘effets DSP, la console de mixage Reloop IQ2 MIDI offre en plus trois nouveaux effets Crossfader. Deux modes sont disponibles pour l‘utilisation des effets : Mode curseur : Commencer par positionner le sélecteur d‘effets du Crossfader -15- sur „Fader“. L‘effet Crossfader -22 a, b ou c- actif s‘éclaire. Le canal actif est affiché par la DEL d‘affectation d‘effet du Crossfader -20- et en plus sur l‘écran d‘infos ACL -13; I-.
4. Installation ASIO Insérer le cédérom d‘installation dans votre lecteur. Sélectionner le pilote adapté à votre système dans le répertoire ASIO-Drivers et l‘installer. 4.1 Vous accédez à l‘écran de sélection des langues 4.2 A près la sélection de votre langue, les options d‘installation sont affichées. Sélectionner „Install the driver“. 4.3 Vous devez ensuite connecter la console Reloop IQ2 MIDI avec votre système. Brancher le câble USB sur un port USB libre de votre ordinateur. FRANCAIS 4.
5. Mode audio MIDI/USB Votre Reloop IQ2 MIDI est bien plus qu‘une console de mixage analogique. L‘interface audio/MIDI professionnelle 24 bits/96 kHz intégrée en fait un contrôleur MIDI à part entière. 5.1 TRAKTOR MAPPING FRANCAIS Après l‘installation du pilote ASIO requis pour votre système, ouvrir les réglages (Preferences) dans Traktor, choisir la rubrique „Audio Setup“ et sélectionner „Reloop IQ2 MIDI en tant qu‘équipement. 58 Deux modes sont disponibles pour l‘IQ2 MIDI dans Traktor : 5.1.
Dans ce mode, le Gain, l‘égaliseur à 3 voies et les curseurs linéaires fonctionnent comme en mode audio. Cela signifie que vous pouvez directement manipuler le signal virtuel de Traktor avec la console.
FRANCAIS 5.1.2 Mode de console interne (Stand Alone Mode) Dans Traktor, ouvrir les réglages (Preferences), choisir la rubrique „Output Routing“ et configurer comme le montre l‘image. 60 Sur la console IQ2 MIDI, régler le canal A sur „MIDI1“ et le canal B sur „MIDI2“ avec le sélecteur de signal d‘entrée -6-. Ainsi, toutes les voies de canal des canaux A + B sont actives en mode MIDI.
MIDI MAPPING: IQ2 MIDI INTERNAL Decks AB/CD Gain A/C Gain B/D Filter A-D Cue Volume Key A-D 3-fold EQ BD Sync A-D Pan A-D Cue Mix 3-fold EQ A/C Channel Fader B/D Deck Select A-D Cue A/C Cue B/D Beat phase monitor Crossfader FRANCAIS Channel Fader A/C > AUDIO-ROUTING INTERNAL: En mode interne (MIDI 1/2), la sortie Master-Output représente la sortie 1/2 (Master) et la sortie de casque la sortie 3/4 (moniteur).
5.2 AFFECTATION MIDI 5.2.1 XF MIDI Si „XF MIDI“ -37- est activé, le Crossfader envoie des données MIDI FRANCAIS 5.2.2 FX MIDI Si „FX MIDI“ -46- est activé, les éléments de contrôle de l‘unité d‘effets envoient des données MIDI. 62 NOTE! Lors „FX MIDI“ est activé (ON), l‘écran affiche la platine Traktor (A, B, C, D) pouvant être contrôlée en haut à gauche. Le potentiomètre Channel Select permet de commuter entre les platines.
5.2.3 MIDI 1/2 Lorsque „MIDI“ 1 ou „MIDI 2“ est activé, la voie de canal respective envoie des données MIDI. FRANCAIS 5.3 RÉGLAGE MIDI CANAL Le canal MIDI devant recevoir les données de l’IQ2 MIDI peut être réglé. Ceci s‘avère particulièrement utile si plusieurs IQ2 MIDI sont interconnectées ou si d‘autres contrôleurs avec des données MIDI se recoupent.
5.
Center DECK LEDs led on led off P1 09 9n 11 7F 09 9n 11 00 P2 09 9n 12 7F 09 9n 12 00 P3 09 9n 13 7F 09 9n 13 00 P4 09 9n 14 7F 09 9n 14 00 P5 09 9n 15 7F 09 9n 15 00 P6 09 9n 16 7F 09 9n 16 00 A1 09 9n 17 7F 09 9n 17 00 A2 09 9n 18 7F 09 9n 18 00 A3 09 9n 19 7F 09 9n 19 00 TAP 09 9n 1A 7F 09 9n 1A 00 FX_ON 09 9n 1B 7F 09 9n 1B 00 CFA 09 9n 1C 7F 09 9n 1C 00 CFB 09 9n 1D 7F 09 9n 1D 00 CUE1 09 9n 1E 7F 09 9n 1E 00 CUE2 09 9n 1F 7F 09 9n 1F 00 CUE_FX 09 9n 20
6. Caractéristiques La plausibilité et l‘exactitude des données suivantes du fabricant ne sont pas contrôlées par la société Global Distribution GmbH : 6.1 Impédance entrée/sortie & sensibilité (EQ Flat, Max. Gain, FX Off, Load = 100 kOhm): Impédance d‘entrée et niveau d‘entrée de référence : CD, AUX: ............................................................................ 10 kOhm / -14 dBV +/-0,1 dB (200 mV) Line: ...................................................................................
6.12 Section USB (EQ Flat, FX Off, avec 20 kHz LPF, Master Output, Load = 100 kOhm): Playback: (Sony Sound Forge 8.0) Output: . ............................................................................. 0 dBV (1 V) +/-2 dB (TCD-782,96K/24Bit TRK. 16, Max. Gain) THD+N: .............................................................................. < 0,07% (TCD-782,96K/24Bit TRK. 2, Gain @ Master = 0 dBV Out, avec 20 kHz LPF, AWeighted) Réponse en fréquence: . ............................................
FRANCAIS www.reloopdj.com Reloop Trademark Global Distribution GmbH Schuckertstr.