VirtualDJ 8 – Reloop Terminal Mix 8 1
Table of Contents INSTALLATION ......................................................................................................................... 3 Firmware & Drivers ................................................................................................................ 3 VirtualDJ 8 Setup ................................................................................................................... 3 Advanced Setup .......................................................................
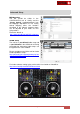
INSTALLATION Firmware & Drivers Firmware: Update the firmware of the unit to the latest version from http://www.reloop.com/reloop-terminal-mix-8 Drivers (for Windows only): Install the latest Reloop ASIO drivers from http://www.reloop.com/reloop-terminal-mix-8 No drivers are required for Mac OSX computers VirtualDJ 8 Setup Download and install VirtualDJ 8 from http://www.virtualdj.com/download/index.html (in case you have not done already) Once VirtualDJ 8 is launched, a Login Window will appear.
Advanced Setup MIDI Operation The unit should be visible in the CONTROLLERS tab of Config and the “factory default” available/selected from the Mappings drop-down list. The factory default Mapping offers the functions described in this Manual, however those can be adjusted to your needs via VDJ Script actions. Find more details at http://www.virtualdj.com/wiki/VDJscript.html AUDIO Setup The unit has a pre-defined Audio setup and a special button in the AUDIO tab of Config to provide that.
A. TRANSPORT 1. SHIFT. Press and hold this button to access secondary functions of other controls on the TM8 2. SYNC. Press this button to automatically match the corresponding Deck's tempo with the opposite Deck's (or the Master Deck’s if using a 4 decks Skin) tempo and phase. Press and hold Shift and press this button to set this deck as Master Deck (for 4 decks skins). 3. STUTTER. Press this button to return to the last paused position and play the track from there. 4. CUE.
B. TEMPO 9. PITCH. Controls the track's playback tempo. The blue led indicates that the pitch fader of the unit is on zero (center) position 10. RANGE (SHIFT). Hold SHIFT down and then press this button to select the next available pitch range. The pitch range applies to all VirtualDJ decks (global setting) 11. KEY (SHIFT). Hold SHIFT down and then press this button to enable/disable Master Tempo (Keylock) on the deck. C.
15. FX1 ON. Press this button to enable/disable the selected effect of FX Slot 1. Hold SHIFT down and then press this button, to select the next available effect for FX Slot 1. 16. FX2 ON. Press this button to enable/disable the selected effect of FX Slot 2. Hold SHIFT down and then press this button, to select the next available effect for FX Slot 2. 17. FX3 ON. Press this button to enable/disable the selected effect of FX Slot 3.
Slicer & Slicer Hold mode Press the SLICE mode button to set the PADs to SLICER mode. The eight pads represent eight sequential beats—"Slices"—in the Beat Grid. The playing Slice is represented by the currently red lit pad. The red light will "move through the pads" as it progresses through each eight-Slice phrase. Press a pad to repeat that Slice (hold it down if you want to keep looping it).
SHIFT and the same pads to stop the sample. If the SAMPLER mode is selected, press again the same Mode button to receive the Sampler parameters (led will blink). Use Pads 1 and 5 to select the previous and next available Sampler Bank. Use Pads 4 and 8 to select the next sampler trigger mode (On/off, Hold, Stutter and Unmute) Use Pad 2 to record the deck into a new Sample. Use Pad 3 to toggle the Sampler between the List and Trigger pad view.
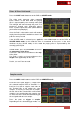
Loop & Loop Roll mode Press the LOOP mode button to set the PADs to Loop mode. Each one of the PADs triggers a loop of a different size as per the image. Press the same pads to disable the applied loop or another one to apply a loop of a different size. The LOOP encoder can be also used to half/double the size. Hold SHIFT down and then press one of the pads to trigger a momentary Loop Roll of a different size as per the image.
While SHIFT is pressed use Pads 1 and 2 to repeat the last triggered loop (reloop) and exit. Use Pads 3 and 4 to delete the saved Loops. Use Pads 7 and 8 to Load (and jump to) the saved Loops. HotCue & Sampler dual mode Press the CUE and the SAMPL mode buttons at the same time to set the PADs to the Hot Cue & Sampler Dual mode. In this mode the top 4 PADs assigns a Hot Cue Point (1 to 4) or returns the track to that Hot Cue Point. Hold SHIFT and then press a pad to delete its assigned Hot Cue Point.
In this mode the top 4 PADs will trigger a Loop of a different size (from 1/8 to 1 beat) Hold SHIFT down and then use the same PADs to trigger a momentary Loop Roll of a different size (1/16 to 1/2 beats) The 4 lower PADs will trigger a Sample (slots 1 to 4) Depending on the selected trigger mode, use SHIFT and the same pads to stop the sample. E. MIXER & BROWSER 24. CROSSFADER. Blends audio between the channels assigned to the left and right side of the crossfader. 25. VOLUME.
33. MASTER VOLUME. Adjust the level of the Master Output. Hardware operation movement not visible on the VirtualDJ GUI 34. BOOTH VOLUME. Adjust the level of the Booth Output. Hardware operation – movement not visible on the VirtualDJ GUI. 35. HEAPHONES LEVEL. Adjust the Volume Output of the Headphones Channel. Hardware operation – movement not visible on the VirtualDJ GUI. 36. HEADPHONES MIXING. Adjust how the Channels and the Master Output blend at the Headphones Channel. 37. SAMPLER VOLUME.
F. INPUTS & RECORDING The Terminal Mix 8 offers 2 stereo Inputs. An AUX at the rear side (Input Channels 1 and 2) and a Microphone Input at the front (Input channels 3 and 4). Each one of the Inputs can be routed through the Master Output directly (front switcher to MST position) or through VirtualDJ (front switcher to SW position). A Level knob for each Input is offered to adjust its Input Volume.
Hardware Integration Department 2014 - ATOMIX PRODUCTIONS Reproduction of this manual in full or in part without written permission from Atomix Productions is prohibited.