® ELECTRIC CHAIN SAW OWNER’S MANUAL ® ® MODELS LNT-2: 076728J, 100089-06, & 099178H EL-1, EL-1 Fast Sharp EL-7: 075762J, 098031J, 099039J, 100015, 100089-01, 100089-04, 100089-05, & 100089-07 EL-7 Fast Sharp: 076702J Pole Saw: 104316-01 Pole Saw Assembly: 104317 IMPORTANT: Read and understand this manual before assembling or operating this chain saw. Improper use of saw can cause severe injury. Keep this manual for future reference.
® ELECTRIC CHAIN SAW SAFETY WARNINGS Make certain you read and understand all Safety Warnings on pages 2 and 3. Improper use of this chain saw can cause severe injury or death from fire, electrical shock, body contact with moving chain, or falling wood. BEFORE OPERATING SAW 1. 2. 3. 4. 5. 6. 7. 8. Read and understand this owner’s manual before operating chain saw. Watch what you are doing. Use common sense. Do not operate saw when you are tired. Use chain saw for cutting wood only.
OWNER’S MANUAL MAINTENANCE AND STORAGE OF CHAIN SAW SAFETY WARNINGS 1. KICKBACK WARNING: Kickback may occur when the nose or tip of the guide bar touches an object, or when the wood closes in and pinches the saw chain in the cut. Tip contact in some cases may cause a lightning fast reverse reaction, kicking the guide bar up and back towards the operator. Pinching the saw chain along the top of the guide bar may push the guide bar rapidly back towards the operator.
® ELECTRIC CHAIN SAW CHAIN SAW NAMES AND TERMS Bucking Process of cutting a felled tree or log into lengths. Felling Process of cutting down a tree. Felling Cut Final cut when felling a tree. Make this cut on opposite side of tree from notching cut. Front Handle Located at front of saw body. Front Hand Guard Shield between front handle and guide bar. Protects left hand while using saw. Guide Bar Metal bar that extends from saw body. The guide bar supports and guides chain.
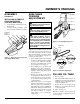
OWNER’S MANUAL PRODUCT IDENTIFICATION UNPACKING Front Hand Guard Guide Bar Nose Saw Chain Rear Handle Guide Bar Spike Rear Hand Guard Scabbard Power Cord Oil Level Sight Hole (located on saw body, hidden by front handle) Oil Cap Front Handle Motor Housing Switch Lockout Trigger Figure 2 - Electric Chain Saw 097017 5 1. 2. Remove all items from carton. Check all items for any shipping damage.
® ELECTRIC CHAIN SAW ASSEMBLY Note: Some models are pre assembled. Assembly is not needed on these models. See Saw Chain Tension Adjustment, page 7. WARNING: Cutting edges on chain are sharp. Use protective gloves when handling chain. 8. Place chain around drive sprocket, then along top groove of guide bar and around guide bar nose. Note: Make sure cutting edges of chain are facing the right direction. Position chain so cutting edges on top of guide bar face guide bar nose (see Figure 3).
OWNER’S MANUAL ASSEMBLY Continued INSTALLING AUTOMATIC CHAIN SHARPENER (Fast Sharp Models Only) 1. 2. Screw automatic chain sharpener into threaded hole. Continue turning automatic chain sharpener until you hear five (5) clicks. Automatic Chain Sharpener PU S SH TO H AR PE N Figure 5 - Automatic Chain Sharpener (Fast Sharp Models Only) 097017 SAW CHAIN TENSION ADJUSTMENT WARNING: Unplug chain saw from power source before adjusting saw chain tension. WARNING: Cutting edges on chain are sharp.
® ELECTRIC CHAIN SAW OPERATING CHAIN SAW WARNING: Read and understand this owner’s manual before operating this saw. Make certain you read and understand all Safety Warnings, pages 2 and 3. Improper use of this chain saw can cause severe injury or death from fire, electrical shock, or body contact with moving chain, or falling wood. OILING CHAIN 5. Always check oil level before using saw. To oil chain, press oil cap. Do not attempt to operate the oiler while cutting with the saw.
OWNER’S MANUAL OPERATING CHAIN SAW Direction of Fall Retreat Path Continued Direction of Fall FELLING A TREE 2 Inches (Cutting Down a Tree) 45° • • • • WARNING: Avoid kickback. Kickback can result in severe injury or death. See Kickback, page 3 to avoid risk of kickback. Do not fell a tree without ample skill or expert help. Keep children, animals, and bystanders away from area when felling a tree.
® ELECTRIC CHAIN SAW OPERATING CHAIN SAW Continued LIMBING A TREE WARNING: Avoid kickback. Kickback can result in severe injury or death. See Kickback, page 3 to avoid risk of kickback. WARNING: When cutting limb that is under tension, use extreme caution. Be alert for wood springing back. When wood tension is released, limb could spring back and strike operator causing severe injury or death. Limbing is removing branches from a fallen tree. Make sure your footing is firm. Keep feet apart.
OWNER’S MANUAL OPERATING CHAIN SAW Continued Log Supported On Both Ends 1. 2. Make first cut from above log (see Figure 16). Cut 1/3 through diameter of log. This cut will keep section from splintering when cut. Make second cut on underside of log, directly under first cut. Use top of guide bar to make this cut. Cut up to meet first cut. This will keep log from pinching guide bar and chain. 1st Cut TRIMMING A TREE (Pruning) WARNING: Avoid kickback. Kickback can result in severe injury or death.
® ELECTRIC CHAIN SAW CLEANING AND MAINTENANCE NOTICE: Below are instructions for servicing your chain saw. Any servicing not mentioned below should be done by an authorized service center. CLEANING SAW BODY CARE OF GUIDE BAR Normal Guide Bar Maintenance Uneven bar wear causes most guide bar problems. Incorrect sharpening of chain cutter and depth gauge settings often cause this. When bar wears unevenly, it widens guide bar groove (see Figure 18). This causes chain clatter and rivet popping.
OWNER’S MANUAL CLEANING AND MAINTENANCE Continued SHARPENING SAW CHAIN (Non-Fast Sharp Model) WARNING: Unplug chain saw from power source before servicing. Severe injury or death could occur from electrical shock or body contact with moving chain. WARNING: Cutting edges on chain are sharp. Use protective gloves when handling chain. Sharpening Cutters 4. Use file guide for 30° filing. 1. Adjust chain for proper tension (see Saw Chain Tension Adjustment, page 7). 2.
® ELECTRIC CHAIN SAW SHARPENING SAW CHAIN CLEANING AND MAINTENANCE (Fast Sharp Model) Continued Filing Cutter Depth Gauges The cutter depth gauge clearance is reduced as cutters are sharpened. After every second or third sharpening, reset cutter depth gauges. 1. Place depth gauge tool (.025") firmly across top of two cutters. Make sure depth gauge enters slot in depth gauge tool (see Figure 22). 2. Use medium flat file. File depth gauge level with depth gauge tool. 3. Remove depth gauge tool.
OWNER’S MANUAL TROUBLESHOOTING WARNING: Unplug chain saw from power source before servicing. Severe injury or death could occur from electrical shock or body contact with moving chain. OBSERVED FAULT POSSIBLE CAUSE REMEDY Saw runs, but does not cut. Chain assembled backwards on guide bar See Assembly, page 6 Saw does not cut unless heavily forced. Cutting produces only sawdust with few large chips.
® ELECTRIC CHAIN SAW PARTS CENTRALS Ray's Portable Heater Service 3191 Myers Road Camino, CA 95709 916-644-7716 Baltimore Electronics 1348 Dixwell Avenue Hamden, CT 06514 203-248-7553 1-800-397-7553 Eckley’s Small Engine 31617 Spruce Drive Eustis, FL 32726 352-357-6764 Parts Company of America 1657 Shermer Road Northbrook, Ill 60062 708-498-5900 1-800-323-0620 Portable Heater Parts 342 North County Road 400 East Valparaiso, IN 46383 219-462-7441 1-800-362-6951 Four Flags Power Products 1115 Stateline Roa
OWNER’S MANUAL INDIANA (IN) Hutchens Sales and Service R.R. #5, Box 550 Bloomfield, IN 47424 812-876-1891 KANSAS (KS) Abilene Rent-All & Sales 1701 West 1st Street Abilene, KS 67410 913-263-7668 MARYLAND (MD) Center Supply Company 6802 Industrial Drive #208 Beltsville, MD 20705 301-595-0860 Nichols Ice & Oil 2018 Park Road Connersville, IN 47331 317-825-3741 NAAB Electric, Inc. 2013 W. Jones Garden City, KS 67846 316-276-8101 Lehmans Hardware, Inc.
® ELECTRIC CHAIN SAW NEW JERSEY (NJ) Complete Saw Service 336 River Road Garfield, NJ 07026 201-478-7838 Nemeth's Mower Service 55 - 4th Ave. Haskell, NJ 07420 201-835-0080 Air & Electric Tool Service, Inc. 215 North 8th Street Kenilworth, NJ 07033 908-272-5567 Associated Industries Rd 38, Box 2486 Mt. Holley, NJ 08060 609-267-8417 Woodchuck's Lawnmower and Appliance 220 Whitehorse Pike Magnolia, NJ 08049 609-783-1111 Myron Tepper/Tep's Power Equipment 1007 N.
OWNER’S MANUAL UTAH (UT) Roosevelt Service Center 133 South 300 East, Box 1546 Roosevelt, UT 84066 801-722-2708 VIRGINIA (VA) Industrial Hardware 4109 Bainbridge Blvd. Chesapeake, VA 23324 804-543-2232 WASHINGTON (WA) Action Small Appliance Service 1500 145th Place SE Bellevue, WA 98005 206-455-3578 WEST VIRGINIA (WV) Beckley Mower Service 3695 Robert C. Byrd Drive Beckley, WV 25802 304-253-5748 Longs Engine Service 7536 Stone Road Salt Lake, UT 84121 801-943-5135 Warren E. Smith Shops 564 Reading Rd.
REPAIR SERVICE Warranty Service Note: Only use original replacement parts. If saw requires warranty service, return it to This will protect your warranty coverage for nearest authorized service center. You must show proof of purchase. If faulty materials parts replaced under warranty. or workmanship caused damage, we will Each authorized service center is indepen- repair or replace saw without charge. dently owned and operated. For additional service center or warranty information, call 1-800-323-5190.