Owner’s Manual Owner’s Manual for: Remington Model SPR 310 and SPR 320 Over/Under Shotguns PAGE 2 ........THE TEN COMMANDMENTS OF FIREARM SAFETY IMPORTANT! PAGE 7 ........IMPORTANT PARTS OF THE FIREARM READ ALL WARNINGS AND INSTRUCTIONS IN THIS MANUAL BEFORE USING THIS SHOTGUN PAGE 11........ASSEMBLY INSTRUCTIONS PAGE 13........LOADING AND UNLOADING PAGE 16 ......FIRING 1 PAGE 17 ......
Safety is Critical to Performance. A superbly crafted gun is only as good as the hands that hold it. You can never be too careful. Shooting accidents are often caused by careless oversights such as failing to control the direction of the muzzle, failing to fully engage the safety, leaving ammunition in the chamber or using improper loads. These oversights can result in the destruction of life, limb or property.
rd COMMANDMENT Never Rely on Your Firearm’s Safety Mechanism to Justify Careless Handling. If your firearm is equipped with a manual safety mechanism, do not rely on the safety as an excuse for improper or careless handling of the firearm. The safety mechanism is merely a supplement to your proper handling of the firearm. The safety mechanism may be broken or altered.
7th COMMANDMENT Always Wear Eye and Ear Protection. Wear protective shooting glasses and hearing protection when shooting. Be sure to wear eye protection when disassembling or cleaning a firearm to protect your eyes from springs and other tensioned parts. Continued exposure to shooting noise can permanently damage your hearing. 8th COMMANDMENT Be Sure the Barrel is Clear of Obstructions Before Shooting.
Use the Security Lock Provided with your Shotgun This shotgun comes with a security lock to assist in protecting against unauthorized use. See Picture 1. The shotgun must be unloaded when the security lock is in place on the shotgun. WARNING: Using the security lock cannot substitute for securing your firearm and ammunition in separate, locked locations. Picture 1 The security lock operates as follows: 1.
Use the Security Lock Provided with your Shotgun (cont’d) 3. Screw the Trigger Lock Nut on the Trigger Lock Screw (clockwise) and tighten the nut with the key. DO NOT TIGHTEN THE NUT TOO TIGHT OR YOU COULD DAMAGE THE LOCK SCREW (See Picture 5). Picture 5 4. To remove the Trigger Lock, unscrew the Trigger Lock nut with the key and detach the Trigger Lock Screw (See Picture 6).
Important Parts of the Firearm Congratulations on your choice of a Remington® Model SPR 310 or Model 320 shotgun. With proper care and if used in accordance with the Ten Commandments of Firearm’s Safety and this owner’s manual, your shotgun should give you many years of dependable use and enjoyment. The following picture depicts the main parts of your shotgun and will aid in understanding the instructions in this Owner’s Manual.
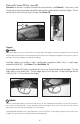
External Control Parts (cont’d) Top Lever: The top lever is located just forward of the safety mechanism. (See Picture 9). The top lever is used to break open the action to load and/or unload the shotgun, and to assemble and disassemble the shotgun. To break open the action, fully push the top lever to the right. (See Picture 10). Picture 9 Picture 10 Triggers: WARNING Never pull the trigger(s) until you are actually ready to fire.
External Control Parts (cont’d) The Ejectors: Model 310 and 320 shotguns are equipped with ejectors which are preset at the factory for automatic ejection of fired rounds upon opening of the action. However, the ejectors may be adjusted by the user to disable the automatic-ejection feature. When the ejectors are set in the disabled position, fired shells will not be automatically ejected from the barrels when the action is opened.
External Control Parts (cont’d) To return the shotgun to the automatic-ejection mode, simply turn the set screws counterclockwise 1/4 of a turn to their original position with the set screw slots oriented in a vertical position perpendicular to the length of the barrels. (See Picture 19 and Picture 20). Picture 19 Picture 20 WARNING Never adjust or disable the ejector set screws when the shotgun is loaded. Adjust the set screws only when the shotgun is completely unloaded.
The Barrel Selector (for Model 310 single-trigger shotguns only) (cont’d) Picture 21 The Serial Number: The shotgun’s serial number is located on the top of the receiver underneath the top lever. WARNING Never load or fire the shotgun unless the barrel is locked into position on the receiver, and the fore end is locked in to the receiver and barrel.
Instructions For Assembly Of Shotgun (cont’d) 2. Now push the top lever of the receiver to the right and hold with one hand. Do not force the top lever. (See Picture 23). Picture 23 3. Holding the barrels with the other hand, engage the lower locking lug located on the lower portion of the barrel with the receiver. The half round cut out on the lower locking lug fits around the round bar in the forward lower portion of the slot in the receiver.
Instructions For Assembly Of Shotgun (cont’d) 5. Warning: Never fire the gun unless the barrel is locked into position on the receiver and the fore end is locked into the receiver and barrels. 6. Make sure the trigger block safety is engaged after completion of assembly (Red Dot covered) (See Picture 28). Picture 28 Loading and Unloading Your Shotgun WARNING Never load or fire the shotgun unless the barrels is locked into position on the receiver, and the fore end is locked in to the receiver and barrels.
Loading and Unloading Your Shotgun (cont’d) TO LOAD: 2. Visually inspect the chambers and barrels for obstructions by breaking open the shotgun by depressing the locking lever and tipping the barrels down. The chambers and barrels should be free of oil or grease or obstructions. (See Picture 29). Picture 29 3.
Loading and Unloading Your Shotgun (cont’d) TO UNLOAD: 1. Break open the shotgun by pushing the top lever of the receiver all the way to the right and tipping the barrels down. (See Picture 34). Picture 34 2. Remove the shell(s) from the chamber(s) by grabbing them by the rim of the shell(s) and pulling them from the chambers. (See Picture 35). Picture 35 3. Visually check the barrels to make sure that they are free from obstructions. (See Picture 36).
Firing Your Shotgun WARNING: NEVER LOAD A CARTRIDGE INTO THE CHAMBER UNTIL YOU ARE READY TO FIRE THE SHOTGUN. WARNING Do not disengage the trigger block safety until the shotgun is pointed in a safe direction and you are ready to fire.
Firing Your Shotgun (cont’d) 4. With the butt stock held firmly against your shoulder and the barrel pointed towards your intended target, place your trigger finger on the trigger. The shotgun will fire when you pull or squeeze the trigger with the requisite force. (See Picture 39). Picture 39 5. If you wish to fire a second shot from the other barrel, you must: a) In the case of a Model 310 single-trigger shotgun, release the trigger and then pull or squeeze it again. The second barrel will then fire.
Manufacturer’s Warning This firearm was manufactured to properly perform with the original parts as designed. It is your duty to make sure any parts you buy are correctly installed and that neither replacements nor originals are altered or changed. Your shotgun has many parts that must relate correctly to other parts for safe and accurate operation. Putting a gun together wrong or with modified parts can result in a damaged gun, or personal injury or death to you or others.
DANGER – Ammunition Warning Firearms may be damaged and serious personal injury or death to the shooter or bystanders may result from any condition which contributes to the generation of excessive pressure or uncontrolled release of gas within the firearm. Such adverse conditions can be caused by bore or chamber obstructions, propellant powder overloads or by defective, incorrect or improperly loaded and assembled cartridge components.
PARTS AND SERVICE (cont’d) One Year Limited Warranty Transportation to and from our repair facilities, government fees, damage caused by failure to perform normal maintenance, sales outside the United States, damage caused by use of high velocity, high pressure, reloaded or other nonstandard ammunition, or by any unauthorized repair, modification, misuse, abuse or alteration of the shotgun is not covered by this Limited Warranty.
PARTS LIST Model SPR310/320 Exploded View List of Model 310 and 320 Components 1.barrel assembly 2.ejector 3.screw 4.front sight 5.swivel ring 6.pin 7.hinge assembly 8.fore grip 9.screw 10.bush 11.catch casing 12.fore grip catch 13.pin 14.spring 15.housing 16.locking lever 17.screw 18.locking lever axle 19.locking strip 20.recoil spring 21.top striker 22.bottom striker 23.striker spring 24.right-hand hammer 25.left-hand hammer assembly 26.pin 27.mainspring pivot 28.mainspring 29.right-hand sear 30.
Model 310/320 Ejector Parts LIST OF COMPONENTS 1. 2. 3. 4. 5. 6. 7. 8. 9. 10. 11. 12. 13. 14. 15. 16. 17. barrel assembly right-hand ejector left-hand ejector ejector spring plunger hinge assembly fore grip ejector right-hand sear ejector left-hand sear ejector sear bolt spring base right-hand bolt plunger left-hand bolt plunger tripping lever tripping lever catch spring Model 310 Single Trigger Mechanism Parts LIST OF COMPONENTS 1. 2. 3. 4. 5. 6. 7. 8. 9. 10. 11. 12. 13. 14. 15. 16. 17. 18. 19.
Choke Tubes WARNING Never install or remove choke tubes while the firearm is loaded. Only install or remove choke tubes with the firearm unloaded, the action open and the trigger block safely engaged.
Additional Information On Screw Choke Tubes: (cont’d) D. Correctly installed choke tubes: Lead shot choke tubes should fit flush or slightly below the muzzle end of the barrel. Steel shot choke tubes will protrude out from the barrel about 3/4” and the mating lip will be flush with barrel end. E. Before using the shotgun make sure that the choke tubes are installed correctly. F. Keep choke tubes lubricated and installed. Never fire the gun without a choke tube installed.
WARNING Children are attracted to and can operate firearms that can cause severe injuries or death. Prevent child access by always keeping guns locked away and unloaded when not in use. If you keep a loaded firearm where a child obtains and improperly uses it, you may be fined or sent to prison. ADVERTENCIA A los ninos los atroen las armaside de fuego y los pueden hacer funcionar. Ellos pueden causarses lesiones graves y la muerte.
Remington is a trademark registered in the United States Patent and Trademark Office by Remington Arms Company, Inc.