
Manual

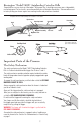

TO REMOVE THE MAGAZINE:
1. Point the firearm in a safe direction.
2. Engage the safety mechanism.
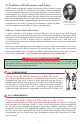
RED BAND WILL NOT SHOW.
3.
CAUTION
: Keep your fingers away from the ejection port and
operating handle.
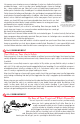
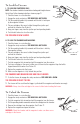
4. Push the bolt release to close the action. See Picture 8.
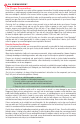
5. Push the magazine latch forward. See Picture 7. Pull the magazine
from the receiver.
The Trigger Assembly
Pulling the trigger fires the firearm.
The weight of the trigger pull is preset at the factory.
All adjustments to the trigger and trigger plate assembly must be
made by the factory or a REMINGTON
®
AUTHORIZED GUNSMITH.
WARNING: NEVER
put your finger on the trigger unless you are
going to fire the firearm.
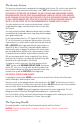
The Barrel
The inside of the barrel must be clean and free of obstructions.
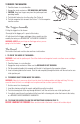
I. TO CHECK THE INSIDE OF THE BARREL:
WARNING:
Look into the ejection port. Check the chamber and magazine to make sure there are no cartridges
in the firearm.
1. Point the firearm in a safe direction.
2. Engage the safety mechanism. Make sure the
RED BAND IS NOT SHOWING.
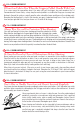
3. Pull the operating handle fully rearward until the bolt is held open by the magazine follower.
4. Insert a cleaning rod into the muzzle. Push the rod completely through the barrel until the rod can be seen
in the ejection port.
II. TO REMOVE OBJECT FROM INSIDE THE BARREL:
WARNING:
Never try to remove an object from the barrel by loading another cartridge and firing. This may
cause the barrel to burst or a cartridge case to rupture and cause serious personal injury.
1. Use the correct size cleaning rod.
2. Insert the cleaning rod into the muzzle and lightly tap rod to free object.
3. Push the cleaning rod all the way through the barrel, until the rod can be seen in the ejection port.
4. If an object cannot be easily pushed out of the barrel with a cleaning rod, return the firearm to the factory
or a REMINGTON RECOMMENDED GUNSMITH.
III. TO CLEAN THE BARREL FOLLOW THE INSTRUCTIONS SHOWN ON PAGE 11.
BEFORE LOADING THE FIREARM:
Make sure the inside of the barrel is free of dirt or other objects.
9
PICTURE 8
PICTURE 7