® El+EC1 RIC BLOWER/VA¢ OWNER'S MANUAL MODELS: BV12200A, iMPORTANT: operating injury Read and this appliance, or death. understand improper BV12200AT this Keep this manuaJ for future _ manual before use of this appliance reference.
REMINGTON ELECTRIC BLOWER/VAC table of contents 1 ImportantSafetyInformation 1 2 Productldentification 3 3 Blower/VatAssembly 4 4 AssemblingBlower ........................... 4 Converting from BlowertoVacuum.................... 5 Blower/Vat Operation Extension Cords............................. 7 Operating theBlower/Vat........................ 8 Blower/VatMaintenance 120133 7 11 CleaningandMaintenance........................ 11 Servicingof Double-Insulated Appliances................
iv I welcome Thank you for purchasing this Remington brand Electric Blower/Vac. We are proud to offer this quality product to assist you in keeping your property neat and wellgroomed. This owner's manual provi des compl ere instructi ons for safely assembling, operating, and maintaining your Blower/Vac. Read and save these instructions. Refer to this manual each time before using your Blower/Vac. For easy reference, record the information nameplate label located on the appliance.
REMINGTON ELECTRIC BLOWER/VAC 1 importa SAFETY WARNINGS When using an electric appliance, basic precautions should always be followed, including the following: safety inform 1 " n BEFORE OPERATING BLOWER/VAC WHILE OPERATING BLOWER/VAC READ ALL INSTRUCTIONS BEFORE OPERATING THIS BLOWERA/AC. 1. Stay alert.Watch what you are doing. Use common sense. 2. Keep hair, loose clothing, fingers, and all parts of body away from openings and moving parts. 3.
2 I Chapter 1: Important Safety Information MAINTENANCE AND STORAGE OF BLOWER/VAC 1. Maintain blower/vacwith parts, mounting, and any other condition that may affect its operation. " A guard or other part that is damaged should be properly repaired or replaced by a qualified service center unless indicated elsewhere in this manual. care. " Do not use with damaged cord or plug.
REMINGTON ELECTRIC BLOWER/VAC 2 product identification @ A. B. Biower/Vac Housing On/Off Switch C. Blower Tube D. Bottom inletCover E. Vacuum BagAdapter F. Vacuum Bag G. Vacuum Tube Adapter H. I. Upper Vacuum Tube LowerVacuumTube J. Extension Cord Retainer K.
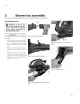
4 I 3 lower/vat Assembling assembly Blower ,_1. WARNING: To Reduce The Risk of Personal injury or Electric Shock- Disconnect from power source before assembling or changing attachments. Follow the steps below to assemble the blower. IMPORTANT;The blower will not run unless the bottom inlet cover is locked Figure 3-1:Sliding blowertubeintoplace into place. 1. Slide the blower tube onto outlet on front ofblower/vac housing (see Figure 3-1).
REMINGTON ELECTRIC BLOWER/VAC I Converting from Blower to Vacuum _k, WARNING: To Reduce The Risk of Personal injury or Electric Shock- Disconnect from power source before assembling or changing attachments. Follow the steps below to convert from blower to vacuum. IMPORTANT: The vacuum will not run unless the vacuum tube assembly (9 is locked into place. 1. Press cover from from 2. Slide vacuum tube adapter onto outlet on front of blower/vac housing (see Figure 3-6).
6 I Chapter 3: Blower/Vac Assembly Converting from Blower to Vacuum, continued 4. Connect the tubes adapter (see Figure to the vacuum 3-9). Align on the top tube with vacuum until 5. tube you hear Position front assembly Press on the together a "snap". of vacuum over (see Figure the tab the notch adapter. tube motor Notch tube adapter housing @ hook 3-10). Tab 6.
REMINGTON ELECTRIC BLOWER/VAC 4 blower/vac To reduce the risk of electric hold use only. b]ower/vac has a polarized plug (one blade is wider than the other) and will require the use of a polarized extension cord.The b]ower/vac's plug will fit into a polarized extension cord only one way. If the plug does not fit fully into the extension cord, reverse the plug. If the plug still does not f_t, obtain a correct polarized extension cord.
8 I Chapter 4: Blower/Vac Operation Operating the Blower/Vac The on/off:toggle switch has three settings; off, low, and high. The middle switch position, marked "O", is off. The rear switch position, marked 'T', is low: The forward switch position, marked "11",is high. See Figure 4-4. Blower _IL Operation WARNING: throw debris, those nearby. • • • • The blower causing injury can to Do not blow nails, bolts, rocks, or other hard objects. Do not operate blower near bystanders or pets.
REMINGTON ELECTRIC BLOWER/VAC Vacuum Operation _ CAUTION: Normal vacuum usage causes the vacuum bag to wear and deteriorate. A worn or deteriorated bag allows vacuum to throw debris through the bag, possibly hitting and injuring the operator. Check vacuum bag frequent ly. if it isworn, deteriorated, or damaged, replace with a genuine vacuum bag. _Ib WARNING: The vacuum can throw debris, causing injury to those nearby. • Donotoperatevacuumwithout the vacuum bag attached or with the bag zipper opened.
10 I Chapter 4: Blower/Vac Operation Emptying 1. the Vacuum Bag Turn vacuum off and unplug power cord. 2. Lift and release draw latch on vacuum bag adapter and remove from blower/ vac housing (see Figure 4-10). 3. Unzip vacuum bag and shake out contents (see Figure 4-11). 4. Zip the vacuum bag closed and reassemble vacuum bag adapter to blower/vac housing. Note: Be sure to securely connect the draw latch to the vacuum bag adapter. Removing Clogged Debris from the Impeller 1.
REMINGTON ELECTRIC BLOWER/VAC 5 blower/vac Cleaning and Maintenance _kWARNING: Disconnectblower/ vac from power supply before cleaning or servicing. Severe injury or death could occur from fire, electrical shock, or rotating impeller, not in use, store the blower/vac extension cord indoors • Appliances A double-insulated appliance is marked with one or more of the following: The words "DOUBLE INSULATION" or "DOUBLE INSULATED" or the double insulation a square).
121 6 trou eshooting _llb Unplugoccur blower/vac power source before impeller, servicing. injuryWARNING: or death could from fire, from electrical shock, or rotating Note: For additional technical service www.desatech.com. help, web visit site Severe J our at Technical Service You may have further questions about assembling, operating, or maintaining this blower/vac. 1fso,you can visit ourTechni cal Service web site at www.desateeh.
REMINGTON ELECTRIC BLOWER/VAC 7 Replacement Use the part numbers blower!vac.
141 8 warranty information REMINGTON BRAND LiMiTED ELECTRIC BLOWER/VAC WARRANTIES NEW PRODUCTS Standard Warranty DESA Power Tools warrants this new product and any parts thereof to be free from defects in material and workmanship tbr a period of two (2) years from the date of first purchase from an authorized dealer provided the product has been maintained and operated in accordance with DESA Power Tools'warnings and instructions.