
Full Product Manual


26
MAINTAINING THE SAW CHAIN
For safe, efficient operation, the saw chain must be maintained
properly.
The saw chain will wear with use, causing the chain to stretch. This
is normal. When it is no longer possible to obtain a correct chain
tension adjustment, the saw chain will need to be repaired by an
authorized service dealer or replaced. Refer to Replacing the Guide
Bar and Saw Chain.
Always keep the sa
w c
hain sharp. During operation, look for the
following indicators of a dull saw chain:
• Wood chips are small and powdery.
• The saw chain must be forced through the wood.
• The saw chain cuts to one side.
If any of these conditions exist, sharpen or replace the saw chain.
Refer to Sharpening the Saw Chain or Replacing the Guide Bar and
Saw Chain.
NOTE: If you do not fully understand the sharpening procedure
a
fter
reading the instructions, have the saw chain sharpened by an
authorized service dealer or replace the saw chain.
SHARPENING THE SAW CHAIN
If the saw chain was damaged by contacting hard objects, such as
nails or stones, or was abraded by mud or sand on the wood, have
an authorized service dealer sharpen the saw chain.
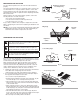
When sharpening the saw chain, file all cutters to the specified
angles and measure
ments. Other angles or measurements can
cause excessive wear to the guide bar and saw chain, cause the
chain to dull quickly and increase the chance of kickback. Fast
cutting can be obtained only when all cutters are uniform.
1. Tighten the chain tension so that the saw chain is taut and does
not wobble. Refer to Adjusting the Chain Tension.
• Always file the saw chain at the midpoint of the guide bar.
2
. U
se a round file and file holder (tools not included) to sharpen
the top plate and side plate of each cutter.
• Use a 5/32 inch (4 mm) diameter file.
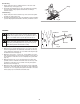
• Keep the file level with the top plate of the cutter (Fig. 39). Do
not let the file dip or rock. Use light, but firm pressure.
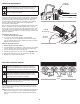
• File toward the front corner of the cutter (Fig. 40). Lift the file
away from the cutter at the end of the forward stroke. Only
f
ile
on the forward stroke.
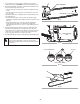
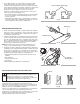
• Apply a few firm strokes to each tooth. When filed correctly,
the top plate will be at a 30º angle and the side plate will be at
an 80º angle (Fig. 41). Using the correct file and file holder will
automatically produce the correct angles.
• File all the left-hand cutters in one direction (Fig. 40). Then
move to the other side of the saw chain and file all of the right-
hand cu
tters
in the opposite direction (Fig. 40).
• Occasionally remove filings with a wire brush.
WARNING:
The saw chain is very sharp. Always wear
heavy-duty protective gloves when handling or performing
maintenance on the saw chain.
CAUTION:
A dull or improperly sharpened saw chain
can cause excessive motor speed during operation, which
can result in severe motor damage.
WARNING:
An improperly sharpened saw chain
increases the chance of kickback. Failure to replace or
properly maintain the saw chain can cause serious injury.
Fig. 39
Depth Gauge
Top Plate
Fig. 40
Filing Angle
Fig. 41
Correct Filing Angles
Top Plate
Fig. 42
Depth Gauge Jointer
Flat File
Side Plate
Depth Gauge Clearance
1/32 inch (0.6 mm)
Right-Hand
Cutters
Left-Hand
Cutters
Side Plate
80º
30º