
User Manual


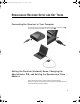
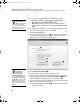
Table Of Contents
- Contents
- Free Online Training
- Support by Phone and Web
- What You Received
- Renaissance Receiver Setup and Key Tasks
- Using the Responders
- MathFacts in a Flash Practice on Responders
- Software-the 2Know! Toolbar
- Install the Toolbar
- Start the 2Know! Toolbar and Get Ready for the Session
- Start the Session
- Ask the Questions
- Use the Graph
- Ask Pulse Questions
- Use the Teacher Responder Feature
- Choose a Different Theme and/or Change the Size of the Toolbar
- Get Software Updates
- View 2Know! Toolbar Instructions while Using the Toolbar
- View the Toolbar Version and Other Information
- Tips for Using the 2Know! Toolbar in a Classroom
- Software-AccelTest Key Tasks
- Software-Accelerated Math RP
- Frequently Asked Questions
- Limited Warranty

R ENAISSANCE RECEIVER SETUP AND KEY TASKS
Setting the Receiver (Network) Name, Changing the Administrator PIN, and Setting the Renaissance Place Address
10
1. At your computer, start the Renaissance Wireless Server Utility:
• Windows: Click StartProgramsRenaissance Wireless
ServerRenaissance Wireless Server Utility.
• Macintosh: Open the Applications folder, then the Renaissance
Wireless Server folder. Double-click Renaissance Wireless Server
Utility.
2. Type 1234 and click OK to log in. (1234 is the default Administrator PIN
here and for Responders.) If necessary, click Start.
3. Click the Server Settings tab.
4. Change the Network (Receiver) name
A from “Renaissance Receiver” to
a name your Responder users will recognize. Make sure the name is
different from the name of other Receivers you own.
5. Click Update Network Settings
B.
6. Click OK. Tell your Responder users the Receiver name.
7. If you want to change the Administrator PIN used for this utility and for
setting changes on Responders, click Set Administrator PIN
C. Enter a
new PIN (4–8 characters with letters and/or numbers). Click OK.
8. If you want students to send their MathFacts in a Flash practice results to
MathFacts in a Flash RP, do the following:
a. Click Renaissance Place Settings D. (See the tip to the left if you
don’t have the button.)
The Renaissance
Wireless Server
Utility is installed with
AccelTest and the 2Know!
Toolbar. It is also installed with
NEO Manager if you are using
that program with NEOs.
A
B
C
D
The Renaissance
Place Settings
button is only
available if you have
installed NEO Manager. If
you don’t have the button, go
to www.renlearn.com/neo/
downloads to download NEO
Manager for your operating
system. Double-click the file
that you download to begin
installing.
2KnowResourceGuide.fm Page 10 Tuesday, June 15, 2010 11:40 AM