
Data Sheet


Intended use
The product is intended for displaying the indoor / outside temperature as well as the time. In addition, there
is an integrated alarm function (with snooze mode).
By observing the trend for the atmospheric pressure over the past few hours, a weather forecast for the next
12 to 24 hours is calculated and presented on the display using symbols.
The package contents also include a sensor for measuring the soil moisture and soil temperature, these
readings are then transmitted to the base station via radio; this sensor can be used to monitor an indoor
plant, for example.
Power is supplied by batteries.
Always observe the safety instructions and all other information included in these operating instructions.
This product complies with the applicable National and European requirements. All names of companies and
products are the trademarks of the respective owner. All rights reserved.
Package Contents
• Weather station
• Soil sensor:
• 1 x button cell (type CR2450) for the soil sensor
• Operating Instructions
Safety Instructions
The warranty will be void in the event of damage caused by failure to observe these safety
instructions! We do not assume liability for any resulting damage.
We do not assume any liability for material and personal damage caused by improper use
or non-compliance with the safety instructions. In such cases, the warranty will be null
and void.
• The unauthorised conversion and/or modifi cation of the product is not permitted for safety and
approval reasons (CE). Never dismantle the product.
• The product is not a toy and must be kept out of the reach of children. It should be operated
out of the reach of children.
• The weather station is only intended for use in dry, closed interiors, it must not get damp or
wet.
The soil sensor may be used both indoors and outdoors. The soil sensor‘s tip may be used in
damp conditions or under water (e.g. in the soil around a plant), but not the sensor head with
the integrated display and the battery!
• Do not leave packaging material carelessly lying around since it could become a dangerous
plaything for children.
Handle the product with care, it can be damaged by impacts, blows, or accidental drops, even
from a low height.
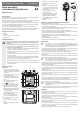
Controls
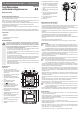
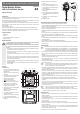
a) Weather station
1 2 3 4 5
6
7
8
9
10 11 12
13
1 “CH” button to switch between multiple soil
sensors and to start or stop a search for avail-
able soil sensors
2 “WATER AL” button for turning the watering
alarm on/off
3 The “SNOOZE” button to interrupt the alarm
signal and activate the snooze mode
4 “MAX/MIN” button to display the
maximum / minimum values
5 “
” button for the alarm function
6 Display area for weather forecast and trend
indicator (arrow icon to the upper left)
7 Display area for soil moisture, information
on watering and channel number
8 Display area for indoor / outside temperature
and channel number
9 Display area for soil temperature (“SOIL”),
time and alarm time
10 “+CF” button to switch between °C / °F or for
setting (increase value)
11 “CLOCK” button to activate the clock setting
12 “-” button for setting (decrease value)
13 Battery compartment for two batteries of type
AA/mignon
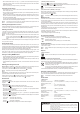
14 Battery compartment for one battery type
CR2032
15 Knob for setting the transmission channel
16 “TX C/F” button to switch between °C/°F or for
manual transmission of readings (when tuning
the weather station)
17 LED for indicating data transmission (LED
fl ashes briefl y)
18 LCD for displaying the air and soil temperature
for the selected transmission channel and the
soil moisture
19 “AL ON/OFF” button for turning the watering
alarm on/off
20 Measurement probe
General information on batteries/rechargeable batteries
• Batteries/rechargeable batteries must be kept out of the reach of children.
• Do not leave batteries/rechargeable batteries lying around; they could be swallowed by children or pets. If
swallowed, consult a doctor immediately.
• Leaking, or damaged batteries/rechargeable batteries, in contact with the skin can cause acid burns,
therefore, use suitable protective gloves.
• Batteries/rechargeable batteries must not be short-circuited, opened or thrown into a fi re. There is a risk of
explosion!
• Do not recharge normal, non-rechargeable batteries, risk of explosion! Only charge rechargeable batteries
that are intended for this purpose; use a suitable battery charger.
• Never mix standard batteries with rechargeable batteries, use either standard batteries or rechargeable
batteries.
• Do not mix batteries/rechargeable batteries with different charge levels (e. g. full and half-full batteries/
rechargeable batteries).
• Always replace the complete set of batteries/rechargeable batteries.
• Check that the polarity is correct, when inserting the batteries/rechargeable batteries (pay attention to
plus/+ and minus/-).
Getting Started
☞
The weather station may also be powered with rechargeable batteries. However, the lower volt-
age provided by rechargeable batteries (non-rechargeable battery = 1.5 V, rechargeable battery
= 1.2 V) and the lower capacity leads to a shorter operating time. For this reason, we recommend
the product be only used with high-quality alkaline batteries to ensure a long and safe operation.
• Open the battery compartment (13) on the back of the weather station and insert two AA batteries
(Mignon), while paying attention to the correct polarity (plus/+ and minus/-). Close the battery compart-
ment again.
• All display segments will appear briefl y, the weather station then emits a beep. At the top left of the screen,
the icon for the weather forecast starts to fl ash.
• Set the current weather using the „+CF“ (10) and „-“ (12) buttons. This helps to ensure the precise working
of the weather forecast station.
• Wait until the weather forecast icon stops fl ashing and the sensor starts searching for the soil sensors (the
soil sensor indicators fl ash).
☞
You can stop the setting of the weather forecast station prematurely by using the “CLOCK” but-
ton; however, if you do so, the sensor search must be started manually by pressing the “CH” (1)
button for about 3 seconds, so soil sensor indicators fl ash.
• Insert a button cell of the type CR2450 in the soil sensor‘s battery compartment (14). This may have been
done by the manufacturer; if so, remove the plastic strip from the battery compartment (it prevents the
premature discharge of the battery).
• If more than one soil sensor is used (one is included in the delivery, additional ones can be ordered as
accessories); a separate transmission channel must be assigned to each of the sensors. You will fi nd a
knob (15) for this purpose in the battery compartment (14). The current transmission channel appears on
the soil sensor display (e.g. “CH1”).
• While the sensor search is active in the weather station (sensor indicators fl ash), hold the “TX C/F” (16)
button pressed (about 3 seconds) until the LED (17) above the soil sensor indicator fl ashes briefl y.
The weather station now recognises the soil sensor and displays the channel number and the correspond-
ing readings.
If more than one soil sensor is used, proceed as described above (set the transmission channel, insert
battery, hold the “TX C/F” button pressed for about 3 seconds).
• The sensor search stops automatically after a few minutes (if it is to be ended prematurely, press the “CH”
(1) button for about 3 seconds).
☞
If desired, a new sensor search can be started by pressing the “CH” (1) button for about 3
seconds until the soil sensor indicators in the weather station‘s display start to fl ash.
• Before you close the soil sensor‘s battery compartment, select the temperature unit, °C (degrees Celsius)
or °F (degrees Fahrenheit) ,by pressing the “TX C/F” (16) button briefl y.
Setting the time
• Stop any sensor search running (hold down the “CH” (1) button for 3 seconds), so there are no indicators
fl ashing on the display.
• Press and hold the “CLOCK” (11) button (about 3 seconds) until the weather station emits a beep and the
hours of the time start to fl ash.
• Set the hours using the “+CF” (10) or “-” (12) buttons. For a quick adjustment hold the corresponding but-
ton for a while longer.
• Briefl y press the “CLOCK” (11) button, the minutes of the time then fl ash.
• Set the minutes using the “+CF” (10) or “-” (12) buttons. For a quick adjustment hold the corresponding
button for a while longer.
• Press the “CLOCK” (11) button briefl y, until “24 h” or “12 h” fl ashes on the display. Select between the the
24h and 12h mode, using the “+ CF” (10) or “-” (12) buttons. In the 12h mode, “PM” will appear in front of
the time during the second half of the day.
• Briefl y press the “CLOCK” (11) button, the weather forecast icon fl ashes.
OPERATING INSTRUCTIONS www.conrad.com
Radio Weather Station
with soil moisture sensor
Item no. 67 27 01
Version 06/12
14
15
16
19
20
17
18