
User guide


CSPC7501R-2:1
10
Setting up the debugger system
IAR C-SPY Hardware Debugger Systems
User Guide
USB
Use this option if an emulator is connected to your host computer via a USB cable. If
more than one emulator is connected, choose which one to use with the Serial No
option.
LAN
Use this option to debug using a PC7501 Emulator on the same local area network that
your host computer is connected to. The emulator must first be assigned a TCP/IP
address with the Emulator>TCP/IP Setup command, see Emulator menu, page 11.
Log communication
Use this option to log the communication between C-SPY and the target system to a file.
To interpret the result, a detailed knowledge of the communication protocol is required.
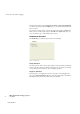
HARDWARE CONFIGURATION
Before C-SPY is started for the first time in a new project, and when you change the
derivative, the hardware must have been set up. If you have not set it up already by
choosing Emulator>Hardware Setup, this dialog box will be displayed when you start
the debugging session.
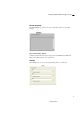
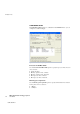
Figure 7: Emulator Hardware Setup message
Click OK to enter the Hardware Setup dialog box. See Hardware Setup, page 12.
When the hardware setup is done and you click OK, the download of the debug file is
started.
If the debug file contains a memory area that is not defined in the hardware setup, several
warnings will be displayed in the Debug Log window.
The hardware setup is saved for each project and does not have to be set more than once.
If you want to change the setup for a project, choose Hardware Setup from the
Emulator menu.
For further details about the Emulator menu, see Emulator menu, page 11.