1. Installation Do not connect the E8A debugger hardware until the software support has been installed. 1. Insert the CD into your computer’s CD-ROM drive. The CD should automatically run the installation program. If the installer does not start, browse to the RSK directory from the CD root folder and double click on ‘setup.exe’. 2. The installer will ask you which language is to be used, please choose the appropriate one. 3. On the first screen of the installer proper, click . 4.
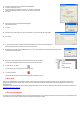
29. Select the correct device type (e.g. H8/36079F for RSKH836079). 30. Select “Erase Flash and Connect”. 31. Select “Power target from Emulator” and select “5V” if the E8A is to provide the power to the RSK board. Otherwise connect a 5V centre positive power supply. 32. Click . 33. The first time the E8A is used the ‘E8AH8’ dialog appears: Otherwise skip to step 37. 34. Click . 35. Select “Renesas E-Series USB Driver”. Select “USB interface”. The channel number will not be needed. 36.
7. Support Online technical support and information is available at: www.renesas.com/renesas_starter_kits Technical Contact Details America: techsupport.rta@renesas.com tools.support.eu@renesas.com Europe: csc@renesas.com Japan: Note on Autoupdate: The Autoupdater is configured to automatically add itself to the Startup folder in the Windows Start Menu and use the registry defaults for access to the web. After restarting the machine the Icon will appear in the System Tray next to the clock.