To our customers, Old Company Name in Catalogs and Other Documents On April 1st, 2010, NEC Electronics Corporation merged with Renesas Technology Corporation, and Renesas Electronics Corporation took over all the business of both companies. Therefore, although the old company name remains in this document, it is a valid Renesas Electronics document. We appreciate your understanding. Renesas Electronics website: http://www.renesas.
Notice 1. 2. 3. 4. 5. 6. 7. All information included in this document is current as of the date this document is issued. Such information, however, is subject to change without any prior notice. Before purchasing or using any Renesas Electronics products listed herein, please confirm the latest product information with a Renesas Electronics sales office.
User’s Manual Renesas Starter Kit 2+ for SH/7670 μClinux-Setup Guide RENESAS SINGLE-CHIP MICROCOMPUTER SuperH™RISC engine Rev.1.00 2008.
µClinux-SH7670 Setup Guide 2 Contents Contents ....................................................................................................................................................................................... 2 Programming the SH7670 Flash Memory ................................................................................................................................... 3 Starting HEW ..............................................................................................
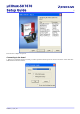
µClinux-SH7670 Setup Guide Programming the RSK2+SH7670 Flash Memory It is assumed that; • The user has a Renesas E10A in-circuit debugger. • RSK2+SH7670 development board & supplied PSU. Use the accompanying RSK Quick Start Guide to install the HEW High-performance Embedded Workbench software. Starting HEW Create a Workspace 1. Open HEW, and click on File -> New Workspace to get started and connect to the board. Select the RSK2+SH7670 option, and provide a Workspace name.
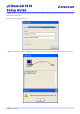
µClinux-SH7670 Setup Guide Select the Sample Code option, Click Next when you are ready to continue. Select the SH Linux application. Press Next to continue the setup or Finish to complete the process.
µClinux-SH7670 Setup Guide 5 Press Finish to complete the process. Connecting to the board 1. When a new workspace has been created, you will be presented with the option to connect to the board.
µClinux-SH7670 Setup Guide 6 2. HEW may ask you to connect to the E10A. If there are any problems, usually the best course of action is to disconnect the E10A and then reconnect it. Note: The Channel displayed may vary. 3. HEW will connect to the board. Again follow the on screen prompts, and reset the RSK2+SH7670 board when required.
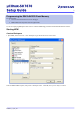
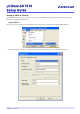
µClinux-SH7670 Setup Guide Setting up HEW for Flashing Once HEW has a workspace set up, it will be necessary to ensure that HEW has the appropriate settings for writing to the flash chips on the RSK2+SH7670 board. Setting FMTool Once connected, you will need to ensure HEW has some settings entered to communicate with the RSK2+SH7670. 1. Choose the “Emulator > System” configuration options from the Setup menu, and check the following settings.
µClinux-SH7670 Setup Guide 8 2. On the “Loading Flash Memory” tab set “Loading flash memory” to enable. This will enable the configuration of the rest of the dialog control. Then set “Erasing flash memory” to enable. This will enable the erasing details to be configured. • These settings are not retained through disconnects of the board, and you will need to check this page every time you reconnect to the RSK2+SH7670 board. • “File name” should point to the chip erase tool “fmtool_MultiBank.mot”.
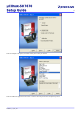
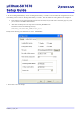
µClinux-SH7670 Setup Guide Setting the board initialisation script 1. Select the “Debug Settings” menu option from the “Debug” menu. 2. Add the binary file that are available for downloading to the board, to the target download section. In the Download Module Dialog, the Format should be set to “Binary” and the Access Size should be set to 4. The sh-uclinux-full binary should be written at address 0x00000000. 3.
µClinux-SH7670 Setup Guide 4. Add the fmtool_rsk.hdc to run “Before download of modules” as shown in the following screenshot. Note: fmtool_rsk.hdc can be found in: $PROJECT_DIR\$PROJECT_NAME\FMTools\ 5. Click “OK” to save the settings.
µClinux-SH7670 Setup Guide 11 Flashing the images to the board Once connected, the image can be downloaded to the board through the debug menu This may take approximately 2 minutes. Once the binary file “sh-uclinux-bin” is programmed to the RSK2+SH7670 board the programming is complete. Click the ‘Disconnect’ icon on HEW debug toolbar, and power down the power supply and remove the programming cable from the RSK2+SH7670 board. Re-apply the power to boot the board and run the demo.
µClinux-SH7670 Setup Guide 12 Running the µClinux Demo on the RSK This chapter details the operation of the µClinux that has just been downloaded. It is assumed that you have the following; • RSK2+SH7670 development board & supplied PSU. • A network connection to a PC (either direct using the supplied crossover cable or via an Ethernet hub) • Renesas USB 128MB Stick k Optional (not supplied) • Serial 9-way cable (for terminal connectivity to the SH device).
µClinux-SH7670 Setup Guide 13 Once Linux has booted the finial stage of initialisation is to execute the rc script (located /etc/rc). When this script is executed the display will change Finally when the Linux load process has completed, the welcome screen is presented to the viewer and the prompt will be displayed on the debug terminal (if connected). At this stage you will be able to cycle through the images on the board using push buttons SW2 & SW3.
µClinux-SH7670 Setup Guide 14 Webserver demonstration on the RSK Now connect the Ethernet cable and follow the guidance below on configuring the PC for correct operation. Configuring the Ethernet interface Ensure that you are logged on with Administrator privileges and that no network cable is connected to your machine. Configure the IP address From the Start menu open the Control Panel. Double-click on the connection that will be used (an example is shown). Double-click on Network Connections.
µClinux-SH7670 Setup Guide 15 When the IP address details have been input, click on OK to close this window and apply the new IP address settings. Web Front End To connect to the web front end, enter the board’s IP address (http://192.168.1.100/) into a Web browser. The home page (shown below) should appear. If it does not then Firewall settings may also need to be changed. Contact an IT Administrator for help.
µClinux-SH7670 Setup Guide 16 Changing Images stored on the Board To view the images that is stored on connected USB Stick to USB Host. • Power down the board. • Alter SW4-1 to ON, SW4-2 to OFF, SW4-3 to ON for correct USB Host operation. • Power on the board. The Web Front End and Slide Show should reflect any changes you have made. • Power down the board.
µClinux-SH7670 Setup Guide 17 With this tool one can convert Windows Bitmap (.BMP) files into a 16-bit RGB format that can be used in conjunction with the “TFT_LCD Display” RSK2+SH7670 sample project. You can simply replace the Image.c file supplied in the sample program with the file generated by bmp2src to change the image. Usage bmp2src File1[.bmp] [File2] The tool takes up to 2 parameters:File1: Filename of the source Windows Bitmap (.BMP) file. File2: Filename given to the output from the program.