To our customers, Old Company Name in Catalogs and Other Documents On April 1st, 2010, NEC Electronics Corporation merged with Renesas Technology Corporation, and Renesas Electronics Corporation took over all the business of both companies. Therefore, although the old company name remains in this document, it is a valid Renesas Electronics document. We appreciate your understanding. Renesas Electronics website: http://www.renesas.
Notice 1. 2. 3. 4. 5. 6. 7. All information included in this document is current as of the date this document is issued. Such information, however, is subject to change without any prior notice. Before purchasing or using any Renesas Electronics products listed herein, please confirm the latest product information with a Renesas Electronics sales office.
Application Notes Renesas E10A-USB Emulator Introductory Guide for SH/Tiny (SH7125) Application Notes Renesas Single-Chip Microcomputer SuperH RISC engine Family SH/Tiny Series www.renesas-electoronics.com Rev.1.00 2007.
Renesas E10A-USB Emulator Introductory Guide for SH/Tiny (SH7125) Renesas E10A-USB Emulator Introductory Guide for SH/Tiny (SH7125) Introduction Notes Renesas Technology Corp. (hereafter referred to as Renesas) reserves the right to change, wholly or partially, the specifications, design, user's manual, and other documentation at any time without notice. This documentation and emulator product are copyrighted and all rights are reserved by Renesas.
Renesas E10A-USB Emulator Introductory Guide for SH/Tiny (SH7125) Contents 1. Overview ........................................................................................................................................... 3 2. Components and Environment ......................................................................................................... 4 3. Product Specifications...................................................................................................................
Renesas E10A-USB Emulator Introductory Guide for SH/Tiny (SH7125) 1. Overview This introductory guide (application note) is intended for first-time users of the E10A-USB emulator. It provides simple descriptions regarding the E10A-USB emulator to help the user easily follow a straight path from unpacking of the emulator to running and stopping of a program without getting lost on the way. The operating procedures are described in sections 4 through 6.
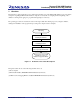
Renesas E10A-USB Emulator Introductory Guide for SH/Tiny (SH7125) 2. Components and Environment This section shows the components of the E10A-USB emulator and the SH7125 series debugging MCU board. Unpack the E10A-USB emulator and MCU board packages and check the components against the component lists. 2.1 Components (1) Table 2.1 is a list of the E10A-USB emulator components. Table 2.
Renesas E10A-USB Emulator Introductory Guide for SH/Tiny (SH7125) (2) Table 2.2 is a list of the components of the SH7125 series debugging MCU board. In the product package as shipped, the main unit of the debugging MCU board is connected to the user system interface board with flexible flat cables (FFC). Do not detach the boards from each other. Table 2.
Renesas E10A-USB Emulator Introductory Guide for SH/Tiny (SH7125) Table 2.2 Components of the SH7125 Series Debugging MCU Board (cont) ClassiComponent fication Hardware Guide pins 2.2 Appearance Quantity 2 or 3 Screwdriver 1 User’s manual 1 Remarks *The quantity will differ according to the supported device. Two guide pins are provided for the SH7125 (PLQP0064KB-A) and SH7124 (PLQP0048JA-A), and three are provided for the SH7125 (PRQP0064GB-A).
Renesas E10A-USB Emulator Introductory Guide for SH/Tiny (SH7125) debugging anywhere indoors or out with the E10A-USB emulator. The host computer for controlling the debugging MCU board must be an IBM PC compatible machine with USB 1.1/2.0 (Full-Speed). This guide describes the operation of the E10A-USB emulator when connected to the single-unit SH7125 series debugging MCU board. 2.
Renesas E10A-USB Emulator Introductory Guide for SH/Tiny (SH7125) 3. 3.1 Product Specifications High-performance Embedded Workshop The High-performance Embedded Workshop integrates software development tools, such as the C compiler, assembler, emulator software, and editor, into a common graphical user interface (GUI) to make software development more efficient. 3.
Renesas E10A-USB Emulator Introductory Guide for SH/Tiny (SH7125) 4. Installing the Software 4.1 4.1.1 Installing the Provided Software Before Starting Installation (1) Do not connect the E10A-USB emulator to the host computer before the provided software is installed. ⎯ Installing the provided software transfers the E10A-USB emulator driver to the host computer, and the new hardware detection processing will automatically start.
Renesas E10A-USB Emulator Introductory Guide for SH/Tiny (SH7125) (3) The [E10A-USB Emulator Software] installation starts as the first component in the full-screen mode. Figure 4.2 Starting the E10A-USB Emulator Software Installation (4) The [Welcome to the InstallShield Wizard for E10A-USB Emulator Software] dialog box will appear. Click the [Next] button. Figure 4.3 Dialog Box for Starting the E10A-USB Emulator Software Installation REJ06J0007-0100/Rev.1.
Renesas E10A-USB Emulator Introductory Guide for SH/Tiny (SH7125) (5) The [License Agreement] dialog box will appear. Read the contents and click the [Yes] button. Figure 4.4 License Agreement for the E10A-USB Emulator Software (6) The [Choose Destination Location] dialog box will appear. To change [Installation folder], click the [Browse…] button and select the target folder. Check [Installation folder], and click the [Next] button. This guide shows an example of using the default installation folder.
Renesas E10A-USB Emulator Introductory Guide for SH/Tiny (SH7125) (7) The [Start Copying Files] dialog box will appear. Click the [Next] button. Figure 4.6 High-performance Embedded Workshop Components to Be Installed (8) The following progress bar will be displayed while the program files are being copied. Figure 4.7 Progress Bar for Software Installation (9) The [InstallShield Wizard Complete] dialog box will appear. Click the [Finish] button. Figure 4.
Renesas E10A-USB Emulator Introductory Guide for SH/Tiny (SH7125) (10) Next, installation of the E10A-USB emulator component will start. The [Select Device Group] will appear. Select the [Super H RISC engine family] radio button and click [Next]. Figure 4.9 Selecting Device Group (11) For the SH7125 series described in this guide, select [SH-2 Device Group] and click the [Next] button. Figure 4.10 Selecting the SuperH Device Group REJ06J0007-0100/Rev.1.
Renesas E10A-USB Emulator Introductory Guide for SH/Tiny (SH7125) (12) The [Start Copying Files] dialog box will appear. Click the [Next] button. Figure 4.11 Starting Copying of the E10A-USB Emulator Component (13) The following progress bar will be displayed while the program files are being copied. Figure 4.12 Progress Bar for E10A-USB Emulator Program Copying (14) The [InstallShield Wizard Complete] dialog box will appear. Click the [Finish] button. Figure 4.
Renesas E10A-USB Emulator Introductory Guide for SH/Tiny (SH7125) (15) Next, installation of the AutoUpdate will start. The [Configure AutoUpdate] dialog box will appear. Select the desired update detection frequency from the [Scheduling] menu and click the [OK] button. Figure 4.14 Configure AutoUpdate Dialog Box (16) The [Welcome to the AutoUpdate Wizard] dialog box will appear. Click the [Next] button. Figure 4.15 Starting AutoUpdate Installation REJ06J0007-0100/Rev.1.
Renesas E10A-USB Emulator Introductory Guide for SH/Tiny (SH7125) (17) The [Looking for Updates] dialog box will appear. Click the [Next] button. Figure 4.16 Starting AutoUpdate Installation This figure shows an example where the host computer is not connected to the Internet. (18) The dialog box for finishing the AutoUpdate installation will appear. Click the [Finish] button. Figure 4.17 Finishing AutoUpdate Installation Installation from the CD-ROM is completed through these steps. REJ06J0007-0100/Rev.
Renesas E10A-USB Emulator Introductory Guide for SH/Tiny (SH7125) 5. Installing the Driver Before connecting the main unit of the E10A-USB emulator to the host computer, be sure to check that the supplied software is installed in the computer. Installing the provided software transfers the E10A-USB emulator driver to the host computer, and the new hardware detection processing will automatically start. 5.
Renesas E10A-USB Emulator Introductory Guide for SH/Tiny (SH7125) (4) Windows® automatically detects and installs the driver. Figure 5.3 Dialog Box Shown during Driver Installation Note: When a driver is installed in Windows® XP, a warning message from the Windows® logo test may be displayed, but this is not a problem. Select [Continue Anyway] to proceed with driver installation. (5) The [Completing the Found New Hardware Wizard] dialog box will appear. Click the [Finish] button. Figure 5.
Renesas E10A-USB Emulator Introductory Guide for SH/Tiny (SH7125) 6. Let's Try Using the E10A-USB Emulator This section describes the basic usage of the E10A-USB emulator with regard to the sample program in the supplied CD-ROM. 6.1 Before Starting 6.1.1 Checking the Software This example uses the High-performance Embedded Workshop and the E10A-USB emulator software supplied with the emulator. Be sure to check that the software is installed in the computer before using the emulator.
Renesas E10A-USB Emulator Introductory Guide for SH/Tiny (SH7125) 6.1.3 Setting MCU Board Switches (1) Setting the Power-Selection Switch Set switch SW1 to the [EXTERNAL] label side (in the direction of the red arrow in figure 6.2). Be sure to connect the power cable to the MCU board and supply 5-VDC power from the external power source unit. Figure 6.2 Power-Selection Switch (SW1) on the MCU Board (2) Setting the User-System Input Signal Enabling/Disabling Switches Set the switch marked as [UCON] (no.
Renesas E10A-USB Emulator Introductory Guide for SH/Tiny (SH7125) 6.2 6.2.1 Activating the High-performance Embedded Workshop Activating the High-performance Embedded Workshop Activate the High-performance Embedded Workshop by opening the [Start] menu and selecting [All Programs], [Renesas], [High-performance Embedded Workshop], and [High-performance Embedded Workshop] in that order. Figure 6.
Renesas E10A-USB Emulator Introductory Guide for SH/Tiny (SH7125) 6.3.1 E10A-USB Setup Before the E10A-USB emulator is used for the first time, the E10A-USB emulator firmware should be set up using the setup tool through the following steps. (1) Connect the E10A-USB emulator to the host computer through the USB cable. When the emulator is connected for the first time, the driver should be installed; follow the wizard for adding hardware as described in section 5, Installing the Driver.
Renesas E10A-USB Emulator Introductory Guide for SH/Tiny (SH7125) (4) After the tool for setting up the E10A-USB emulator (E1setup.exe) is activated, the following dialog box will appear. (a) (b) (c) Figure 6.8 E10A-USB Setup Tool (a) Device group of the emulator firmware: (b) Version number of the emulator firmware: (c) Version number of the setup program: Name of the device group currently set. Version number of the control software installed in the E10AUSB emulator.
Renesas E10A-USB Emulator Introductory Guide for SH/Tiny (SH7125) (6) The following progress bar will be displayed while the E10A-USB emulator firmware is being written. Figure 6.10 Starting Setup Note: Do not turn off the host computer or disconnect the USB cable while setting up the E10A-USB emulator; if such an attempt is made, the E10A-USB emulator may be damaged. (7) The following dialog box will appear when E10A-USB emulator has been successfully completed. Click the [OK] button. Figure 6.
Renesas E10A-USB Emulator Introductory Guide for SH/Tiny (SH7125) 6.3.2 Opening a Workspace (1) The [Welcome!] dialog box will appear on the High-performance Embedded Workshop screen. Figure 6.13 Startup Screen of the High-Performance Embedded Workshop Select the [Browse to another project workspace] radio button in the [Welcome!] dialog box and click the [OK] button. Figure 6.14 Selecting the Workspace Processing REJ06J0007-0100/Rev.1.
Renesas E10A-USB Emulator Introductory Guide for SH/Tiny (SH7125) (2) The [Open Workspace] dialog box will appear. Figure 6.15 Selecting a Workspace File When the software from the CD-ROM of this product has been installed, workspace "Tutorial.hws" is stored in the folder structure shown below (standard location). Specify the correct location by opening the folders in order. Select the workspace "Tutorial.hws" and click the [Select] button.
Renesas E10A-USB Emulator Introductory Guide for SH/Tiny (SH7125) (4) If the directory information of the workspace differs from the current directory, a dialog box will prompt you to confirm the current directory. Click the [Yes] button. Figure 6.18 Dialog Box for Confirming Current Workspace Directory 6.3.3 Connecting the E10A-USB Emulator (1) The [Select Emulator mode] dialog box will appear. Figure 6.
Renesas E10A-USB Emulator Introductory Guide for SH/Tiny (SH7125) (3) When the E10A-USB emulator is connected for the first time, the [Driver Details] dialog box will appear. Select [Renesas E-Series USB Driver], and [USB interface] and the unique channel number for the host computer will be automatically displayed. Check the contents of [Details] and click the [Close] button. Figure 6.
Renesas E10A-USB Emulator Introductory Guide for SH/Tiny (SH7125) (5) The [System Clock] dialog box will appear. Enter the oscillating frequency of the crystal resonator installed on the MCU board and click the [OK] button. In this example, a 12-MHz crystal resonator is used, so "12.00" (12.00 MHz) is entered. Figure 6.24 Specifying Operating Frequency (6) The [ID Code] dialog box will appear. Enter "E10A" here and click the [OK] button. Figure 6.
Renesas E10A-USB Emulator Introductory Guide for SH/Tiny (SH7125) (8) [Connected] is displayed in the [Debug] tab and the E10A-USB emulator is now operative. Figure 6.27 Message Shown when E10A-USB Emulator Connection is Established 6.3.4 Loading a Sample Program (1) Select [Download Modules] form the [Debug] menu to load the sample program. Figure 6.28 Downloading the Sample Program REJ06J0007-0100/Rev.1.
Renesas E10A-USB Emulator Introductory Guide for SH/Tiny (SH7125) (2) Select the file "Tutorial.abs" registered in the workspace. Figure 6.29 Selecting the Sample Program File 6.3.5 Opening a Source File (1) Double-click the source file name "tutorial.cpp" in the workspace to open the source code. Figure 6.30 Opening a Source File REJ06J0007-0100/Rev.1.
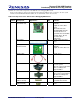
Renesas E10A-USB Emulator Introductory Guide for SH/Tiny (SH7125) 6.3.6 Setting a Breakpoint (1) Scroll the source code display to show line 48 by using the scroll bar. Double-click line 48 Figure 6.31 Setting a Hardware Break Here, double-click the [Event] column on line 48 to set a break condition. A blue dot indicates that a break condition has been set. To clear a break condition previously set, double-click the blue dot.
Renesas E10A-USB Emulator Introductory Guide for SH/Tiny (SH7125) 6.3.7 Executing a Program (1) Select [Reset Go] from the [Debug] menu to execute a program. Figure 6.32 Executing a Program after a Reset 6.3.8 Break Occurrence (1) When a break condition is satisfied, the source window shows the program stop position. Figure 6.33 Screen Showing Break Condition Satisfaction The yellow arrow points to the program counter location and the corresponding source line is highlighted in yellow.
Renesas E10A-USB Emulator Introductory Guide for SH/Tiny (SH7125) 6.3.9 Viewing Trace Information (1) The following describes an example of viewing trace information. Select [Code] and [Trace], in that order, from the [View] menu. Figure 6.34 Opening the Trace Window REJ06J0007-0100/Rev.1.
Renesas E10A-USB Emulator Introductory Guide for SH/Tiny (SH7125) (2) The Trace window displays the trace information recorded during program execution. Trace window Figure 6.35 Trace Window Display Through analysis of the trace information, the cause of the target event or the program execution path can be found, which makes debugging more efficient. The trace functions and the trace information to be displayed depend on the target device.
Renesas E10A-USB Emulator Introductory Guide for SH/Tiny (SH7125) 7. 7.1 Limitations Limitations on Free Evaluation-Version C Compiler 1) The free evaluation-version compiler has no limitations in usage for 60 days after it is used for compilation for the first time. 2) From the 61st day on, the linkage size is limited to within 256 kbytes. 7.2 Limitations on Emulator Software There are two types of documents related to the E10A-USB emulator: common documents and additional documents.
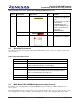
Renesas E10A-USB Emulator Introductory Guide for SH/Tiny (SH7125) 7.3 Memory Map Figure 7.1 shows the memory map of the 128-kbyte flash memory-version SH7125 or SH7124 in mode 3 (single-chip mode). In the 64-kbyte flash memory version, the on-chip ROM is allocated at addresses H'0 to H'FFFF. Figure 7.1 Memory Map of the SH7125 or SH7124 (128-kbyte Flash Memory Version) REJ06J0007-0100/Rev.1.
Renesas E10A-USB Emulator Introductory Guide for SH/Tiny (SH7125) 8. 8.1 Frequently Asked Questions A communication error has occurred at startup. If a communication error has occurred at startup, confirm the following. 1) The USB cable and user system interface cable are correctly connected. 2) The power is supplied to the MCU board from an external power source. 3) "SH7125_Debug_MCU_BOARD" was selected for [Select Emulator mode] when the E10A-USB emulator was connected.
Renesas E10A-USB Emulator Introductory Guide for SH/Tiny (SH7125) 9. Related Documents The E10A-USB emulator and High-performance Embedded Workshop provide many other useful functions not mentioned in this document. Please refer to the following related documents for important information such as detailed specifications, technical information, or restrictions.
Renesas E10A-USB Emulator Introductory Guide for SH/Tiny (SH7125) 10. For More Information Access the following addresses for information on this product. Ask technical questions about the E10A-USB emulator through the following e-mail addresses. USA: techsupport.rta@renesas.com Europe: tools.support.eu@renesas.com Japan: csc@renesas.com Information on the E10A-USB emulator is available at the following Renesas websites: http://www.renesas.com/e10a_usb (Global site) http://japan.renesas.
Renesas E10A-USB Emulator Introductory Guide for SH/Tiny (SH7125) Revision Record Rev. 1.00 Date Feb.15.07 REJ06J0007-0100/Rev.1.
Renesas E10A-USB Emulator Introductory Guide for SH/Tiny (SH7125) Notes regarding these materials 1. This document is provided for reference purposes only so that Renesas customers may select the appropriate Renesas products for their use.
Renesas E10A-USB Emulator Introductory Guide for SH/Tiny (SH7125) 9. You should use the products described herein within the range specified by Renesas, especially with respect to the maximum rating, operating supply voltage range, movement power voltage range, heat radiation characteristics, installation and other product characteristics. Renesas shall have no liability for malfunctions or damages arising out of the use of Renesas products beyond such specified ranges. 10.
Renesas E10A-USB Emulator Introductory Guide for SH/Tiny (SH7125) Publication Date: Feb. 07, 2007 Rev.1.00 Sales Strategic Planning Div. Published by: Edited by: Renesas Technology Corp. Microcomputer Tool Development Department Renesas Solutions Corp. © 2007. Renesas Technology Corp. and Renesas Solutions Corp., All rights reserved. Printed in Japan.
Renesas E10A-USB Emulator Introductory Guide for SH/Tiny (SH7125) Application Notes 1753, Shimonumabe, Nakahara-ku, Kawasaki-shi, Kanagawa 211-8668 Japan REJ06J0007-0100