D Bedienungsanleitung renkCast Musik Best.-Nr. 1397145 Seite 2 - 16 G Operating Instructions renkCast Musik Item No. 1397145 Page 17 - 31 F Mode d’emploi renkCast Musik N° de commande 1397145 Page 32 - 46 O Gebruiksaanwijzing renkCast Musik Bestelnr.
Inhaltsverzeichnis D Seite 1. Einführung...............................................................................................................................3 2. Symbol-Erklärung..................................................................................................................4 3. Bestimmungsgemäße Verwendung...................................................................................4 4. Lieferumfang...........................................................................
1. Einführung Sehr geehrte Kundin, sehr geehrter Kunde, wir bedanken uns für den Kauf dieses Produkts. Dieses Produkt entspricht den gesetzlichen, nationalen und europäischen Anforderungen. Um diesen Zustand zu erhalten und einen gefahrlosen Betrieb sicherzustellen, müssen Sie als Anwender diese Bedienungsanleitung beachten! Diese Bedienungsanleitung gehört zu diesem Produkt. Sie enthält wichtige Hinweise zur Inbetriebnahme und Handhabung.
2. Symbol-Erklärung Das Symbol mit dem Blitz im Dreieck wird verwendet, wenn Gefahr für Ihre Gesundheit besteht, z.B. durch einen elektrischen Schlag. Das Symbol mit dem Ausrufezeichen im Dreieck weist auf wichtige Hinweise in dieser Bedienungsanleitung hin, die unbedingt zu beachten sind. Das Pfeil-Symbol ist zu finden, wenn Ihnen besondere Tipps und Hinweise zur Bedienung gegeben werden sollen. 3.
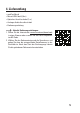
4. Lieferumfang • renkCast Musik • Micro-USB-Kabel (0,6 m) • Optisches Anschlusskabel (1 m) • Analoges Audio-Anschlusskabel • Bedienungsanleitung Aktuelle Bedienungsanleitungen: 1. Öffnen Sie die Internetseite www.conrad.com/downloads in einem Browser oder scannen Sie den rechts abgebildeten QR-Code. 2. Wählen Sie den Dokumententyp und die Sprache aus und geben Sie dann die entsprechende Bestellnummer in das Suchfeld ein. Nach dem Start des Suchvorgangs können Sie die gefundenen Dokumente herunterladen.
5.
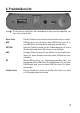
6. Produktübersicht Die Anschlüsse und Taster sind nachfolgend, in Bezug auf das obige Bild, von links nach rechts erklärt Reset-Taste Um das Produkt in den Auslieferungszustand zurück zu setzen USB USB-Anschluss zum Anschluss eines USB-Geräts, wie z.B. einem USB-Stick, von dem Musik abgespielt werden kann OPTICAL Optischer Digital-Ausgang, um das Produkt digital an z.B. einem Soundsystem oder einem AV-Receiver anzuschließen AUX Analoger Audio-Ausgang (3,5 mm Klinke), um das Produkt analog an z.B.
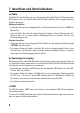
7. Anschluss und Inbetriebnahme a) Audio Schließen Sie das Produkt zuerst an das gewünschte Audio-Gerät (z.B. Soundsystem, AV-Receiver, usw.) an. Hierbei haben Sie die Wahl zwischen dem analogen und dem digitalen Ausgang. Analoger Anschluss: • Verbinden Sie dazu das beiliegende 3,5 mm Klinkenkabel mit der Buchse „AUX“ der Musik Box. • Jetzt schließen Sie noch das andere Ende des Kabels an Ihrem Soundsystem, AVReceiver oder z.B.
8. Installation der EZCast App a) AndroidTM und iOS Nutzer • Öffnen Sie auf Ihrem Smartphone oder Tablet den jeweiligen App-Store. Bei AndroidTM ist das z.B. der „Google Play-Store“. Falls Sie ein iPhone, iPad oder einen iPod Touch verwenden, öffnen Sie den „iTunes Store“ von Apple. • Suchen Sie nach der App „EZCast“ und installieren Sie diese. • Alternativ scannen Sie einfach den entsprechenden QR-Code.
Wenn hierbei eine Abfrage z.B. von der Windows®-Benutzerkontensteuerung erscheint, bestätigen Sie diese mit Ja. Gegebenenfalls müssen Sie auch, falls eine entsprechende Abfrage erscheint, die Software in Ihrer Firewall zulassen. Beachten Sie zur Kompatibilität die Systemvoraussetzungen in den technischen Daten dieser Anleitung und in der Beschreibung des jeweiligen Downloads. Zusätzlich können Sie auf der Webseite die englische original Anleitung der Software sowie diverse YouTube-Videos aufrufen.
b) Verbindung zum Internet herstellen • Es kann sein, dass beim ersten Start der App und beim ersten tippen auf den Button mit der Lupe automatisch das Setup für die WLAN-Einrichtung gestartet wird. Sollte dies nicht der Fall sein, tippen Sie unten in der Mitte im Hauptmenü zuerst auf den Button „AirSetup“ und auf der nächsten Seite auf „Internet“. • Wählen Sie Ihr WLAN-Netzwerk aus und geben Sie das Passwort ein und bestätigen Sie mit „OK“.
d) Ändern der SSID und des Passworts Ein weiterer wichtiger Punkt ist das Ändern des WLAN-Passworts der Box. • Tippen Sie wieder unten in der Mitte im Hauptmenü auf den Button „AirSetup“. • Wenn das Kennwort noch nicht geändert wurde, wird hinter dem Feld Kennwort das Standardpasswort „00000000“ angezeigt. • Tippen Sie darauf und geben Sie ein neues Kennwort ein. • Bestätigen Sie mit OK. • Den WLAN-Namen können Sie direkt im Feld darunter ändern.
b) Wiedergabe von einem USB-Gerät • Schließen Sie am am Anschluss „USB“ z.B. einen USB-Stick an, dem Musik gespeichert ist. • Öffnen Sie im Hauptmenü den Punkt „AirDisk“. • Sobald das USB-Gerät erkannt wurde, wird ein Button „USB Device“ angezeigt. Tippen Sie darauf. • Wählen Sie aus der Liste den gewünschten Titel aus und tippen Sie darauf. • Um die Wiedergabe zu starten tippen Sie noch auf das Play-Symbol. Außerdem können Sie die Datei auf Ihr Tablet herunterladen.
d) Sonstige Funktionen • Zusätzlich zu den oben beschriebenen Funktionen können Sie unteranderem einen Webbrowser benutzen, das Produkt mit Ihrer Cloud verbinden, dem App Hersteller einen Kommentar schicken oder die Funktion „EZChannel“ nutzen. Außerdem können Sie z.B. Ihr Smartphone als Hotspot nutzen. • Die App bietet außerdem noch die Funktion „EZCast Screen“ an. Hierbei benötigen Sie nicht den renkCast Musik, sondern nur 2 Geräte, wie z.B. ein Smartphone und ein Tablet.
11. Zurücksetzen auf die Werkseinstellung Um das Produkt auf die Werkseinstellung zurück zu setzen, gehen Sie wie folgt vor. • Verbinden Sie die renkCast Musik Box mit der Spannungsversorgung und warten Sie bis der Startvorgang abgeschlossen ist. • Drücken Sie mit einem spitzen Gegenstand (z.B. einer Büroklammer) den an der Rückseite versenkt angeordneten Reset-Taster für ca. 10 Sekunden, bis die weiße LED an der Vorderseite kurz ausgeht. Lassen Sie dann die Taste wieder los.
14. Konformitätserklärung (DOC) Hiermit erklären wir, Conrad Electronic SE, Klaus-Conrad-Straße 1, D-92240 Hirschau, dass sich dieses Produkt in Übereinstimmung mit den grundlegenden Anforderungen und den anderen relevanten Vorschriften der Richtlinie 1999/5/EG befindet. Die Konformitätserklärung (DOC) zu diesem Produkt finden Sie unter www.conrad.com 15. Technische Daten Betriebsspannung.................................. 5 V/DC Spannungsversorgung...........................
Table of Contents Page 1. Introduction..........................................................................................................................18 2. Explanation of Symbols......................................................................................................19 3. Intended Use........................................................................................................................19 4. Scope of Delivery.........................................................
1. Introduction Dear Customer, thank you for purchasing this product. This product complies with the statutory national and European requirements. To maintain this status and to ensure safe operation, you as the user must observe these operating instructions! These operating instructions are part of this product. They contain important notes on commissioning and handling. Also consider this if you pass on the product to any third party.
2. Explanation of Symbols The symbol with a lightning bolt in a triangle is used where there is a health hazard, e.g. from electric shock. The exclamation mark in a triangle indicates important notes in these operating instructions that must be observed strictly. The arrow symbol indicates that special advice and notes on operation are provided. 3.
4. Scope of Delivery • renkCast Music • Micro-USB-cable (0.6 m) • Optical connection cable (1 m) • Analogue audio connection cable • Operating instructions Up-to-date operating instructions: 1. Open www.conrad.com/downloads in a browser or scan the displayed QR code. 2. Select document type and language and enter the item number into the search field. After submitting the query you can download displayed records.
5.
6. Product Overview The connections and buttons are explained below with reference to the above screen, from the left to the right. Reset button To reset the product to the factory condition USB USB-connection to connect a USB device, such as a USB drive to play music from OPTICAL Optical digital output to digitally connect the product, e.g. to a sound system or AV receiver AUX Analogue audio output (3.5 mm plug) for analogue connection of the product, e.g.
7. Connection and Operation a) Audio First connect the product to the desired audio device (e.g. sound system, AV receiver, etc.). You can choose between the analogue and digital outputs here. Analogue connection: • Connect the enclosed 3.5 mm jack plug cable to the socket “AUX” of the music box. • Now connect the other end of the cable to your sound system, AV-receiver or any other device with a 3.5 mm jack plug input.
8. Installation of the EZCast App a) AndroidTM and iOS Users • Open the respective App-Store on your Smartphone or Tablet. For AndroidTM, this is, for example, the “Google Play-Store”. If you use an iPhone, iPad or iPod Touch, open the “iTunes Store” by Apple. • Find the App “EZCast” and install it. • Alternatively, just scan the corresponding QR code.
When the query, e.g. from the Windows® user account control, appears, confirm it with Yes. You may also need to approve the software in your Firewall if the corresponding query appears. Observe the system prerequisites in the technical data of these instructions and in the description of the respective download regarding compatibility. Additionally, the English original instructions of the software and various YouTube videos are available on the website.
b) Connecting to the Internet • It is possible that the WLAN setup will start automatically the first time you start the App and tap the button with the magnifying glass. If this is not the case, tap the button “AirSetup” at the lower middle of the main menu first, and then “Internet” on the next page. • Select your WLAN network and enter the password and confirm with “OK”. When the connection has been successfully established, the selected WLAN appears with a blue background.
d) Changing the SSID and the Password Changing the WLAN password of the box is another important aspect. • Tap the button “AirSetup” in the lower middle of the main menu again. • If the password has not been changed yet, the standard password “00000000” will be displayed behind the password field. • Tap it and enter a new password. • Confirm with OK. • You can change the WLAN name right in the field below. • Tap it, enter a new name and confirm your input. The box then restarts.
b) Playback from a USB Device • Connect, e.g., the USB drive on which you have saved some music to the “USB” connection. • Open the item “AirDisk” in the main menu. • Once the USB device has been recognised, a button “USB Device” is displayed. Tap it. • Select the desired track from the list and tap it. • To start playback, tap the play icon. You can also download the file onto your tablet. • Operation takes place in a similar manner as streaming. If the circle in the middle is teal, playback is running.
d) Other Functions • In addition to the above functions, you may use, among others, a web browser, connect the product to your Cloud, send a comment to the App manufacturer or use the function “EZChannel”. You may also use, e.g., your Smartphone as a hotspot. • The App also offers the function “EZCast Screen”. For this, you do not need the renkCast Music, but only 2 devices, such as a Smartphone and a tablet. The two devices should only be connected to your normal WLAN.
11. Resetting to the Factory Settings To reset the product to factory settings, proceed as follows. • Connect the renkCast Music Box to the voltage supply and wait until it has started up completely. • Use a pointed object (such as a paper clip) to push the recessed reset button in the rear for approx. 10 seconds until the white LED on the front goes out briefly. Release the button. • The system restarts and is then reset to factory settings. 12.
14. Declaration of Conformity (DOC) We, Conrad Electronic SE, Klaus-Conrad-Straße 1, D-92240 Hirschau, hereby declare that this product complies with the fundamental requirements and the other relevant regulations of the directive 1999/5/EC. The declaration of conformity (DOC) for this product can be found at www.conrad.com 15. Technical Data Operating voltage................................... 5 V/DC Voltage supply......................................... via micro-USB-connection Power consumption........
Sommaire Page 1. Introduction..........................................................................................................................33 2. Explication des symboles...................................................................................................34 3. Utilisation conforme............................................................................................................34 4. Contenu.................................................................................
1. Introduction Cher client, chère cliente, nous vous remercions d’avoir acheté ce produit. Ce produit est conforme aux exigences légales nationales et européennes. Pour maintenir cet état et garantir un fonctionnement en toute sécurité, vous devez en tant qu’utilisateur respecter ce mode d’emploi ! Ce mode d’emploi appartient à ce produit. Il contient des instructions importantes pour la mise en service et la manipulation. Prenez-le en considération même lorsque vous transmettez ce produit à un tiers.
2. Explication des symboles Le symbole avec l’éclair dans le triangle est utilisé lorsqu’il existe un risque pour votre santé, p. ex. par un choc électrique. Le symbole avec le point d’exclamation dans le triangle indique des informations importantes dans ce mode d’emploi, qui doivent être impérativement observées. Le symbole de la flèche précède les astuces et indications particulières sur le fonctionnement. 3.
4. Contenu • renkCast Musik • Câble micro USB (0,6 m) • Câble d’alimentation optique (1 m) • Câble d’alimentation audio analogique • Mode d’emploi Mode d‘emploi actualisé : 1. Ouvrez la page internet www.conrad.com/downloads dans un navigateur ou scannez le code QR représenté à droite. 2. Sélectionnez le type de document et la langue puis saisissez le numéro de commande correspondant dans le champ de recherche. Une fois la recherche commencée, vous pouvez télécharger les documents trouvés.
5.
6. Caractéristiques produit Les branchements et touches sont expliqués ci après en référence à l’image ci-dessus de gauche à droite.
7. Branchement et mise en service a) Audio Branchez le produit d’abord au système audio souhaité (p. ex système de sonorisation, récepteur AV, etc.) Ici vous avez le choix entre la sortie analogique ou numérique. Connexion analogique : • Raccordez le connecteur d’insert de 3,5 mm joint avec la prise femelle « AUX » de la Musik Box. • Maintenant branchez encore l’autre extrémité du câble à votre système de sonorisation, récepteur AV ou à un appareil quelconque qui possède une entrée jack de 3,5 mm.
8. Installation de l’appli EZCats a) AndroidTM et iOS • Ouvrez l’Appli-Store correspondant sur votre smartphone ou tablette. Sur Android™ il s’agit par exemple de « Google Play-Store » Si vous utilisez un iPhone, iPad ou un iPod ouvrez-le « iTunes Store » d’Apple. • Recherchez l’appli « EZCast » et installez-la. • Alternativement vous pouvez scanner tout simplement le code QR correspondant.
Si ici une requête telle que le contrôle de compte utilisateur (UAC) Windows® apparaît, confirmez par oui. Le cas échéant vous devez également autoriser le logiciel dans votre Firewall, si une telle requête apparaît. Vérifiez les configurations requises pour la compatibilité dans les données techniques de ces instructions et dans la description du téléchargement correspondant. De plus vous pouvez appeler sur la page web les instructions originales du logiciel en anglais ainsi que diverses vidéos YouTube.
b) Se connecter à Internet • Lors de la première mise en service de l‘Appli et en touchant pour la première fois au bouton loupe, la configuration pour la mise en service du WLAN peut être démarrée automatiquement. Si ce n’est pas le cas, touchez le bouton « AirSetup » en dessous au milieu dans le menu principal et sur la page suivante sur « Internet ». • Sélectionnez votre réseau WLAN et saisissez votre mot de passe et confirmez-le avec « OK ».
d) Modifier le SSID le mot de passe Un autre point important est la modification du mot de passe WLAN de la Box. • Touchez à nouveau le bouton « AirSetup » au centre du menu principal. • Lorsque le mot de passe n‘a pas encore été modifié, le mot de passe standard s’affiche derrière le champ mot de passe 00000000. • Appuyez dessus et saisissez un nouveau mot de passe. • Confirmez par OK. • Vous pouvez modifier le nom WLAN directement dans le champ.
b) Restitution depuis un dispositif USB • Raccordez sur le port « USB » une clé USB contenant de la musique. • Ouvrez dans le menu principal l‘option « AirDisk ». • Dès que le périphérique USB a été reconnu, un bouton « USB Device » s‘affiche. Appuyez dessus. • Sélectionnez sur la liste le titre souhaité et appuyez dessus. • Pour démarrer la lecture, appuyez encore sur le symbole Play. D’autre part vous pouvez télécharger les fichiers sur votre tablette.
d) Autres Fonctions • En plus des fonctions décrites ci-dessus vous pouvez entre autre utiliser un navigateur web, relier le produit à votre Cloud, envoyer un commentaire au fabricant de l’appli ou utiliser la fonction « EZChannel ». De plus, vous pouvez utiliser par exemple votre Smartphone comme Hotspot. • L’appli offre d’autre part encore la fonction « Écran EZCast ». Ici vous n’avez pas besoin du rentCast Musik mais seulement de 2 dispositifs, tels que Smartphone et tablette.
11. Réinitialisation des réglages usine Procédez comme suit pour remettre le produit au réglage usine. • Raccordez la renCast Musik Box à l’alimentation en tension et attendez jusqu’à ce que le processus de démarrage soit terminé. • Appuyez avec un objet pointu (p. ex. un trombone) sur la touche Reset encastrée au dos pendant env. 10 secondes jusqu’à ce que la LED blanche à l’avant s’éteigne brièvement. Relâchez ensuite la touche. • Le système redémarre et est ensuite réinitialisé aux réglages d’usine. 12.
14. Déclaration de conformité (DOC) Par la présente nous, Conrad Electronic SE, Klaus-Conrad-Straße 1, D-92240 Hirschau, déclarons que ce produit est conforme aux exigences fondamentales et aux autres règlements relatifs à la directive 1999/5/UE. Vous trouverez la déclaration de conformité (DOC) de ce produit sur www.conrad.com 15. Données techniques Tension de service.............................................5 V/CC Alimentation en tension....................................
Inhoudsopgave Pagina 1. Inleiding.................................................................................................................................48 2. Verklaring van symbolen....................................................................................................49 3. Voorgeschreven gebruik....................................................................................................49 4. Leveringsomvang....................................................................
1. Inleiding Geachte klant, hartelijk dank voor de aanschaf van dit product. Dit product voldoet aan de wettelijke nationale en Europese voorschriften. Volg de instructies van de gebruiksaanwijzing op om deze status van het apparaat te handhaven en een ongevaarlijke werking te garanderen! Deze gebruiksaanwijzing hoort bij dit product. Deze bevat belangrijke instructies voor de ingebruikname en bediening. Let hierop, ook wanneer u dit product aan derden doorgeeft.
2. Verklaring van symbolen Het symbool met de bliksemschicht in een driehoek geeft aan wanneer er gevaar bestaat voor uw gezondheid, bijv. door een elektrische schok. Het symbool met het uitroepteken in een driehoek wijst op belangrijke aanwijzingen in deze gebruiksaanwijzing die in ieder geval moeten worden opgevolgd. Het pijlsymbool ziet u, wanneer u bijzondere tips en aanwijzingen voor de bediening zult verkrijgen. 3.
4. Leveringsomvang • renkCast Music • Micro-USB-kabel (0,6 m) • Optische aansluitkabel (1 m) • Analoog audio-aansluitkabel • Gebruiksaanwijzing Geactualiseerde gebruiksinstructies: 1. Open www.conrad.com/downloads in een browser of scan de afgebeelde QR-code. 2. Kies het documententype en de taal en vul het productnummer in het zoekveld in. Nadat u de zoekopdracht heeft uitgevoerd, kunt u de weergegeven documenten downloaden.
5.
6. Productoverzicht De aansluitingen en knoppen zijn hier met betrekking tot de bovenstaande afbeelding, van links naar rechts verklaard Reset-knop Om het product naar de leveringstoestand te resetten USB USB-aansluiting voor de aansluiting van een USB-apparaat, zoals bv. een USB-stick, waarvan muziek kan worden afgespeeld OPTICAL Optische digitale uitgang om het product digitaal aan bv.
7. Aansluiting en ingebruikname a) Audio Sluit het product eerst aan het gewenste audio-apparaat aan (bv. soundsystem, AV-receiver, etc.). Hierbij hebt u de keuze tussen de analoge en digitale uitgang. Analoge aansluiting: • Verbind daartoe de meegeleverde 3,5 mm cinchkabel met de bus “AUX” van de Music Box. • Nu sluit u nog het andere uiteinde van de kabel aan uw soundsystem, AV-receiver of bv. een ander willekeurig apparaat dat over een 3,5 mm cinchingang beschikt, aan.
8. EZCastApp installeren a) AndroidTM- en iOS-gebruikers • Open de appstore op uw smartphone of tablet. Bij AndroidTM is dat bv. “Google Play Store”. Als u een iPhone, iPad of iPod Touch gebruikt, opent u de “iTunes Store” van Apple. • Zoek naar de gratis app “EZCast” en installeer deze. • Anders scant u gewoon de overeenkomstige QR-code.
Wanneer hierbij een vraag, bv. van de Windows®-gebruikersinhoudbesturing verschijnt, bevestigt u deze met “Ja”. Eventueel moet u ook de software in uw firewall toelaten als er een overeenkomstige vraag verschijnt. Met betrekking tot de compatibiliteit dient u op de systeemvereisten te letten in de technische gegevens in deze gebruiksaanwijzing en in de beschrijving van de respectievelijke download.
b) Verbinding met het internet aanmaken • Het is mogelijk dat bij het eerste opstarten van de app en wanneer u voor het eerst op de button met het vergrootglas klikt, de set-up voor de WLAN-instelling wordt gestart. Als dit niet het geval is, klikt u onderaan in het midden in het hoofdmenu eerst op de button “AirSetup” en op de volgende pagina op “Internet”. • Selecteer uw WLAN-netwerk en voer het wachtwoord in en bevestig met “OK”.
d) SSID en wachtwoord wijzigen Een ander belangrijk punt is het wijzigen van het WLAN-wachtwoord van de Box. • Klik opnieuw onderaan in het midden in het hoofdmenu op de button “AirSetup”. • Wanneer het wachtwoord nog niet werd gewijzigd, wordt na het veld “Wachtwoord” het standaardwachtwoord “00000000” weergegeven. • Klik hierop en voer een nieuw wachtwoord in. • Bevestig met “OK”. • De WLAN-naam kunt u rechtstreeks in het veld daaronder wijzigen.
b) Afspelen van een USB-apparaat • Sluit aan de aansluiting “USB” bv. een USB-stick aan waarop muziek is opgeslagen. • Open in het hoofdmenu het punt “AirDisk”. • Van zodra het USB-apparaat werd herkend, wordt een button “USB Device” weergegeven. Klik hierop. • Kies het gewenste nummer uit de lijst en klik erop. • Om het afspelen te starten, klikt u op het Play-symbool. Bovendien kunt u het bestand op uw tablet downloaden. • De bediening gebeurt hier op dezelfde manier als bij het streamen.
d) Overige functies • Bovenop de hierboven beschreven functies kunt u onder andere een webbrowser gebruiken, het product met uw Cloud verbinden, commentaar naar de app fabrikant verzenden of de functie “EZChannel” gebruiken. Bovendien kunt u bv. uw smartphone als hotspot gebruiken. • De app biedt bovendien nog de functie “EZCast Screen” aan. Hierbij hebt u renkCast Music niet nodig, maar 2 apparaten, zoals bv. een smartphone en een tablet. Beide apparaten moeten nu met uw normaal WLAN verbonden zijn.
11. Herstellen van de fabrieksinstellingen Om fabrieksinstellingen van het product te herstellen, gaat u als volgt te werk. • Verbind de renkCast Music Box met de spanningsverzorging en wacht tot het opstarten voltooid is. • Druk gedurende ca. 10 seconden met een scherp voorwerp (bv. een paperclip) op de aan de voorkant verzonken opgestelde resetknop tot de witte LED aan de voorkant kort uitdooft. Laat nu de toets weer los. • Het systeem start opnieuw op en de fabrieksinstellingen zijn hersteld. 12.
14. Verklaring van overeenstemming (DOC) Hierbij verklaren wij, Conrad Electronic SE, Klaus-Conrad-Straße 1, D-92240 Hirschau, dat dit product in overeenstemming is met de belangrijkste voorwaarden en andere relevante voorschriften van de richtlijn 1999/5/EG. De bij dit product behorende verklaring van conformiteit (DOC) kunt u vinden op www.conrad.com 15. Technische gegevens Bedrijfsspanning..................................... 5 V/DC Spanningsverzorging.............................
i Impressum Dies ist eine Publikation der Conrad Electronic SE, Klaus-Conrad-Str. 1, D-92240 Hirschau (www.conrad.com). Alle Rechte einschließlich Übersetzung vorbehalten. Reproduktionen jeder Art, z. B. Fotokopie, Mikroverfilmung, oder die Erfassung in elektronischen Datenverarbeitungsanlagen, bedürfen der schriftlichen Genehmigung des Herausgebers. Nachdruck, auch auszugsweise, verboten. Die Publikation entspricht dem technischen Stand bei Drucklegung. © Copyright 2016 by Conrad Electronic SE.