Bedienungsanleitung BM-7200 Funkmikrofon-Set Best.-Nr. 1491921 Seite 2 - 20 Operating Instructions BM-7200 Wireless microphone set Item No. 1491921 Page 21 - 39 Notice d’emploi Set - microphone sans fil BM-7200 N° de commande 1491921 Page 40 - 58 Gebruiksaanwijzing BM-7200 Radiomicrofoonset Bestelnr.
Inhaltsverzeichnis 1. 2. 3. 4. 5. 6. 7. 8. 9. 10. 11. 12. 13. 14. 15. 16. 2 Seite Einführung............................................................................................................................................................3 Symbol-Erklärung.................................................................................................................................................3 Bestimmungsgemäße Verwendung...............................................................
1. Einführung Sehr geehrte Kundin, sehr geehrter Kunde, wir bedanken uns für den Kauf dieses Produkts. Dieses Produkt entspricht den gesetzlichen, nationalen und europäischen Anforderungen. Um diesen Zustand zu erhalten und einen gefahrlosen Betrieb sicherzustellen, müssen Sie als Anwender diese Bedienungsanleitung beachten! Diese Bedienungsanleitung gehört zu diesem Produkt. Sie enthält wichtige Hinweise zur Inbetriebnahme und Handhabung.
3. Bestimmungsgemäße Verwendung Das Funkmikrofon-Set dient zur Umwandlung von akustischen Signalen (Schallwellen) in elektrische Signale und zur Übertragung dieser Signale über eine Funkstrecke. Das niederpegelige Audioausgangssignal der Empfangsstation darf nur an geeignete Audioeingänge von Audiogeräten angeschlossen werden. Die Empfangsstation ist nur für den Anschluss an 100 – 240 V/AC, 50/60 Hz Wechselspannung über das beiliegende Netzteil zugelassen.
. Merkmale und Funktionen • LCD-Anzeige • Separate Lautstärkenregelung die Audiokanäle • Separate XLR-Ausgänge für die einzelnen Mikrofone • 21 Kanäle • Kanalsuchfunktion 6. Sicherheitshinweise Lesen Sie sich die Bedienungsanleitung aufmerksam durch und beachten Sie insbesondere die Sicherheitshinweise. Falls Sie die Sicherheitshinweise und die Angaben zur sachgemäßen Handhabung in dieser Bedienungsanleitung nicht befolgen, übernehmen wir für dadurch resultierende Personen-/Sachschäden keine Haftung.
• Lassen Sie Wartungs-, Anpassungs- und Reparaturarbeiten ausschließlich von einem Fachmann bzw. einer Fachwerkstatt durchführen. • Sollten Sie noch Fragen haben, die in dieser Bedienungsanleitung nicht beantwortet werden, wenden Sie sich an unseren technischen Kundendienst oder an andere Fachleute. b) Elektrische Geräte • Gießen Sie nie Flüssigkeiten über elektrische Geräte aus und stellen Sie keine mit Flüssigkeit gefüllten Gegenstände neben das Gerät.
d) Aufstellen • Stellen Sie sicher, dass beim Aufstellen die Kabel nicht gequetscht, geknickt oder durch scharfe Kanten beschädigt werden. • Verlegen Sie Kabel immer so, dass niemand über diese stolpern oder an ihnen hängen bleiben kann. Es besteht Verletzungsgefahr. • Stellen Sie keine offenen Brandquellen wie brennende Kerzen auf oder direkt neben dem Gerät ab. • Benutzen Sie das Gerät nur in gemäßigtem Klima, nicht in tropischem Klima.
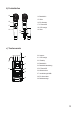
7. Bedienelemente a) Empfangsstation 1 2 3 4 8 5 6 9 7 10 11 12 1 Taste SET 8 Antenne ANT-B 2 Taste UP 9 XLR-Anschluss CH.B 3 Ein-/Ausschalter POWER 10 XLR-Anschluss CH.A 13 4 Lautstärkeregler VOLUME.A/ VOLUME.
b) Funkmikrofon 19 14 Batteriefach 15 Hülse 18 16 Ein-/Austaste 17 17 IR Sensor IR 16 18 LCD-Anzeige 19 Gitter 14 15 c) Taschensender 26 27 28 29 20 20 Antenne 21 LCD-Anzeige 22 Gürtelclip 25 21 23 Batteriefach 22 25 IR Sensor iR 23 26 Klinkenbuchse 24 24 Batteriefachabdeckung 27 Lautstärkeregler VOL 28 Ein-/Ausschalter 29 Betriebsanzeige 9
8. Aufstellen und Rack-Montage Stellen Sie die Empfangsstation nicht auf weichem Untergrund auf, wie z.B. Teppiche oder Betten etc. Es dürfen sich keine Geräte mit starken elektrischen oder magnetischen Feldern, wie z.B. Transformatoren, Motoren, schnurlose Telefone, Funkgeräte usw. in direkter Nähe befinden, da diese das Gerät beeinflussen können. Das Produkt kann auch durch Interferenzen (Einstrahlung) von Tunern, Fernsehgeräten etc. beeinflusst werden.
b) Netzanschluss Das Netzteil muss im Fehlerfall schnell und einfach von der Netzstromversorgung getrennt werden können. Lassen Sie die Leitung des Netzteils nicht mit anderen Leitungen in Kontakt kommen. Seien Sie vorsichtig beim Umgang mit Netzleitungen und Netzanschlüssen. Netzspannung kann lebensgefährliche elektrische Schläge verursachen. • Schalten Sie die Empfangsstation aus (Ein-/Ausschalter POWER in Stellung 0).
10. Batterien einlegen Beim Einlegen von Batterien sind die Polaritätsangaben im Batteriefach zu beachten. Ersetzen Sie die Batterien durch neue des gleichen Typs, wenn das Gerät nicht mehr reagiert oder sich nicht einschalten lässt. Entnehmen Sie Batterien aus dem Batteriefach, wenn Sie das Gerät für längere Zeit nicht verwenden, um Auslaufen zu verhindern. Enladene Batterien in Funkmikrofon und Taschensender werden durch das Symbol Tauschen Sie entladene Batterien gegen neue aus. angezeigt.
a) Empfangsstation • Richten Sie die Antennen ANT-A (13) und ANT-B (8) senkrecht auf (90°). Je nach Positionierung der Empfangsstation kann es hilfreich sein die Antennen anzuwinkeln, um den Empfang zu verbessern. • Schalten Sie den Ein-/Ausschalter POWER in die Position I, um die Station einzuschalten. Die LCD-Anzeige (7) leuchtet auf. Die Empfangstation ist betriebsbereit. • Schalten Sie den Ein-/Ausschalter POWER in die Position 0, um die Empfangstation auszuschalten.
Kanal einstellen: • Halten Sie die Taste SET gedrückt, bis blinkt. • Stellen Sie mit den Tasten UP (2) und DOWN (6) die gewünschte Frequenz ein. Jede Frequenz ist einem Kanal zugeordnet. -- Es stehen insgesamt 21 Kanäle für jeden Audiokanal zur Verfügung. -- Es können nicht zwei Geräte mit verschiedenen Frequenzen (zugeordneten Kanälen) gleichzeitig über den gleichen Audiokanal ( oder ) betrieben werden. • Es ist möglich die gleiche Frequenz dem Funkmikrofon (z.B. auf Audiokanal A) und Taschensender (z.B.
b) Funkmikrofon • Die Ein-/Austaste (16) am Funkmikrofon hat folgende Funktionen: -- Einschalten: Drücken bis die LCD-Anzeige (18) aufleuchtet -- Ausschalten: Drücken und halten bis die LCD-Anzeige ‚Off‘ anzeigt • Schalten Sie das Funkmikrofon bei Nichtbenutzung aus, um Batterieentladung zu vermindern.
d) Kopplung von Funkmikrofon/Taschensender mit Empfangsstation Drehen Sie alle Lautstärkeregler auf null bevor Sie die Empfangsstation mit Strom versorgen und einschalten. Befolgen Sie diese Anweisung nicht, sind Schäden nicht ausgeschlossen. • Schalten Sie die Empfangsstation ein. Funkmikrofon • Schalten Sie das Funkmikrofon ein. • Entscheiden Sie, ob das Funkmikrofon auf Audiokanal A (CH.A) (linke Displayseite der Empfangsstation) oder Audiokanal B (CH.
Funkmikrofon/Taschensender (mit Headset): Beachten Sie einige Hinweise zur Benutzung des Funkmikrofons und Taschensenders (mit Headset): Halten Sie das eingeschaltete Mikrofon nicht an einen gekoppelten Lautsprecher, um Rückkoppelungen zu vermeiden. • Halten Sie das Funkmikrofon nicht am Gitter (19) während es in Betrieb steht, sondern legen Ihre Hand um die Hülse (15). • Der Abstand zum Mund sollte beim Funkmikrofon nicht mehr als 15 cm betragen.
Funkmikrofon oder Taschensender wird nicht empfangen. Die Batterien sind entladen. Führen Sie einen Batteriewechsel durch. Bei der Funkübertragung treten Störungen auf bzw. es ist kein Empfang möglich. Die Antennen sind nicht ideal ausgerichtet. Versuchen Sie die Antennen anders auszurichten. Im Übertragungsweg befinden sich Barrieren für Funkwellen (Metallflächen, Stahlbetonwände etc.). Ändern Sie Ihren Standort bzw. verringern Sie die Entfernung von Sender und Empfangsstation.
14. Konformitätserklärung (DOC) Hiermit erklärt Conrad Electronic SE, Klaus-Conrad-Straße 1, D-92240 Hirschau, dass dieses Produkt der Richtlinie 2014/53/EU entspricht. Der vollständige Text der EU-Konformitätserklärung ist unter der folgenden Internetadresse verfügbar: www.conrad.com/downloads Wählen Sie eine Sprache durch Anklicken eines Flaggensymbols aus und geben Sie die Bestellnummer des Produkts in das Suchfeld ein; anschließend können Sie die EU-Konformitätserklärung im PDF-Format herunterladen.
16. Technische Daten Allgemein: Funkfrequenz.....................................................863 – 865 MHz Sendeleistung....................................................10 mW Kanäle ..............................................................21 Kanäle Reichweite.........................................................max. 25/30 m (im Freifeld) Betriebsbedingungen.........................................-10 bis +40 °C, 20 – 90 % rF Lagerbedingungen.............................................
Contents 1. 2. 3. 4. 5. 6. 7. 8. 9. 10. 11. 12. 13. 14. 15. 16. Page Introduction.........................................................................................................................................................22 Description of symbols........................................................................................................................................22 Intended use...............................................................................................
1. Introduction Dear customer, Thank you for purchasing this product. This product complies with the statutory national and European requirements. We kindly request the user to follow the operating instructions, to preserve this condition and to ensure safe operation! These operating instructions relate to this product. They contain important notices on commissioning and handling. Please take this into consideration when you pass the product on to third parties.
3. Intended use The wireless microphone set is intended for transforming acoustic signals (sound waves) into electric signals and for transmitting these signals over a certain wireless distance. The low-level audio output signal of the receiver station must only be connected to suitable audio inputs of audio devices. The receiver station has been approved for connection to 100 – 240 V/AC, 50/60 Hz alternating current only, using the power adapter provided. It is intended for indoor use only.
5. Features and functions • LC display • Separate volume adjustment for audio channels • Separate XLR outputs for each microphone • 21 channels • Channel search function 6. Safety instructions Read the operating instructions carefully and especially observe the safety information. If you do not follow the safety instructions and information on proper handling in this manual, we assume no liability for any resulting personal injury or damage to property. Such cases will invalidate the warranty/guarantee.
• Maintenance, modifications and repairs are to be performed exclusively by an expert or at a qualified shop. • If you have questions which remain unanswered by these operating instructions, contact our technical support service or other technical personnel. b) Electrical devices • Never pour any liquids over electrical devices or put objects filled with liquid right next to the device. If liquid or an object enters the interior of the device nevertheless, first power down the respective socket (e.g.
d) Setting up • When setting up the product, make sure that the cables are not pinched, kinked or damaged by sharp edges. • Always lay the cables so that nobody can trip over or become entangled in them. This poses a risk of injury. • Do not place sources of open fire, such as candles, on or next to the device. • Use the device in moderate climate zones only. Do not use in tropical climate zones.
7. Operating elements a) Receiver station 1 2 3 4 8 5 6 9 7 10 11 12 1 SET button 8 Antenna ANT-B 2 UP button 9 XLR socket CH.B 3 On/ off switch POWER 10 XLR socket CH.A 4 VOLUME.A/ VOLUME.
b) Wireless microphone 19 14 Battery compartment 15 Sleeve 18 16 On/off button 17 17 IR sensor IR 16 18 LC display 19 Grille 14 15 c) Pocket transmitter 26 27 28 29 20 20 Antenna 21 LC display 22 Belt clip 25 21 23 Battery compartment 22 25 IR sensor iR 23 26 Jack socket 24 28 24 Battery compartment lid 27 Volume control VOL 28 On/off switch 29 Power indicator
8. Installation and rack mounting Do not install the receiver station on a soft surface such as carpets or beds, etc. Make sure there are no other devices with strong electric or magnetic fields in the near proximity, such as transformers, engines, wireless telephones, radio equipment, etc. They could affect the device. The product might also be affected by interferences (radiation) caused by tuners, TV sets, etc. Keep a distance as big as possible to such devices.
b) Mains connection In case of failure, it must be possible to disconnect the mains adapter from the mains quickly and easily. Do not let the mains adapter cable touch other cables. Take care when handling mains cables and mains sockets. Mains voltage can cause fatal electric shocks. • Turn off the receiver station (POWER on/off button to 0 position). • Connect the round plug of the mains adapter connection cable to the DC INPUT mains socket (12) on the receiver station.
10. Inserting batteries When inserting the batteries, observe the polarity markings inside the battery compartment. Replace the batteries by new ones of the same type, once the device does not function or turn on anymore. Remove the batteries from the battery compartment when not using the device for a longer period of time, in order to prevent leaking. The symbol indicates that the batteries in the wireless microphone and pocket transmitter are discharged. Replace discharged batteries by new ones.
a) Receiver station • Erect the ANT-A (13) and ANT-B (8) antennas vertically (90°). Depending on the position of the receiver station, angling the antennas might be useful for improving reception. • Set the POWER on/off button to I position to turn on the station. The LC display (7) lights up. The receiver station is ready for use. • Set the POWER on/off button to 0 position to turn off the receiver station. • Adjust the volume for audio channel A (CH.A) and audio channel B (CH.
Setting up channels: • Press and hold the SET button until starts flashing. • Use the UP (2) and DOWN (6) buttons to set the desired frequency. Every frequency is allocated to a channel. -- There are a total of 21 channels available for each audio channel. -- It is not possible to operate two devices with different frequencies (allocated channels) simultaneously using the same audio channel ( or ). • It is possible to allocate the same frequency to both the wireless microphone (e.g.
b) Wireless microphone • The on/off switch (16) on the wireless microphone features the following functions: -- Turning on: Press until the LCD (18) lights up -- Turning off: Press and hold until the LCD shows “Off”. • Turn off the wireless microphone when not in use, in order to prevent discharging the battery.
d) Pairing wireless microphone/pocket transmitter with receiver station Set all volume controls to zero before connecting the receiver station to the mains and turning on latter one. Non-observance of this instruction can cause damage. • Turn on the receiver station. Wireless microphone • Turn on the wireless microphone • Decide whether to transmit the wireless microphone to audio channel A (CH.A) (left side of the receiver station’s display) or audio channel B (CH.
Wireless microphone/pocket transmitter (with headset): Observe some notes on using the wireless microphone and the pocket transmitter (with headset): Do not bring the activated microphone close to a paired speaker, in order to avoid feedback. • Do not hold the wireless microphone by the grille (19) when in use, but place your hand on the sleeve (15). • When using the wireless microphone, the distance to the mouth should not exceed 15 cm. • Do not hold or bring two activated microphones close to each other.
Wireless microphone or pocket transmitter is not received. Batteries are empty. Replace the batteries. There is interference or no reception during wireless transmission. Antennas are not properly aligned. Try to readjust the antennas. There are obstacles (e.g. metal surfaces, reinforced concrete walls, etc.) inside the transmission path interfering with the sound waves. Change the location or reduce the distance between transmitter and receiver station. The range of the system has been exceeded.
14. Declaration of Conformity (DOC) Conrad Electronic SE, Klaus-Conrad-Straße 1, D-92240 Hirschau hereby declares that this product conforms to the 2014/53/EU directive. Click on the following link to read the full text of the EU declaration of conformity: www.conrad.com/downloads Select a language by clicking on a flag symbol and enter the product order number in the search box. You can then download the EU declaration of conformity in PDF format. 15.
16. Technical data General: Radio frequency................................................863 – 865 MHz Transmission power..........................................10 mW Channels...........................................................21 channels Range................................................................max. 25/30 m (in open area) Operating conditions..........................................-10 to +40 °C, 20 – 90 % RH Storage conditions.............................................
Table des matières 1. 2. 3. 4. 5. 6. 7. 8. 9. 10. 11. 12. 13. 14. 15. 16. 40 Page Introduction.........................................................................................................................................................41 Explication des symboles...................................................................................................................................41 Utilisation prévue..............................................................................
1. Introduction Chère cliente, cher client, Nous vous remercions de l’achat du présent produit. Le produit est conforme aux exigences des directives européennes et nationales en vigueur. Afin de maintenir le produit dans son état actuel et d’assurer un fonctionnement sans risques, les utilisateurs sont tenus de suivre les instructions contenues dans le présent mode d’emploi ! Le présent mode d’emploi fait partie intégrante du produit.
3. Utilisation prévue L'ensemble microphone sans fil sert à la conversion de signaux acoustiques (ondes sonores) en signaux électriques et à la transmission de ces signaux via une liaison radioélectrique. Le signal de sortie audio de bas niveau de la station réceptrice doit être seulement raccordé à des entrées audio d'appareils audio compatibles. La station réceptrice est homologuée seulement pour le raccordement sur la tension alternée 100 - 240 V/CA, 50/60 Hz via le bloc d'alimentation fourni.
5. Caractéristiques et fonctions • Affichage de l'écran à CL • Bouton de réglage du volume séparé des canaux audio • Sorties XLR séparées pour chaque microphone • 21 canaux • Fonction de recherche du canal 6. Consignes de sécurité Lisez le mode d’emploi avec attention en étant particulièrement attentif aux consignes de sécurité.
• Tout entretien, ajustement ou réparation ne doit être effectué que par un spécialiste ou un atelier spécialisé. • Si vous avez encore des questions auxquelles ce mode d‘emploi n‘a pas su répondre, nous vous prions de vous adresser à notre service technique ou à un expert.
d) Mise en place • Assurez-vous que lors de l'installation le câble ne soit pas endommagé par pincements, pliages et arêtes vives. • Placez les câbles de façon à éviter que des personnes ne trébuchent ou ne restent accrochées à ceuxci. Cela entraîne des risques de blessures. • Ne positionnez pas de flammes, comme p. ex. des bougies allumées, qui pourraient se révéler être une source d’incendie, sur ou à proximité du produit.
7. Éléments de fonctionnement a) Station réceptrice 1 2 3 4 8 5 6 9 7 10 11 12 1 Touche SET 8 Antenne ANT-B 2 Touche UP 9 Raccordement XLR CH.B 3 Interrupteur marche/arrêt POWER 10 Raccordement XLR CH.A 4 Bouton de réglage du volume VOLUME.A/ VOLUME.
b) Microphone sans fil 19 14 Compartiment pour piles 15 Embout 18 16 Touche marche/arrêt 17 17 Capteur IR IR 16 18 Affichage de l'écran à CL 19 Grille 14 15 c) Émetteur de sac 26 27 28 29 20 20 Antenne 21 Affichage de l'écran à CL 22 Clip de ceinture 25 21 23 Compartiment pour piles 22 25 Capteur IR iR 23 26 Prise jack 24 24 Couvercle du compartiment des piles 27 Bouton de réglage du volume VOL 28 Interrupteur de marche/arrêt 29 Voyant de fonctionnement 47
8. Installation et montage du rack Ne placez pas la station réceptrice sur une surface molle comme p. ex. un tapis, un lit, etc. Aucun appareil possédant de forts champs électriques ou magnétiques, tel que transformateur, moteur, téléphone sans fil, appareil radio piloté, etc., ne doit se trouver à proximité car ils peuvent affecter le fonctionnement de l'appareil. Le produit peut aussi être affecté par des interférences (irradiation) de tuners, des postes de télévision etc.
b) Branchement au secteur En cas d'incident, le bloc d'alimentation doit pouvoir être débranché rapidement et facilement de l'alimentation en courant. Ne laissez pas le fil du bloc d'alimentation entrer en contact avec d'autres fils. La prudence s’impose lors de la manipulation des fils d’alimentation et des prises secteur. La tension secteur peut provoquer une électrocution mortelle. • Éteignez la station réceptrice (interrupteur marche/arrêt POWER sur la position 0).
10. Insertion des piles En insérant des piles, les indications de polarité dans le compartiment des piles doivent être respectées. Remplacez les piles par des nouvelles du même type, si l'appareil ne réagit plus ou qu'il s'éteint. Afin d'empêcher que les piles fuissent, enlevez-les du compartiment des piles, si vous n'utilisez pas l'appareil sur une longue période.
a) Station réceptrice • Arrangez les antennes ANT-A (13) et ANT-B (8) verticalement (90°). Selon la position de la station réceptrice, il peut être utile de régler les antennes pour améliorer la réception. • Afin d'allumer la station, placez l'interrupteur marche/arrêt POWER sur la position I. L'affichage de l'écran à CL (7) s'allume. La station réceptrice est prête à l'emploi. • Pour éteindre la station réceptrice, placez l'interrupteur marche/arrêt POWER sur la position 0.
Réglage d'un canal : • Maintenez appuyée la touche SET jusqu'à ce que clignote. • Réglez la fréquence souhaitée avec les touches UP (2) et DOWN (6). Chaque fréquence est assignée à un canal. -- Au total, 21 canaux sont disponibles pour chaque canal audio. -- Deux appareils avec différentes fréquences (canaux assignés) ne peuvent pas fonctionner en même temps via le même canal audio ( ou ). • Il est possible d'assigner la même fréquence au microphone sans fil (p. ex.
b) Microphone sans fil • La touche marche/arrêt (16) du microphone sans fil a les fonctionnalités suivantes : -- Allumer : appuyez jusqu'à ce que l'affichage de l'écran à CL (18) s'allume. -- Éteindre : appuyez et maintenez jusqu'à ce que « Off » apparaisse sur l'affichage de l'écran à CL. • Afin d'éviter une décharge des piles, le microphone sans fil s'éteint de lui-même s'il n'est pas utilisé.
d) Couplage du microphone sans fil/de l'émetteur de sac avec la station réceptrice Tournez tous les boutons de réglage du volume sur zéro avant d'alimenter en courant et d'allumer la station réceptrice. Des dommages ne sont pas exclus, si vous ne suivez pas cette instruction. • Allumez la station réceptrice. Microphone sans fil • Allumez le microphone sans fil. • Décidez si le microphone sans fil doit être transmis sur le canal audio A (CH.
Microphone sans fil/émetteur de sac (avec écouteurs) : Veuillez noter quelques instructions pour l'utilisation du microphone sans fil et l'émetteur de sac (avec écouteurs) : Pour éviter les rétroactions du couplage, ne tenez pas le microphone allumé près d'un haut-parleur couplé. • Ne tenez pas le microphone sans fil près de la grille (19) lorsqu'il est utilisé, mais mettez votre main autour de l'embout (15). • La distance du microphone à la bouche ne devrait pas s'élever à plus de 15 cm.
Le microphone sans fil ou l'émetteur de sac n'est pas reçu. Les piles sont déchargées. Effectuez un remplacement des piles. Des dérangements apparaissent lors de la transmission radio et/ou aucune réception n'est possible. Les antennes ne sont pas idéalement orientées. Essayez d'aligner les antennes différemment. Sur la voie de transmission se trouvent des barrières pour des ondes radio (surfaces en métal, parois en béton armé etc.).
14. Déclaration de conformité (DOC) Conrad Electronic SE, Klaus-Conrad-Straße 1, D-92240 Hirschau, déclare par la présente que ce produit est conforme à la directive 2014/53/UE. Le texte intégral de la déclaration de conformité UE est disponible au lien suivant : www.conrad.com/downloads Sélectionnez une langue en cliquant sur le drapeau correspondant puis saisissez le numéro de commande du produit dans le champ de recherche pour pouvoir télécharger la déclaration de conformité UE sous format PDF. 15.
16. Données techniques Généralités : Fréquence radio................................................863 – 865 MHz Puissance d'émission........................................10 mW Canaux..............................................................21 canaux Portée................................................................25/30 m maxi (en champ libre) Conditions de fonctionnement……………….....de -10 à +40 °C, 20 – 90 % hum. rel. Conditions de stockage.....................................
Inhoudsopgave 1. 2. 3. 4. 5. 6. 7. 8. 9. 10. 11. 12. 13. 14. 15. 16. Pagina Inleiding..............................................................................................................................................................60 Verklaring van de symbolen................................................................................................................................60 Bedoeld gebruik.......................................................................................
1. Inleiding Zeer geachte klant, Wij danken u voor de aankoop van dit product. Het product voldoet aan alle wettelijke, nationale en Europese normen. Gelieve deze gebruiksaanwijzing goed op te volgen om deze toestand te behouden en een gebruik zonder gevaren te waarborgen! Deze gebruiksaanwijzing behoort bij dit product. Er staan belangrijke aanwijzingen in over ingebruikname en gebruik. Houd hier rekening mee als u dit product doorgeeft aan een derde.
3. Bedoeld gebruik De draadloze microfoonset dient voor het omzetten van akoestische signalen (geluidsgolven) in elektrische signalen en het overdragen van deze signalen over een draadloos traject. Het lage audio-uitgangssignaal van het ontvangststation mag alleen op een geschikte audio-ingang van een audioapparaat worden aangesloten. Het ontvangststation is alleen goedgekeurd voor aansluiting op 100 – 240 V/AC, 50/60 Hz wisselspanning via de meegeleverde netvoedingsadapter.
5. Kenmerken en functies • LCD-beeldscherm • Afzonderlijke volumeregeling voor de audiokanalen • Afzonderlijke XLR-uitgangen voor de afzonderlijke microfoons • 21 kanalen • Zoekfunctie voor kanalen 6. Veiligheidsinstructies Lees de gebruiksaanwijzing zorgvuldig door en let vooral op de veiligheidsinstructies.
• Onderhoud, aanpassingen en reparaties mogen alleen uitgevoerd worden door een expert of in een daartoe bevoegde winkel. • Als u nog vragen hebt die niet door deze gebruiksaanwijzingen zijn beantwoord, neem dan contact op met onze technische dienst of ander technisch personeel. b) Elektrische apparaten • Zorg dat elektrische apparaten niet met vloeistof in contact komen. Zet voorwerpen waar vloeistof in zit niet naast het apparaat.
d) Opstelling • Wanneer u het product installeert, zorg er dan voor dat de kabel niet doorgeprikt, geknikt of beschadigd is door scherpe randen. • Plaats kabels altijd zo, dat niemand erover kan struikelen of erin verstrikt kan raken. Er bestaat risico op verwonding. • Zet geen brandende voorwerpen, zoals kaarsen, op of naast het apparaat. • Gebruik het product alleen in een gematigd klimaat. Gebruik het niet in een tropisch klimaat.
7. Bedieningselementen a) Ontvangststation 1 2 3 4 5 6 8 9 7 10 11 12 13 1 Toets SET 8 Antenne ANT-B 2 Toets UP 9 XLR-aansluiting CH.B 3 Aan/uit-schakelaar POWER 10 XLR-aansluiting CH.A 4 Volumeregelaar VOLUME.A/ VOLUME.
b) Radiomicrofoon 19 14 Batterijvak 15 Huls 18 16 Aan/uit-toets 17 17 IR-sensor IR 16 18 LCD-beeldscherm 19 Raster 14 15 c) Pocketzender 26 27 28 29 20 20 Antenne 21 LCD-beeldscherm 22 Riemclip 25 21 23 Batterijvak 22 25 IR-sensor iR 23 26 Klinkbus 24 66 24 Deksel batterijvak 27 Volumeregelaar VOL 28 Aan/uit-schakelaar 29 Indicatorlampje
8. Opstellen en montage in rek Plaats het ontvangststation niet op een zachte ondergrond, bijvoorbeeld een tapijt of een bed enz. Er mogen zich in de onmiddellijke omgeving geen apparaten met een sterk elektrisch of magnetisch veld bevinden, bijvoorbeeld transformatoren, motoren, draadloze telefoons, radiocommunicatieapparaten, enz., omdat die het apparaat kunnen beïnvloeden. Het product kan ook beïnvloed worden door interferentie (instraling) van tuners, tv's, enz.
b) Netaansluiting De netvoedingsadapter moet in geval van een fout snel en eenvoudig van de voedingsbron gescheiden kunnen worden. Laat de kabel van de netvoedingsadapter niet met andere kabels in contact komen. Wees voorzichtig bij het omgaan met elektrische leidingen en aansluitingen. Elektrische spanning kan levensgevaarlijke elektrische schokken veroorzaken. • Schakel het ontvangststation uit (aan/uit-schakelaar POWER in positie 0).
10. Batterijen plaatsen Let bij het plaatsen van batterijen op de aanduiding voor de polariteit in het batterijvak. Vervang de batterijen door nieuwe batterijen van hetzelfde type als het apparaat niet meer reageert of niet meer aangezet kan worden. Verwijder de batterijen uit het batterijvak als het apparaat gedurende langere tijd niet gebruikt zal worden, om lekken van de batterijen te voorkomen. Het symbool wijst op lege batterijen in de radiomicrofoon of de pocketzender.
a) Ontvangststation • Richt de antennes ANT-A (13) en ANT-B (8) loodrecht omhoog (90°). Afhankelijk van de positionering van het ontvangststation kan het raadzaam zijn om de antennes in een hoek te plaatsen om de ontvangst te verbeteren. • Zet de aan/uit-schakelaar POWER in de positie I, om het station aan te zetten. Het LCD-beeldscherm (7) licht op. Het ontvangststation is gereed voor bedrijf. • Zet de aan/uit-schakelaar POWER in de positie 0, om het ontvangststation uit te schakelen.
Kanaal instellen: • Houd de toets SET ingedrukt tot knippert. • Stel met de toetsen UP (2) en DOWN (6) de gewenste frequentie in. Elke frequentie is aan een kanaal toegewezen. -- Er zijn in totaal 21 kanalen voor elk audiokanaal beschikbaar. -- Het is niet mogelijk twee apparaten met verschillende frequenties (toegewezen kanalen) tegelijkertijd via hetzelfde audiokanaal ( of ) te gebruiken.
b) Radiomicrofoon • De aan/uit-toets (16) op de radiomicrofoon heeft de volgende functies: -- Inschakelen: Drukken tot het LCD-beeldscherm (18) oplicht -- Uitschakelen: Ingedrukt houden tot het LCD-beeldscherm 'Off' aangeeft • Schakel de radiomicrofoon uit wanneer hij niet gebruikt wordt om het batterijverbruik te verminderen.
d) De radiomicrofoon/pocketzender met het ontvangststation koppelen Draai alle volumeregelaars op nul voordat u het ontvangststation van stroom voorziet en aanzet. Als u deze aanwijzing niet opvolgt, kan er schade optreden. • Zet het ontvangststation aan. Radiomicrofoon • Zet de radiomicrofoon aan. • Beslis of de radiomicrofoon moet communiceren op audiokanaal A (CH.A) (linker beeldschermzijde van het ontvangststation) of audiokanaal B (CH.B) (rechter beeldschermzijde van het ontvangststation).
Radiomicrofoon/pocketzender (met headset): Let op enkele aanwijzingen voor gebruik van de radiomicrofoon en de pocketzender (met headset): Houd de ingeschakelde microfoon niet bij een gekoppelde luidspreker om rondzingen door terugkoppeling te voorkomen. • Houd de radiomicrofoon niet bij het raster (19) vast wanner hij aanstaat, maar houd uw hand om de huls (15). • De afstand tot de mond dient bij de radiomicrofoon niet meer dan 15 cm te bedragen.
De radiomicrofoon of pocketzender wordt niet ontvangen. De batterijen zijn leeg. Vervang de batterijen. Bij de radio-overdracht treden storingen op of er is geen ontvangst mogelijk. De antennes zijn niet optimaal gericht. Probeer de antennes anders te richten. De communicatieweg wordt gehinderd door een barrière voor radiogolven (metalen oppervlak, muur van gewapend beton, enz.). Verander uw positie of verklein de afstand tussen de zender en het ontvangststation.
14. Verklaring van conformiteit (DOC) Bij deze verklaart Conrad Electronic SE, Klaus-Conrad-Straße 1, D-92240 Hirschau, dat dit product voldoet aan de richtlijn 2014/53/EG. De volledige tekst van de EG-conformiteitsverklaring staat als download via het volgende internetadres ter beschikking: www.conrad.com/downloads Kies een taal door op een vlagsymbool te klikken en voer het bestelnummer van het product in het zoekveld in; aansluitend kunt u de EU-conformiteitsverklaring downloaden in pdf-indeling. 15.
16. Technische gegevens Algemeen: Radiofrequentie.................................................863 – 865 MHz Zendvermogen..................................................10 mW Kanalen.............................................................21 kanalen Reikwijdte..........................................................max. 25/30 m (in open veld) Bedrijfsvoorwaarden..........................................-10 tot +40 °C, 20 – 90 % RV Opslagvoorwaarden..........................................
Dies ist eine Publikation der Conrad Electronic SE, Klaus-Conrad-Str. 1, D-92240 Hirschau (www.conrad.com). Alle Rechte einschließlich Übersetzung vorbehalten. Reproduktionen jeder Art, z. B. Fotokopie, Mikroverfilmung, oder die Erfassung in elektronischen Datenverarbeitungsanlagen, bedürfen der schriftlichen Genehmigung des Herausgebers. Nachdruck, auch auszugsweise, verboten. Die Publikation entspricht dem technischen Stand bei Drucklegung. Copyright 2016 by Conrad Electronic SE.