Bedienungsanleitung RF-TB500WW HDMI Soundbar mit Subwoofer Best.-Nr. 1561698 Seite 2 - 23 Operating Instructions RF-TB500WW HDMI soundbar with subwoofer Item No. 1561698 Page 24 - 45 Notice d’emploi RF-TB500WW Barre de son HDMI avec subwoofer N° de commande 1561698 Page 46 - 67 Gebruiksaanwijzing RF-TB500WW HDMI soundbar met subwoofer Bestelnr.
Inhaltsverzeichnis Seite 1. Einführung............................................................................................................................................................4 2. Symbol-Erklärung.................................................................................................................................................4 3. Bestimmungsgemäße Verwendung..................................................................................................................
14. Konformitätserklärung (DOC).............................................................................................................................22 15. Entsorgung.........................................................................................................................................................22 a) Produkt.........................................................................................................................................................
1. Einführung Sehr geehrte Kundin, sehr geehrter Kunde, wir bedanken uns für den Kauf dieses Produkts. Dieses Produkt entspricht den gesetzlichen, nationalen und europäischen Anforderungen. Um diesen Zustand zu erhalten und einen gefahrlosen Betrieb sicherzustellen, müssen Sie als Anwender diese Bedienungsanleitung beachten! Diese Bedienungsanleitung gehört zu diesem Produkt. Sie enthält wichtige Hinweise zur Inbetriebnahme und Handhabung.
3. Bestimmungsgemäße Verwendung Das Produkt dient dazu, Audiosignale zu verstärken und in hörbare Schallwellen umzuwandeln. Die Audioeingänge dürfen nur an entsprechende Audioausgänge von Audiogeräten angeschlossen werden. Die Spannungsversorgung erfolgt über eine haushaltsübliche Netzsteckdose. Eine Verwendung ist nur in geschlossenen Räumen, also nicht im Freien erlaubt. Der Kontakt mit Feuchtigkeit, z.B. im Badezimmer u.ä. ist unbedingt zu vermeiden.
5. Merkmale und Funktionen • Drahtlose Verbindung via Bluetooth • NFC-Funktion • Ausgangsleistung: 2 x 50 W + 120 W (RMS) • Optischer Eingang • AUX-Eingang • Koaxial-Eingang • HDMI ARC-Eingang • Soundbar mit zwei integrierten Lautsprechern • Kabelloser Subwoofer (Funkübertragung von der Soundbar an den Subwoofer) • Komfortable Steuerung via Fernbedienung vom Sofa aus • Rutschfeste Standfüße 6.
• Gehen Sie vorsichtig mit dem Produkt um. Durch Stöße, Schläge oder dem Fall aus bereits geringer Höhe wird es beschädigt. • Beachten Sie auch die Sicherheitshinweise und Bedienungsanleitungen der übrigen Geräte, an die das Produkt angeschlossen wird. • Berühren Sie das Produkt niemals mit nassen oder feuchten Händen. • Als Spannungsquelle darf nur eine ordnungsgemäße Netzsteckdose (220 – 240 V/AC, 50/60 Hz) des öffentlichen Versorgungsnetzes verwendet werden.
• Stellen Sie das Produkt nicht in der Nähe von magnetischen Feldern (z. B. Lautsprecher, Mikrowelle) auf. • Stellen Sie das Produkt nicht direkt auf einen Verstärker oder Receiver. • Stellen Sie keine offenen Brandquellen wie brennende Kerzen auf dem Produkt oder in dessen direkter Nähe ab. • Musik sollte nicht über einen längeren Zeitraum mit übermäßiger Lautstärke gehört werden. Hierdurch kann das Gehör geschädigt werden.
7.
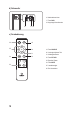
b) Subwoofer 16 Netzkabelanschluss 17 Taste PAIR 18 Kopplungs-Kontrollleuchte 16 17 18 c) Fernbedienung 26 19 25 20 21 24 22 19 Taste SOURCE 20 Vorheriger/nächster Titel 21 Wiedergabe/Pause 22 Taste BT PAIR 23 Equalizer-Tasten 23 24 Taste MUTE 25 Lautstärkeregler 26 Ein-/Ausschalter 10
8. Fernbedienung a) Vor der ersten Verwendung • Bei Anlieferung ist bereits eine Knopfzelle in das Batteriefach eingelegt. • Ziehen Sie vor der ersten Verwendung den Kunststoff-Schutzstreifen aus dem Batteriefach heraus. Der Schutzstreifen dient dazu, eine vorzeitige Entladung der Batterie zu verhindern. b) Batterie ersetzen Wechseln Sie die Batterie, sobald das Produkt nicht mehr auf die Befehle der Fernbedienung reagiert.
9. Aufstellen / Wandmontage Vermeiden Sie Orte, an denen Erschütterungen, Vibrationen, Staub, Hitze, Kälte und Feuchtigkeit vorkommen. Außerdem dürfen sich keine starken Transformatoren oder Motoren in der Nähe des Produkts befinden. Decken Sie das Produkt nicht mit Tischdecken oder ähnlichen Gegenständen ab. Das Produkt kann sich während des Betriebs dadurch zu stark erhitzen. Es besteht Brandgefahr! Achten Sie auf eine ausreichende Belüftung.
• Beide Wandhalterungen müssen mit jeweils 2 Schrauben an der Wand befestigt werden. • Verwenden Sie eine Wandhalterung als Schablone und markieren Sie die Position der Bohrlöcher an der Wand. • Bohren Sie die Löcher in die Wand. • Stecken Sie die beiliegenden Dübel in die Bohrlöcher. • Schrauben Sie die Wandhalterungen an der Wand fest. • Lösen Sie die beiden Schrauben (7) an der Rückseite der Soundbar, so dass die Schraubenköpfe 3 mm aus dem Gehäuse herausragen.
10. Anschlüsse Das Produkt selbst und alle anzuschließenden Geräte müssen ausgeschaltet sein, bevor Sie die Kabel verbinden. a) HDMI (ARC) Verbinden Sie den HDMI-Eingang (15) über ein separat erhältliches HDMI-Kabel (Spezifikation HDMI 1.4) mit dem HDMI-Ausgang des Fernsehers. Die ARC-Funktion (ARC = Audio Return Channel) ermöglicht es, das Audiosignal eines ARC-kompatiblen Fernsehers über eine einzelne HDMI-Verbindung an die Soundbar zu übertragen. Der Fernseher muss ARC und HDMI-CEC unterstützen.
c) Koaxial Verbinden Sie den Koaxial-Eingang (11) über ein separat erhältliches Koaxial-Kabel mit dem Koaxial-Ausgang des Fernsehers (oder eines geeigneten Audiogerätes). d) AUX Um Verzerrungen oder Fehlanpassungen zu vermeiden, die zur Beschädigung des Produkts oder des angeschlossenen Gerätes führen können, dürfen an den AUX-Eingang (14) nur Geräte mit einem Cinchbzw. Kopfhörerausgang angeschlossen werden.
e) Netzanschluss Soundbar • Verbinden Sie den DC-Stecker des Netzteils mit der DC-Buchse (10). • Verbinden Sie den Kleingerätestecker des Netzkabels mit dem Netzteil. • Verbinden Sie den Netzstecker mit einer haushaltsüblichen Netzsteckdose. Subwoofer • Verbinden Sie den Kleingerätestecker mit dem Netzkabelanschluss (16). • Verbinden Sie den Netzstecker mit einer haushaltsüblichen Netzsteckdose.
11. Inbetriebnahme a) Subwoofer mit Soundbar koppeln Automatisch • Subwoofer und Soundbar koppeln sich nach dem Einschalten automatisch. Der Abstand zwischen Subwoofer und Soundbar darf 6 Meter nicht überschreiten. • Während des Koppelns blinkt die Kopplungs-Kontrollleuchte (18). • Sobald das Koppeln abgeschlossen und die Verbindung hergestellt ist, leuchtet die Kopplungs-Kontrollleuchte stetig. Drücken Sie während des automatischen Koppelns nicht die Taste PAIR (17).
b) Einschalten und Standby-Modus • Nach der Verbindung mit dem Stromnetz befindet sich die Soundbar im Standby-Modus. Die Standby-Anzeige (8) leuchtet rot auf. • Drücken Sie den Ein-/Ausschalter (1, 26), um das Gerät einzuschalten. Die LED des zuvor ausgewählten Modus leuchtet oder blinkt. • Drücken Sie den Ein-/Ausschalter erneut, um das Gerät wieder in den Standby-Modus zu schalten. • Wenn das Gerät für ca. 15 Minuten kein Eingangssignal erkennt, schaltet es automatisch in den Standby-Modus.
e) Equalizer Drücken Sie eine der Equalizer-Tasten MOVIE / TV / SPORT / DFLT (23) oder drücken Sie die Taste EQ (3), um den gewünschten Soundeffekt einzustellen. MOVIE Geeignet für Filme, Serien TV Geeignet für Nachrichten, Reportagen, Interviews, etc. SPORT Geeignet für Sportsendungen DFLT Grundeinstellung f) Bluetooth Wenn Sie das erste Mal Ihr Bluetooth-fähiges Gerät mit der Soundbar verwenden, müssen beide Geräte gekoppelt werden.
Musikwiedergabe vom Bluetooth-Gerät • Folgende Profile werden von der Soundbar im Bluetooth-Modus unterstützt: A2DP (Advanced Audio Distribution Profile) Audiowiedergabe AVRCP (Audio Video Remote Control Profile) Musiksteuerung über die Fernbedienung der Soundbar und Audiowiedergabe • Wenn Ihr Mobilgerät AVRCP unterstützt, können Sie mit der Fernbedienung zum nächsten oder vorigen Titel wechseln sowie die Wiedergabe starten oder unterbrechen.
12. Problembehebung Keine Stromversorgung. • Stellen Sie sicher, dass das Netzkabel ordnungsgemäß verbunden ist. • Überprüfen Sie, ob die Steckdose defekt ist. Die Fernbedienung funktioniert nicht. • Verwenden Sie die Fernbedienung innerhalb des Erfassungsbereichs. • Richten Sie die Fernbedienung auf den IR-Empfänger. • Die Batterie ist leer und muss ersetzt werden. • Die Batterie wurde evtl. falsch eingelegt. Lautes Brummen.
14. Konformitätserklärung (DOC) Hiermit erklärt Conrad Electronic SE, Klaus-Conrad-Straße 1, D-92240 Hirschau, dass dieses Produkt der Richtlinie 2014/53/EU entspricht. Der vollständige Text der EU-Konformitätserklärung ist unter der folgenden Internetadresse verfügbar: www.conrad.com/downloads Wählen Sie eine Sprache durch Anklicken eines Flaggensymbols aus und geben Sie die Bestellnummer des Produkts in das Suchfeld ein; anschließend können Sie die EU-Konformitätserklärung im PDF-Format herunterladen.
16. Technische Daten a) Allgemein Bluetooth-Version..............................................3.0 Betriebsbedingungen.........................................0 bis +40 °C, 40 – 85 % rF Lagerbedingungen.............................................-20 bis +60 °C, 40 – 85 % rF b) Soundbar Eingangsspannung/-strom.................................21 V/DC, 3 A Ausgangsleistung..............................................2 x 50 W (RMS) Funkfrequenz.....................................................
Table of contents Page 1. Introduction.........................................................................................................................................................26 2. Explanation of symbols.......................................................................................................................................26 3. Intended use.......................................................................................................................................
14. Declaration of Conformity (DOC)........................................................................................................................44 15. Disposal..............................................................................................................................................................44 a) Product.........................................................................................................................................................
1. Introduction Dear customer, Thank you for purchasing this product. This product complies with statutory national and European requirements. For safety reasons, always follow the instructions in this manual. These operating instructions are part of this product. They contain important information on setting up and using the product. Also consider this if you pass on the product to any third party.
3. Intended use The product is used to amplify audio signals and to convert them to audible sound waves. The audio inputs may only be connected to suitable audio outputs on audio devices. Power is supplied via a normal household mains socket. This product is intended for indoor use only. Do not use it outdoors. Contact with moisture (e.g. in bathrooms) must be avoided under all circumstances. For safety and approval purposes, you must not rebuild and/or modify this product.
5. Features and functions • Wireless connection via Bluetooth • NFC function • Output power: 2 x 50 W + 120 W (RMS) • Optical input • AUX input • Coaxial input • HDMI ARC input • Soundbar with two integrated speakers • Wireless subwoofer (wireless transmission from soundbar to subwoofer) • Comfortable control from the sofa via remote control • Anti-slip feet 6. Safety instructions Read the operating instructions carefully and especially observe the safety information.
• Always handle the product carefully. Jolts, impacts or a fall even from a low height may damage the product. • Always observe the safety and operating instructions of any other devices which are connected to the product. • Never touch the product with wet or damp hands. • Only a proper mains socket (220 – 240 V/AC, 50/60 Hz) connected to the public supply net must be used as voltage source.
• Do not place the product in the vicinity of magnetic fields (e.g. speakers, microwave oven). • Do not place the product directly on an amplifier or receiver. • Do not place open sources of fire such as burning candles on or directly next to the product. • Do not listen to music at an excessive volume for prolonged periods. This may damage your hearing. • The device must not be used near bath tubs, showers, swimming pools or washbasins. The product must not get wet.
7.
b) Subwoofer 16 Mains cable connector 17 PAIR button 18 Pairing indicator 16 17 18 c) Remote control 26 19 25 20 21 24 22 19 SOURCE button 20 Previous/next track 21 Playback/pause 22 BT PAIR button 23 Equalizer buttons 23 24 MUTE button 25 Volume control 26 On/off switch 32
8. Remote control a) Before first use • A button cell is inserted in the battery compartment on delivery. • Pull out the plastic isolating strip from the battery compartment before you use the product for the first time. The isolating strip prevents the battery from discharging prematurely. b) Replacing the battery Replace the battery as soon as the product no longer respond to commands from the remote control. • Loosen the screw of the battery compartment cover with a small Phillips screwdriver.
9. Setting up / wall mounting Avoid places where shocks, vibrations, dust, heat, cold and moisture occur. In addition, no powerful transformers or motors should be used close to the device. Do not cover the product with a tablecloth or similar objects. This could cause the product to heat up strongly during operation. This constitutes a fire hazard! Ensure that there is sufficient ventilation. Maintain a sufficient distance to other devices and walls.
• Both wall mounts need to be fixed to the wall with 2 screws each. • Use a wall mount as a template and mark the position of the drill holes on the wall. • Drill the holes in the wall. • Insert the included dowels into the drilled holes. • Screw the wall mounts tightly to the wall. • Loosen the two screws (7) on the back of the soundbar so that the screw heads extend 3 mm from the housing. • Hang the soundbar in the two mounting brackets.
10. Connections The product itself and all units must be switched off before you connect the cables. a) HDMI (ARC) Connect the HDMI input (15) via a separately available HDMI cable (HDMI specification 1.4) with the HDMI output of the TV set. The ARC function (ARC = Audio Return Channel) allows the signal of an ARC-compatible TV to be transmitted to the soundbar via a single HDMI connection. The TV set must support ARC and HDMI-CEC. Both functions may need be activated in the menu of the TV set.
c) Coaxial Connect the coaxial input (11) via a separately available coaxial cable with the coaxial output of the TV (or a suitable audio device). d) AUX To avoid distortion or mismatching that may damage the product or the connected device, you may only connect devices with a cinch or headphone output to the AUX input (14). • Option A: Connect the AUX input via the supplied jack-to-jack cable with the headphone jack or the LINE-OUT jack of the TV (or a suitable audio device).
e) Mains connection Soundbar • Connect the DC plug of the mains adapter to the DC jack (10). • Connect the appliance coupler of the mains cable to the mains adapter. • Connect the mains plug to a standard mains socket. Subwoofer • Connect the appliance coupler with the mains cable connector (16). • Connect the mains plug to a standard mains socket.
11. Operation a) Pairing the subwoofer and soundbar Automatic • The subwoofer and soundbar will pair automatically after turning on. The distance between the subwoofer and the soundbar must not exceed 6 meters in open space. • During pairing, the pairing indicator lamp (18) flashes. • As soon as the pairing process is completed and the connection is established, the pairing indicator is lit solid. Do not press the PAIR (17) button during automatic pairing.
b) Turn on and standby mode • After connecting to the mains grid, the soundbar switches to standby mode. The standby indicator (8) is lit red. • Press the on/off button (1, 26) to switch on the device. The LED of the previously selected mode is lit or flashes. • Press the on/off button again to switch the device back to standby mode. • If the device detects no signal input for approx. 15 minutes, it automatically switches to standby mode. The standby indicator lights up red.
e) Equalizer Press one of the equalizer buttons MOVIE / TV / SPORTS / DFLT (23) or press the EQ (3) button to set the desired EQ setting. MOVIE Suitable for films, series TV Suitable for news, reports, interviews, etc. SPORT Suitable for sports programs DFLT Default setting f) Bluetooth If this is the first time you are using your Bluetooth-enabled device with the soundbar, both devices must be paired.
Music playback from your Bluetooth device • The soundbar supports the following profiles in Bluetooth mode: A2DP (Advanced Audio Distribution Profile) Audio playback AVRCP (Audio/Video Remote Control Profile) Music control via the remote control of the soundbar and audio playback • If your mobile device supports AVRCP, you can use the remote control to jump to the next or previous track as well as start or pause playback. You can start or pause playback with the PAIR (4) button on the soundbar.
12. Troubleshooting No power supplied. • Make sure that the mains cord is properly connected. • Verify that the mains outlet is in working order. The remote control does not work. • Use the remote control within range. • Aim the remote control at the IR receiver. • The battery is empty and needs to be replaced. • The battery may have been inserted incorrectly. Loud hum. • Disconnect the product from the mains supply and clean the connectors as well as the plugs of the audio cables.
14. Declaration of Conformity (DOC) Conrad Electronic SE, Klaus-Conrad-Straße 1, D-92240 Hirschau, hereby declares that this product conforms to the 2014/53/EU directive. Click on the following link to read the full text of the EU declaration of conformity: www.conrad.com/downloads Select a language by clicking on a flag symbol, and then enter the product order number in the search box. The EU Declaration of Conformity is available for download in PDF format. 15.
16. Technical data a) General information Bluetooth version...............................................3.0 Operating conditions..........................................0 to +40 °C, 40 – 85 % RH Storage conditions.............................................-20 to +60 °C, 40 – 85 % RH b) Soundbar Input voltage/current..........................................21 V/DC, 3 A Output power.....................................................2 x 50 W (RMS) Radio frequency.......................................
Table des matières Page 1. Introduction.........................................................................................................................................................48 2. Explication des symboles...................................................................................................................................48 3. Utilisation prévue..................................................................................................................................
14. Déclaration de conformité (DOC).......................................................................................................................66 15. Élimination des déchets......................................................................................................................................66 a) Produit..........................................................................................................................................................66 b) Piles/accumulateurs..
1. Introduction Chère cliente, cher client, Nous vous remercions de l'achat du présent produit. Le produit est conforme aux exigences des normes européennes et nationales en vigueur. Afin de maintenir l'appareil en bon état et d'en assurer un fonctionnement sans danger, l'utilisateur doit impérativement respecter le présent mode d'emploi ! Le présent mode d'emploi fait partie intégrante du produit. Il contient des consignes importantes pour la mise en service et la manipulation du produit.
3. Utilisation prévue Le produit sert à renforcer les signaux audio et à transformer en ondes sonores audibles. Les entrées audio doivent être connectées à des sorties audio compatibles d'appareils audio. L’alimentation en énergie électrique est fournie via une prise de courant domestique classique. L'utilisation est uniquement autorisée en intérieur, dans les locaux fermés ; l'utilisation en plein air est interdite. Éviter impérativement tout contact avec l'humidité, par ex. dans une salle de bains, etc.
5. Caractéristiques et fonctions • Connexion sans fil via Bluetooth • Fonction NFC • Puissance de sortie : 2 x 50 W + 120 W (RMS) • Entrée optique • Entrée AUX • Entrée coaxiale • Entrée ARC HDMI • Barre de son avec deux haut-parleurs intégrés • Subwoofer/caisson de basses sans fil (transmission par radio de la barre de son au subwoofer.) • Commande pratique depuis votre canapé via une télécommande • Pieds antidérapants 6.
• Maniez le produit avec précaution. Les chocs, les coups et les chutes, même d’une faible hauteur, suffisent pour endommager l’appareil. • Respectez également les informations concernant la sécurité et le mode d'emploi pour les autres appareils connectés à cet appareil. • Ne touchez jamais le produit avec les mains mouillées ou humides. • Comme source de tension, il convient d’utiliser uniquement une prise de courant conforme (220 – 240 V/CA, 50/60 Hz) raccordé au réseau d’alimentation public.
• Ne placez pas le produit à proximité directe de sources de chaleur (p. ex. chauffage, poêle, plaque électrique, amplificateur). • Ne placez pas le produit à proximité de champs magnétiques (p. ex. haut-parleur, micro-ondes). • Ne placez pas directement le produit sur un amplificateur ou un récepteur. • Ne placez pas de flammes qui pourraient déclenchées un incendie comme p. ex.
7.
b) Subwoofer 16 Raccordement du cordon d’alimentation 17 Touche PAIR 18 Voyant de contrôle de couplage 16 17 18 c) Télécommande 26 19 25 20 21 24 22 19 Touche SOURCE 20 Titre précédent/suivant 21 Lecture/pause 22 Touche BT PAIR 23 Touches d'égaliseur 23 24 Touche MUTE 25 Réglage du volume 26 Interrupteur de marche/d'arrêt 54
8. Télécommande a) Avant la première utilisation • À la livraison, une pile-bouton est déjà insérée dans le compartiment de la pile. • Avant la première mise en service, tirez d'abord sur la languette de protection en plastique placée dans le compartiment de la pile. La languette de protection sert à éviter une décharge prématurée de la pile. b) Remplacement de la pile Remplacez la pile dès que le produit ne réagit plus aux commandes de la télécommande.
9. Installation/montage mural Évitez les endroits où des chocs, des vibrations peuvent se produire ainsi que ceux où de la poussière, de la chaleur, du froid et de l'humidité sont présents. De plus, aucun transformateur puissant ou moteur ne doit se trouver à proximité du produit. Ne recouvrez pas le produit avec des nappes ou tout autre article semblable. Le produit peut ainsi fortement surchauffer durant le fonctionnement. Risque d'incendie ! Veillez à une aération suffisante.
• Les deux supports muraux doivent être fixés sur le mur avec chacun 2 vis. • Utilisez un support mural comme gabarit et marquez la position des trous à percer sur le mur. • Percez les trous dans le mur. • Insérez les chevilles fournies dans les trous percés. • Vissez bien les supports muraux sur le mur. • Desserrez les deux vis (7) au dos de la barre de son, de manière à ce que les têtes des vis dépassent de 3 mm du boîtier. • Accrochez la barre de son aux deux supports muraux.
10. Connexions Le produit en lui-même et tous les appareils à raccorder doivent être éteints avant d'effectuer tous les branchements des câbles. a) HDMI (ARC) Reliez l'entrée HDMI (15) à la sortie HDMI du téléviseur en utilisant un câble HDMI disponible en option (spécification HDMI 1.4). La fonction ARC (ARC pour Audio Return Channel) permet que le signal audio d'un téléviseur ayant un canal de retour audio soit transmis via une seule connexion HDMI à la barre de son.
c) Coaxial Raccordez l'entrée coaxiale (11) via un câble coaxial disponible en option à la sortie coaxiale du téléviseur (ou un appareil audio compatible). d) AUX Pour éviter les distorsions ou des désadaptations qui peuvent provoquer des dégâts au produit ou à l'appareil raccordé, seulement des appareils avec une sortie casque ou RCA doivent être branchés sur l'entrée AUX (14).
e) Branchement au secteur Barre de son • Branchez la fiche CC du bloc d'alimentation sur la prise CC (10). • Raccordez la petite fiche du cordon d'alimentation au bloc d'alimentation. • Branchez la fiche de secteur sur une prise électrique courante. Subwoofer • Raccordez la petite fiche au raccordement du cordon d’alimentation (16). • Branchez la fiche de secteur sur une prise électrique courante.
11. Mise en service a) Couplage du subwoofer à la barre de son Automatique • Le subwoofer et la barre de son se couplent automatiquement après la mise sous tension. La distance entre le subwoofer et la barre de son ne doit pas dépasser 6 mètres. • Pendant le couplage, le voyant de contrôle du couplage (18) clignote. • Le voyant de contrôle de couplage s’allume en permanence dès que le couplage est terminé et que la connexion est établie. N'appuyez pas sur la touche PAIR (17) pendant le couplage automatique.
b) Mise en marche et mode veille • Après la connexion au réseau électrique, la barre de son se trouve en mode veille. Le voyant du mode veille (8) s'allume rouge. • Appuyez sur l'interrupteur marche/arrêt (1, 26) pour allumer le produit. La diode LED du mode qui a été choisi préalablement s'allume ou clignote. • Appuyez sur l'interrupteur marche/arrêt de nouveau pour permettre à l'appareil de repasser en mode veille. • Si l'appareil ne reçoit pas de signal de commande pendant env.
e) Équaliseur Appuyez sur une des touches de l’égaliseur MOVIE / TV / SPORT / DFLT (23) ou appuyez sur la touche EQ (3) pour régler l'effet sonore souhaité. MOVIE convient pour regarder des films, séries TV convient pour les nouvelles, reportages, interviews, etc. SPORT convient pour des chaînes sportives DFLT réglage basique f) Bluetooth Si vous utilisez pour la première fois votre appareil Bluetooth compatible avec la barre de son, les deux appareils doivent être couplés.
Lecture de musique de l'appareil Bluetooth • Les profils suivants sont compatibles avec la barre de son en mode Bluetooth : A2DP (Advanced Audio Distribution Profile) Reproduction audio AVRCP (Audio Video Remote Control Profile) Commande de la musique via la télécommande de la barre de son et lecture audio • Si votre appareil portable supporte l'AVRCP, vous pouvez utiliser la télécommande pour passer au titre suivant ou revenir au titre précédent et démarrer ou arrêter la lecture.
12. Guide de dépannage Pas d'alimentation en électricité • Assurez-vous que le cordon d'alimentation soit correctement branché. • Réexaminez si la prise de courant n'est pas défectueuse. La télécommande ne fonctionne pas. • Utilisez la télécommande dans le champ de réception. • Dirigez la télécommande vers le récepteur IR. • La pile est vide et doit être remplacée. • La pile est éventuellement mal insérée. Ronflement bruyant.
14. Déclaration de conformité (DOC) Conrad Electronic SE, Klaus-Conrad-Straße 1, D-92240 Hirschau, déclare par la présente que ce produit est conforme à la directive 2014/53/UE. Le texte intégral de la déclaration de conformité UE est disponible au lien suivant : www.conrad.com/downloads Sélectionnez une langue en cliquant sur le drapeau correspondant puis saisissez le numéro de commande du produit dans le champ de recherche pour pouvoir télécharger la déclaration de conformité UE en format PDF. 15.
16. Données techniques a) Généralités Version Bluetooth..............................................3.0 Conditions de service........................................de 0 à +40 °C, 40 – 85 % HR Conditions de stockage.....................................de -20 à +60 °C, 40 – 85 % HR b) Barre de son Tension/courant d’entrée...................................21 V/CC, 3 A Puissance de sortie...........................................2 x 50 W (RMS) Fréquence radio................................................
Inhoudsopgave Pagina 1. Inleiding..............................................................................................................................................................70 2. Verklaring van de symbolen................................................................................................................................70 3. Doelmatig gebruik.....................................................................................................................................
14. Conformiteitsverklaring (DOC)............................................................................................................................88 15. Afvoer.................................................................................................................................................................88 a) Product.........................................................................................................................................................
1. Inleiding Zeer geachte klant, Wij danken u voor de aankoop van dit product. Het product voldoet aan alle wettelijke, nationale en Europese normen. Om dit zo te houden en een veilig gebruik te garanderen, dient u als gebruiker deze gebruiksaanwijzing in acht te nemen! Deze gebruiksaanwijzing behoort bij dit product. Er staan belangrijke aanwijzingen in over ingebruikname en gebruik. Houd hier rekening mee als u dit product doorgeeft aan een derde.
3. Doelmatig gebruik Het product dient ervoor om audiosignalen te versterken en in hoorbare geluidsgolven om te zetten. De audioingangen mogen alleen aan daarvoor geschikte audio-uitgangen van audioapparatuur aangesloten worden. De stroomvoorziening verloopt via een normaal stopcontact in de woning. Het product is alleen bedoeld voor gebruik in gesloten ruimtes dus gebruik buitenshuis is niet toegestaan. Contact met vocht, bijv. in badkamers e.d. dient per sé te worden vermeden.
5. Eigenschappen en functies • Draadloze verbinding via Bluetooth • NFC-functie • Uitgangsvermogen: 2 x 50 W + 120 W (RMS) • Optische ingang • AUX-ingang • Coaxiale ingang • HDMI ARC-ingang • Soundbar met twee geïntegreerde luidsprekers • Draadloze subwoofer (signaaloverdracht van de Soundbar naar de subwoofer) • Comfortabele bediening vanaf de bank via de afstandsbediening • Slipvaste voetjes 6. Veiligheidsinstructies Lees de gebruiksaanwijzing zorgvuldig door en let vooral op de veiligheidsinstructies.
• Behandel het product met zorg. Schokken, stoten of zelfs vallen vanaf een geringe hoogte kunnen het product beschadigen. • Neem ook de veiligheids- en gebruiksaanwijzingen van alle andere apparaten in acht die op het product zijn aangesloten. • Raak het product nooit met natte of vochtige handen aan. • Als spanningsbron mag alleen een normaal stopcontact (220 - 240 V/AC, 50/60 Hz) van het openbare stroomnet worden gebruikt.
• Plaats het product niet in de buurt van magneetvelden (bijv. luidsprekers, magnetrons, etc.). • Zet het product niet direct op een versterker of ontvanger neer. • Plaats geen open vuur zoals brandende kaarsen op het product of in de directe omgeving ervan. • Luister niet te lang naar te hard afgespeelde muziek. Hierdoor kan uw gehoor beschadigd raken. • Het apparaat mag niet in de nabijheid van een badkuip, douche, zwembad of wastafel gebruikt worden. Het product mag niet nat worden.
7.
b) Subwoofer 16 Aansluiting elektrisch snoer 17 Toets PAIR 18 Koppelingscontrolelampje 16 17 18 c) Afstandsbediening 26 19 25 20 21 24 22 19 Toets SOURCE 20 Vorig/volgend nummer 21 Weergave/pauze 22 Toets BT PAIR 23 Equalizer-toetsen 23 24 Toets MUTE 25 Volumeregelaar 26 Aan-/uitschakelaar 76
8. Afstandsbediening a) Voor het eerste gebruik • Bij levering bevindt er zich al een knoopcel in het batterijvak. • Trek voor het eerste gebruik de kunststoffen beschermstrip uit het batterijvak. De beschermende strip dient ervoor om te verhinderen dat de batterij voortijdig leegloopt. b) De batterij vervangen Vervang de batterij zodra het product niet meer op het signaal van de afstandsbediening reageert. • Draai de schroef van het deksel van het batterijvak los met een kruiskopschroevendraaier.
9. Opstellen / wandmontage Vermijd plaatsen waar schokken, trillingen, stof, hitte, kou en vocht voorkomen. Zorg er tevens voor dat er zich geen krachtige transformatoren of motoren in de buurt van het apparaat bevinden. Dek het product niet af met een tafelkleed of soortgelijke voorwerpen. Het product kan daardoor tijdens gebruik te heet worden. Er bestaat brandgevaar! Zorg voor voldoende ventilatie. Houd voldoende afstand tot andere apparaten en muren.
• Beide wandhouders moeten elk met 2 schroeven aan de wand worden bevestigd. • Gebruik een wandhouder als sjabloon en markeer de positie van de boorgaten op de wand. • Boor de gaten in de wand. • Steek de meegeleverde pluggen in de boorgaten. • Schroef de wandhouders aan de wand. • Draai de beide schroeven (7) aan de achterkant van de soundbar los, zodat de schroefkoppen 3 mm uit de behuizing steken. • Hang de soundbar in de beide wandhouders.
10. Aansluitingen Het product zelf en alle aan te sluiten apparaten moeten uitgeschakeld zijn voordat u de kabel aansluit. a) HDMI (ARC) Sluit de HDMI-ingang (15) via een afzonderlijk verkrijgbare HDMI-kabel (specificatie HDMI 1.4) aan op de HDMIuitgang van de televisie. De ARC-functie (ARC = Audio Return Channel) maakt het mogelijk om het audiosignaal van een ARCcompatibele televisie via een enkele HDMI-verbinding naar de Soundbar over te dragen. De televisie moet ARC en HDMI-CEC ondersteunen.
c) Coax Verbind de coaxiale ingang (11) via een afzonderlijk verkrijgbare coaxiale kabel met de coaxiale uitgang van de televisie (of een geschikt audio-apparaat). d) AUX Om vervormingen of foutieve aanpassingen te voorkomen, die kunnen leiden tot beschadiging van het product of van het aangesloten apparaat, mogen op de AUX-ingang (14) alleen apparaten met een cinchof een koptelefoonaansluiting aangesloten worden.
e) Netstroomaansluiting Soundbar • Verbind de DC-stekker van de netvoedingsadapter met de DC-aansluitbus (10). • Verbind de kleine apparaatstekker van het netsnoer met de netvoedingsadapter. • Steek de netstekker in een in het huishouden gewoon stopcontact. Subwoofer • Verbind de kleine apparaatstekker met de aansluiting voor het netsnoer (16). • Steek de netstekker in een in het huishouden gewoon stopcontact.
11. Ingebruikname a) Subwoofer verbinden met de Soundbar Automatisch • Na het inschakelen worden de subwoofer en Soundbar automatisch met elkaar verbonden. De afstand tussen de subwoofer en de Soundbar mag niet groter zijn dan 6 meter. • Tijdens het koppelen knippert het koppelingscontrolelampje (18). • Wanneer het koppelen voltooid is en de verbinding tot stand is gebracht, brandt het koppelingscontrolelampje continu. Druk tijdens het automatische koppelen niet op de toets PAIR (17).
b) Inschakelen en standby-modus • Na te zijn verbonden met het elektriciteitsnet staat de Soundbar in de standby-modus. Het standby-indicatielampje (8) brandt rood. • Druk op de aan-/uitschakelaar (1, 26) om het apparaat aan te zetten. De LED van de eerder gekozen modus brandt of knippert. • Druk opnieuw op de aan-/uitschakelaar om het apparaat weer in de standby-modus te zetten. • Als het apparaat gedurende ca. 15 minuten geen ingangssignaal herkent, zet het zichzelf automatisch in de standby-modus.
e) Equalizer Druk op een van de equalizertoetsen MOVIE / TV / SPORT / DFLT (23) of druk op de toets EQ (3) om het gewenste geluidseffect in te stellen. MOVIE Geschikt voor films, series TV Geschikt voor nieuws, reportages, interviews, enz. SPORT Geschikt voor sportuitzendingen DFLT Basisinstelling f) Bluetooth Als u voor het eerst uw Bluetooth-compatibele apparaat in combinatie met de Soundbar gebruikt, moeten beide apparaten gekoppeld worden.
Muziekweergave van het Bluetooth-apparaat • De volgende profielen worden door de Soundbar in de Bluetooth-modus ondersteund: A2DP (Advanced Audio Distribution Profile) Audioweergave AVRCP (Audio Video Remote Control Profile) Muziekregeling via de afstandsbediening van de Soundbar en audioweergave • Als uw mobiele apparaat AVRCP ondersteunt, kunt u met de afstandsbediening naar het volgende of vorige nummer wisselen en de weergave starten of onderbreken.
12. Probleemoplossing Geen stroom beschikbaar. • Zorg ervoor dat het netsnoer goed aangesloten is. • Controleer of het stopcontact defect is. De afstandsbediening werkt niet. • Gebruik de afstandsbediening alleen binnen zijn detectiebereik. • Richt de afstandsbediening op de IR-ontvanger. • De batterij is leeg en moet vervangen worden. • Mogelijk is de batterij niet goed in het batterijvak geplaatst. Luid gebrom.
14. Conformiteitsverklaring (DOC) Hiermee verklaart Conrad Electronic SE, Klaus-Conrad-Straße 1, D-92240 Hirschau dat het product voldoet aan richtlijn 2014/53/EU. De volledige tekst van de EU-conformiteitsverklaring is als download via het volgende internetadres beschikbaar: www.conrad.com/downloads Kies een taal door op een vlagsymbool te klikken en voer het bestelnummer van het product in het zoekveld in; aansluitend kunt u de EU-conformiteitsverklaring downloaden in pdf-indeling. 15.
16. Technische gegevens a) Algemeen Bluetooth-versie.................................................3.0 Bedrijfscondities................................................0 tot +40 ºC, 40 – 85 % RV Opslagcondities.................................................-20 tot +60 ºC, 40 – 85 % RV b) Soundbar Ingangsspanning/-stroom..................................21 V/DC, 3 A Uitgangsvermogen............................................2 x 50 W (RMS) Radiofrequentie.................................................
Dies ist eine Publikation der Conrad Electronic SE, Klaus-Conrad-Str. 1, D-92240 Hirschau (www.conrad.com). Alle Rechte einschließlich Übersetzung vorbehalten. Reproduktionen jeder Art, z. B. Fotokopie, Mikroverfilmung, oder die Erfassung in elektronischen Datenverarbeitungsanlagen, bedürfen der schriftlichen Genehmigung des Herausgebers. Nachdruck, auch auszugsweise, verboten. Die Publikation entspricht dem technischen Stand bei Drucklegung. Copyright 2017 by Conrad Electronic SE.