
User manual


• Maintenance, modications and repairs are to be performed exclusively by an
expert or at a qualied shop.
• If you have questions which remain unanswered by these operating instructions,
contact our technical support service or other technical personnel.
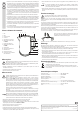
Parts and controls
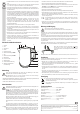
1
10
4
9
7
2
5
11
3
12
1 Spout
2 Filter
3 Isolated area
4 Lid
5 Lid release button
6 1.7 L MAX water level indicator
7 Grip
8 0.7 L MIN water level indicator
9 Power LED
10 On/o switch
11 Water tank
12 Base with cable storage
13 Mains cable with mains plug
(not shown)
6
8
Set-up
Do not let the water tank, base or mains cable get in contact with hot surfaces (e.g.
stove).
Operate the water kettle on a dry, at and stable surface only, in order to prevent it
from tipping over.
• Fully unwind the mains cable (13) and guide it through the recess in the base (12).
• Place the base near a wall socket.
• Place the water tank (11) on the base.
Operation
Only heat drinking water. Do not heat any other liquids or foodstu with this product.
Fill the water tank at least until the 0.7 L MIN marking before switching the device on.
Never switch on the product without or with too little water. If done so accidentally,
the safety cut-o (dry-boil protection or overheat protection) will be activated. After
such a case, wait for approx. 15 minutes until the device has cooled down to room
temperature, before lling it with water and switching it on again.
Never open the lid during or shortly after boiling. There is a risk of scalding from
escaping water steam!
Close the lid, as the boiling process will be extended otherwise.
The water kettle must be switched o when connecting it to the mains.
When hot, touch the water tank by its handle (7) or isolated area (3) only. Keep the
product upright to prevent hot water from escaping.
Fill the water tank with water until the MAX marking before rst time use and start
boiling as described further below. Only use clear water without any additives. Do that
two times before rst time use in order to remove any manufacturing residue.
• Switch the product o. Connect the mains plug to the wall socket.
• Press the lid release button (5). The lid (4) will open.
• Fill the water tank with drinking water. The water level must be between the
0.7 L MIN and 1.7 L MAX markings on the water level indicator (6, 8).
• Close the lid until it locks into place.
• Place the water tank on the base (12).
• Set the on/o switch (10) to I position. The power LED (9) lights up.
• The product turns o once the water starts boiling. The on/o switch returns to O position and
the power LED turns o.
• Hold the water tank by its handle and lift it from the base. Carefully pour the water from the
spout (1).
You can stop heating at any time by setting the on/o switch to O position. Wait for
approx. 30 seconds before boiling water again.
• Disconnect the mains plug from the wall socket and let the water kettle cool down before
storing. Wind the mains cable around the cable storage inside the base.
Maintenance and cleaning
The product is not dishwasher-safe.
Do not immerse the product in water or other liquids!
Do not use any aggressive cleaning agents, rubbing alcohol or other chemical solutions as they
can cause damage to the housing and malfunctioning.
Despite occasional descaling, the product is maintenance-free. There are no components located
inside the product you need to maintain. Never dismantle the product.
Disconnect the product from the mains before cleaning and wait for the product to fully cool down
to room temperature. Keep in mind that the heating element in the water tank cools down slower.
Rinse the inside of the water tank with clear water only. Do not use brushes, sponges or similar, as
those will damage the heating element or plate.
Open the lid as described earlier and remove the lter(2) from
the inside. Clean the lter with a soft brush and then reinstall
it in its holder.
Clean the base and the mains cable with a clean, soft and dry cloth only.
Descaling
Descale the water tank from time to time. The periods in-between depend on the hardness of the
water and the frequency of use.
• Use a commercially available descaling agent and dose it according to the manufacturer
instructions. Do not use vinegar!
• Fill the water tank with the descaling solution and leave it according to the manufacturer
instructions.
• Pour the descaling agent away, rinse the water tank several times with fresh water and use a
soft cloth to wipe away any lime scale residue.
• After descaling, boil water for three or four times, in order to remove even the last remaining
residue of descaling solution.
• The descaling solution and its residue are not suitable for consumption. Pour the solution and
the boiled water away.
Disposal
Electronic devices are recyclable waste and must not be disposed of in the household
waste.
At the end of its service life, dispose of the product according to the relevant statutory
regulations.
You thus full your statutory obligations and contribute to the protection of the
environment.
Technical data
Operating voltage.........................................220 - 240 V/AC, 50 Hz
Power consumption.....................................2520 - 3000 W
Capacity ......................................................... 0.7 to 1.7 l
Water tank material ..................................... Stainless steel
Protection class ...........................................I
Cable length .................................................. approx. 75 cm (with power plug)
Operating/storage conditions .................... +5 to +40 ºC, 10 - 90 % rF
Dimensions (W x H x D)...............................155 x 241 x 225 mm
Weight ............................................................ 1.16 kg
This is a publication by Conrad Electronic SE, Klaus-Conrad-Str. 1, D-92240 Hirschau (www.conrad.com).
All rights including translation reserved. Reproduction by any method, e.g. photocopy, microlming, or the capture in electronic data
processing systems require the prior written approval by the editor. Reprinting, also in part, is prohibited. This publication represent the
technical status at the time of printing.
© Copyright 2015 by Conrad Electronic SE. V2_1115_02-HK