
Instructions


Replace nozzle
• Before changing or replacing the nozzle, the nozzle must be heated so that the lament can
be unloaded from the extruder and residues be removed.
The nozzle temperature depends on the lament material. Always check the
specication of the lament before replacing the nozzle.
Do not keep the nozzle temperature at 260 °C for more than 10 minutes. After 10
minutes, decrease it to 230 °C and keep it at this temperature for at least 10 minutes
before increasing it again. If you consistently operate the 3D printer at temperatures
over 230 °C, the life time of the extruder will drastically be shortened.
In order to (un)load the lament, ensure the nozzle temperature reaches 170 °C
or above.
Danger of burns! Do not touch the hot nozzle directly with bare hands.
1
2
• Remove the build bed carefully.
• Lay the 3D printer down on its side.
• Connect the power cable.
• Switch the 3D printer on.
Unload filament
Move axis
Disable steppers
Temperature
3
Nozzle 200
4
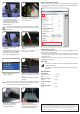
• First select < Prepare > in < Main > menu,
then select < Temperature >.
• Adjust target temperature of nozzle by
turning the control knob e.g. 200 ºC.
• Conrm the temperature by pressing the
control knob. The nozzle heats up.
.
200 / 200
X 0 Y 0 Z 0
3D Printer ready.
(1)
5
Unload filament
Move axis
Disable steppers
Temperature
6
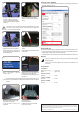
• The < Info screen > indicates the heating
process: The current temperature (1) is
rising.
• Once the target temperature is reached,
...
• ... select < Unload lament > in
< Prepare > menu.
• Remove the lament.
Replacement instructions
Nozzle for RF100
Item no. 1521716 Nozzle 0.4 mm
Item no. 1522154 Nozzle 0.6 mm
Item no. 1522155 Nozzle 0.8 mm
Intended use
This component replaces the nozzle installed in the 3D printer RF100 (item no. 1507428).
Change the nozzle, if you want to switch to another nozzle with smaller or larger opening.
Replace the nozzle, if the existing nozzle is damaged.
For safety and approval purposes, you must not rebuild and/or modify this product. If you use
the product for purposes other than those described above, the product may be damaged.
Read the instructions carefully and keep them. Make this product available to third parties only
together with its replacement instructions.
This product complies with the statutory national and European requirements. All company
names and product names are trademarks of their respective owners. All rights reserved.
Up-to-date replacement instructions
Download the latest replacement instructions at www.conrad.com/downloads
or scan the QR code above. Follow the instructions on the website.
Explanation of symbols
The symbol with the exclamation mark in the triangle is used to highlight important
information in these replacement instructions. Always read them carefully.
The arrow symbol indicates special information and advice.
Safety instructions
Read the replacement instructions carefully and especially observe the safety
information. If you do not follow the safety instructions and information on
proper handling in these instructions, we assume no liability for any resulting
personal injury or damage to property. Such cases will invalidate the warranty/
guarantee.
• The device is not a toy. Keep it out of the reach of children and pets.
• Do not leave packaging material lying around carelessly. This may become
dangerous playing material for children.
• Also observe the safety and operating instructions of the 3D printer (item no.
1507428).
• Take enough time for the assembly. Hurrying often leads to mistakes that may
damage components or ruin the time benet by elaborate rework.
• The workplace should be sufciently large, clean and at.
• Always observe the images during assembly. Here, the assembly locations and
correct alignment of the components are shown.
• The mechanical component was manufactured with high precision. Never apply
any force during replacement procedure. All parts can be assembled without any
great application of force. If this is not the case, rethink the assembly step and
re-read the corresponding description in these instructions.
• Do not overtighten the nozzle.
• To prevent overheating of the 3D printer, do not cover it while it is in operation.
• Proceed with care during replacement procedure! The product has some sharp
edges. There is a risk of injury!
• If you have questions which remain unanswered by these replacement instructions,
contact our technical support service or other technical personnel.
Required tools
• Tweezers (supplied with item no. 1507428)
• Adjustable spanner (as shown in image 7)
• 8 mm ring spanner