
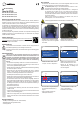
Instructions


This is a publication by Conrad Electronic SE, Klaus-Conrad-Str. 1, D-92240 Hirschau (www.conrad.com).
All rights including translation reserved. Reproduction by any method, e.g. photocopy, microlming, or the capture in
electronic data processing systems require the prior written approval by the editor. Reprinting, also in part, is prohibited.
This publication represents the technical status at the time of printing.
Copyright 2017 by Conrad Electronic SE. *1521716_1522154_5_V1_0117_02_LS_m_gb
(1)(2)(3)
7
(1)
8
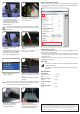
• Use the 8 mm ring spanner (2) to remove
the nozzle (1). While you loosen the
nozzle (in a counterclockwise direction)
lock the nozzle holder with the adjustable
spanner (3).
• Remove any lament residue with the
tweezers or a clean cloth from the plastic
tube (1).
The extruder must not be twisted during nozzle change/replacement. The nozzle
must never be turned when it has been cooled down since the plastic tube
((1) in step 8) may break otherwise.
(1)(2)(3)
9
10
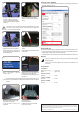
• Carefully screw in the new nozzle.
• Tighten the new nozzle (in a clockwise
direction). While you do so, make sure you
lock the nozzle holder against twisting with
the adjustable spanner.
• Bring back the 3D printer into its normal
position.
• Insert the lament into the lament opening
in the extruder.
Auto home
Level Bed
Preheat PLA
Load filament
11
12
• Select < Load lament > under the
< Prepare > menu.
• Gently push and guide the lament into
extruder until it exits from the nozzle.
• Feel the lament slowly getting drawn into
the extruder.
If no lament exits from the nozzle after lament movement stopped, select < Load
lament > again. After lament is loaded, lament residue can be removed with the
tweezers.
13
14
• Switch the 3D printer off by moving the
power switch to the O position.
• Let the 3D printer cool down to room
temperature.
• Place the build bed.
• Switch the 3D printer on.
• Calibrate build bed as usual (for details
refer to RF100 manual).
Print from “Cura“ software
• If you print from “Cura“ software, update the “Nozzle size“ in “Basic settings“ according to the
new nozzle opening size e.g. “0.4“.
15
Print from SD card
The “Nozzle size“ default setting of all GCODE les in the RF100 enclosed SD card is 0.4 mm.
• If you print from SD card, load the model le in “Cura“ software and update the “Nozzle size“
in “Basic settings“ according to the new nozzle opening size.
• Connect the SD card to the computer and save the new GCODE model le onto the SD card.
Disposal
At the end of its service life, dispose of the product in accordance with applicable
regulatory guidelines.
You thus full your statutory obligations and contribute to the protection of the
environment.
Technical data
a) All models
Dimensions (L x H x W) ................ 13 x 8 x 8 mm
Weight .......................................... approx. 2.50 g
b) Item no. 1521716
Nozzle (ø) ..................................... 0.4 mm
c) Item no. 1522154
Nozzle (ø) ..................................... 0.6 mm
d) Item no. 1522155
Nozzle (ø) ..................................... 0.8 mm