2014 CanWay Planner User’s manual 2014/4 1
CONTENTS INSTALL CANWAY PLANNER ........................................................................................................ 3 CANWAY PLANNER TAB LIST WINDOW ....................................................................................... 5 ADD.EDIT,CANCEL WAYPOINT ...................................................................................................... 6 ADD.EDIT,CANCEL PLANNING ROUTE...........................................................................................
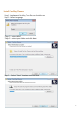
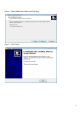
Install CanWay Planner Step.1 –Implement CanWay Tour Planner Installer.exe Step.2 –Select Language Step.3 – select NEXT Step.4 – select your folder and click Next Step.
Step.6– Select Additional Tasks and click Next Step.
CanWay Planner Tab List Window No.
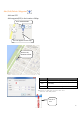
Add, Edit,Delete Waypoint Add new POI Add waypoint(POI) in the location of Map Click “Add New POI” An icon appears on the map Click on the locations of POI 項 目 Description Name Icon Edit POI name and display on POI list and Map Select one of built-in 9 Icon, and display on Route list and Map Location Display the latitude and longitude ※Length of name must greater than zero and less than 250 pixels 9 Kinds of Icon 6
Finish adding new POI and will display on POI list and Map . Add Waypoint in POI list the If you want to edit POI, please click waypoint on the POI list or Map. The mapping will appear on the editing bar can be modified.
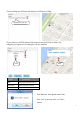
Add.Edit.Delect Route along the road Click ”Add new Route” and click the point with Map ”A”. The appear the “A” point along點 the road.
If you want to back “C” to “B”, click and back to last point “B” Click ”back to last point” Press the mouse left-button and draw point “B”, place point “B” with desired position and then route will be done automatically.
If you want to modify the planning route, make the point to the route that you want to modify. Draw and edit the route with suggestion. Press the mouse left-button and draw the route where it is needed, then release the mouse left-button and finishing.
Finishing the route palnning, click and appear the “Route Properties” TAB. Then enter the name and the route color. NAME Name Color Thickness Distance DESCRIPTION Enter name and display on Route list Choose Route color and display on the map Choose thickness and display on the map Total distance with planning route ※Length of name must greater than zero and less than 250 pixels When finish the “Route properties”editing, the planning route will display on the map and also will add to the Route List.
If want to edit the planning route, click the route in the route list or click the icon with starting point of the route on the map. Appear the TAB to edit.
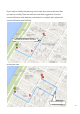
Add,Edit,Delect Line Add new line for the route isn’t along the road on map, like the following gray area on map Switching the satellite map to view, it’s a stadium and no road through Click ,and add the new line on the map 13
Edit the Route properties,and finish the planning route 14
Switching to map mode, then you can see the panning route with gray area on the map without road through Finish adding new line and appear on the Route list, and user also can edit it and same way as page.
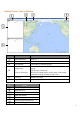
Altitude Display of Planning Click the planning route of route list, or click on the map route starting point of Icon the front. There will be a graph with altitude below map. When point with the curve of altitude graph, it will display corresponding altitude and distance. It will also display this point on map.
TAB List Window Introduction File TAB name Description Open Open file Save as Save as new file Import import GPX or KML or CanWay Planner save file Export Export GPX or KML file Sync with device Sync the planning route and waypoint to the device Read form device Read data form device and download data to Route List and POI List Exit Close CanWay Planner software TAB Tool window Name Option Description Setting for the COM Port of GPS device, Preferences and device font Language Select the
Open Click Open and appear “open file” window. Please select the *.sav format that you want to open it, then click “open file” button.
Save As Click “Save as” and appear the save as window. Select the saving position and file name , then click “save” button. And finish saving the *.sav file.
Import For example to import the GPX file: click the “GPX” file and appear the “open file” window. Select the import file, then click open button and open the GPX file.
When import the GPS file, it will display on the Map and route list or POI Lsit Clcik the import file on the Route Lsit and modify it, and finish it 21
Export When export data, it will export both the Route List and POI List . For example to export the KML file: click the “GPX” file and appear the “save as ” window. Select the export file name, then click save button and save as the GPX file.
User can open the KML file with Google Earth . When open the KML file, alsocan see the same Route List or POI List as CanWay Planner. Note: Some software can not support import waypoint, only support import some route.
Syne With Device Connect to GPS device and click “sync with device” button, will upload all the Route and waypoint to GPS device.
Read form Device Connect to GPS device and click “read form device”button. It will download data to PC, and display Route or waypoint on the Map and Route List or POI list.
Preferences Click “Option”, and appear the preferences window GPS device COM Port Setting the GPS location unit Font Name Setting distance unit Font Size Setting to display font name with waypoint Setting the font size with and route for the GPS device and route for the GPS device 26