Operating instructions Internet Radio RF-IR-PSOCKET1 Item No.
Table of contents Page 1. Introduction...........................................................................................................................................................3 2. Explanation of symbols.........................................................................................................................................3 3. Intended use.....................................................................................................................................
1. Introduction Dear Customer, thank you for purchasing this product. This product complies with the statutory national and European specifications. To maintain this status and to ensure safe operation, you as the user must observe these operating instructions! These operating instructions are part of this product. They contain important notes on commissioning and handling. Also consider this if you pass on the product to any third party.
3. Intended use This product is designed to play Internet radio stations. You can also use it to stream music over your home network via UPnP and DLNA. It features a clock with an alarm function. The radio connects to the Internet via your home Wi-Fi network. This product is only designed for connection to a 100–240 V/AC wall-mounted mains socket. This product is intended for indoor use only. Do not use it outdoors. Contact with moisture (e.g. in bathrooms) must be avoided under all circumstances.
. Safety instructions Read the operating instructions and safety information carefully. If you do not follow the safety instructions and information on proper handling in this manual, we will assume no liability for any resulting personal injury or damage to property. Such cases will invalidate the warranty/guarantee. • This product is not a toy and must be kept out of the reach of children! Children do not understand the hazards associated with the incorrect use of electrical devices.
• Always read these operating instructions before using, installing, configuring or servicing this product. • Never place objects containing liquid (e.g. glasses, buckets, vases or plants) on or directly next to the device. Liquids may seep into the casing and impair the electrical safety of the device. There is also the risk of a fire or a fatal electric shock. Isolate the mains socket (e.g. switch off the circuit breaker and RCD), and then unplug the device from the mains socket.
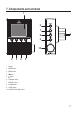
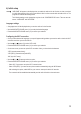
. Components and controls 1 6 7 8 9 10 2 3 4 5 1 Display 2 MODE button 3 MENU button 4 button 5 button 6 STANDBY button 7 PRESET button 8 ALARM button 9 SLEEP button 10 NAVIGATE/VOLUME control 7
. Electrical connection Make sure that the voltage indicated on the product corresponds with your household mains voltage. Never attempt to operate the device with any other type of voltage. Exercise caution when handling power adapters and mains connections. Mains voltages can cause fatal electric shocks. Plug the device into a wall socket. 9. Using the radio In this menu, options have been left in English in the German version of the manual, a German explanation is provided in brackets.
b) Initial setup “WELCOME” will appear on the display when you switch the radio on for the first time, or when you switch it on after disconnecting it from your home network. Wait for a few seconds while the radio turns on. The progress bar indicates the loading status. The following settings can be changed at any time via the “CONFIGURATION” menu. There are two submenus: “LANGUAGE” and “NETWORK”. Language settings • A language menu will be displayed when you turn the radio on for the first time.
-- Select “YES” if you want to configure the Wi-Fi connection manually. The Internet radio will automatically search for available Wi-Fi networks. Use the NAVIGATE/VOLUME control (10) to select the desired network. Press the NAVIGATE/VOLUME control (10) to confirm your selection. Enter the password for the selected Wi-Fi network. Turn the NAVIGATE/VOLUME control (10) to select the characters for the password. Press the button (5) to go to the next character.
“MEDIA CENTER” Refer to “Media center mode” for a detailed description of this mode. • “UPnP” (Universal Plug and Play) Use this menu option to access your media server. The server must support UPnP. When you select this option, the radio will display a list of available servers. • “MY PLAYLIST” Displays the tracks in your playlist. • “CLEAR MY PLAYLIST” Deletes the tracks in your playlist. “INFORMATION CENTER” • “WEATHER INFORMATION” Displays weather information for different locations across the globe.
• “NETWORK” -- “WIRELESS NETWORK CONFIGURATION” Use this menu option to search for wireless access points and connect to a network. Refer to “Initial setup” and follow the instructions for the “YES” option to connect to the desired network. -- “WIRELESS NETWORK (WPS PBC)” Use this menu options to enable WPS and connect the radio to your router. Refer to “Initial setup” and follow the instructions for the “YES (WPS)” option to connect to the router.
• “ALARM” Refer to “Alarm” for detailed instructions on how to configure the alarm settings. -- “ALARM 1 (TURN OFF)” Alarm 1 settings. -- “ALARM 2 (TURN OFF)” Alarm 2 settings. -- “NAP ALARM (TURN OFF)” This feature turns on the alarm after a preset duration (e.g. when you take a midday nap). -- “ALARM VOLUME” Use this option to set the alarm volume. The volume settings apply to all alarms. • “TIMER” Use this menu to set a countdown timer. Set the countdown time using the to confirm your selection.
• “BUFFER” Use this menu to buffer radio reception for 2,4 or 8 seconds. The Internet radio will store audio data for a few seconds to prevent interrupted playback. • “WEATHER” -- “SET LOCATION” Use this menu to select the city for which you want to view weather data. Select the desired continent, and then select the country and city. -- “TEMPERATURE UNIT” Use this option to select the temperature unit. You can choose from “CELCIUS” (°C) and “FAHRENHEIT” (°F).
• “SOFTWARE UPDATE” This feature is only designed for use by service technicians and for factory configuration. • “RESET TO DEFAULT” Use this menu option to reset the Internet radio to the factory settings. Select “YES” to proceed or “NO” to exit. “LOCAL RADIO” Refer to “Internet radio mode” for a detailed description of this mode. • Use this option to select a local radio station. The listed stations are based on the location settings that you configured in “LOCAL RADIO SETUP” in the “CONFIGURATION” menu.
• Example: Use the NAVIGATE/VOLUME control (10) to navigate to “RADIO STATION/MUSIC”, and then press the NAVIGATE/VOLUME control to confirm your selection. • A number of subcategories will appear on the display. Use the NAVIGATE/VOLUME control (10) to navigate through the subcategories, and then press to confirm your selection. • For example, select “GENRE” > “BLUES” > “BLUES/TOP 10”, and then select the desired station. • The Internet radio will automatically connect to the selected station.
e) Media center mode Media center mode allows you to stream music from a computer on your home network (UPnP playback). Switching to Media center mode • To switch to Media center mode, scroll to “MEDIA CENTER” using the NAVIGATE/VOLUME control (10) or the (4) and (5) buttons. • Press the control NAVIGATE/VOLUME control (10) to confirm your selection. UPnP playback The radio supports UPnP (Universal Plug and Play). This allows you to stream music over your home network.
Creating a playlist • To add the current track to your playlist, hold down the NAVIGATE/VOLUME control (10) until a symbol appears on the display (1). • The current track will be added to the playlist. • To add another track to the playlist, select the desired track and hold down the NAVIGATE/VOLUME control (10) until a symbol appears to the left of the time display. • The selected track will be added to playlist. • To access the playlist, go to “MY PLAYLIST” in the media center menu.
g) Alarm Configuring the alarm settings • Press the ALARM button (8) to access the alarm menu. • Alternatively, go to the “CONFIGURATION” menu, and then select “ALARM”. Setting the alarm The radio has two separate alarms. Each alarm is configured in the same way. • In the alarm menu, select “ALARM 1 (TURN OFF)” or “ALARM 2 (TURN OFF)”. • Select “TURN ON” and confirm your selection.
h) My mediaU You can use your computer to create your own list of favourite radio stations. Proceed as follows: • Go to the “CONFIGURATION” menu, and then select “MANAGE MY mediaU”. • Change the setting from “DISABLE” to “ENABLE”. • Exit the settings menu. • “MY mediaU” should now be displayed in the main menu. • Open your computer browser and visit “http://www.mediayou.net/web/index.php”. • Click “JOIN NOW” to create an account. • Once you have created an account, log in and register your Internet radio.
11. Troubleshooting The radio does not connect to your Wi-Fi network. • Check whether another device (e.g. a computer or tablet) can connect to the Internet over the Wi-Fi network. • Check whether your router is running a DCHP server and that you have configured the static IP address (including the subnet mask and standard gateway) correctly. • Check whether your firewall is blocking the outgoing ports.
The radio keeps buffering and playback is intermittent. • The radio streams Internet radio stations over a broadband connection. If your Internet bandwidth is too low or other users are downloading large amounts of data, playback may be intermittent. • Check your Internet connection and try switching to another station. “Buffering” means that the playback device downloads a certain amount of data before starting playback. This normally ensures that the audio data is played without interruption.
14. Technical data Operating voltage..............................................100–240 V/AC 50/60 Hz Power consumption...........................................Max. 3.5 W Output power.....................................................2 W Display...............................................................240 x 320 pixel TFT colour screen Alarms...............................................................2 + NAP alarm Transmission frequency....................................2.
This is a publication by Conrad Electronic SE, Klaus-Conrad-Str. 1, D-92240 Hirschau (www.conrad.com). All rights including translation reserved. Reproduction by any method, e.g. photocopy, microfilming, or the capture in electronic data processing systems require the prior written approval by the editor. Reprinting, also in part, is prohibited. This publication represent the technical status at the time of printing. Copyright 2017 by Conrad Electronic SE.