The Traveler SeriesTM : Voyager 20A PWM Waterproof PWM Controller w/ LCD Display 1 2775 E. Philadelphia St., Ontario, CA 91761 1-800-330-8678 Version 1.
Important Safety Instructions Please save these instructions. This manual contains important safety, installation, and operating instructions for the charge controller. The following symbols are used throughout the manual: WARNING: Indicates a potentially dangerous condition. Use extreme caution when performing this task.
• Be careful when working with large lead acid batteries. Wear eye protection and have fresh water available in case there is contact with the battery acid. • Over-charging and excessive gas precipitation may damage the battery plates and activate material shedding on them. Too high of an equalizing charge or too long of one may cause damage. Please carefully review the specific requirements of the battery used in the system.
Table of Contents General Information ............................................................................................................................................ 5 Five Charging Stages ........................................................................................................................................ 6 Installation .............................................................................................................................................................
General Information The Voyager is an advanced 5-stage PWM charge controller suitable for 12V solar system applications. It features an intuitive LCD displaying information such as charging current and battery voltage, as well as an error code system to quickly diagnose potential faults. The Voyager is completely waterproof and suitable for charging up to 7 different battery types, including lithiumion.
Five Charging Stages The Voyager has a 5-stage battery charging algorithm for a rapid, efficient, and safe battery charging. They include: Soft Charge, Bulk Charge, Absorption Charge, Float Charge, and Equalization. Soft Charge: When batteries suffer an over-discharge, the controller will softly ramp the battery voltage up to 10V. Bulk Charge: Maximum battery charging until batteries rise to Absorption Level Absorption Charge: Constant voltage charging when battery is over 85% for lead acid batteries.
WARNING: Over-charging and excessive gas precipitation may damage the battery plates and activate material shedding on them. Too high of equalizing charge or for too long may cause damage. Please carefully review the specific requirements of the battery used in the system. Charging Stages Output battery voltage is 3V-10VDC, Soft-Charge Current = half of the solar panel current 10VDC to 14VDC Bulk Current = Rated Charge Current Constant voltage until current drops to 0.75/1.0 amps and holds for 30s.
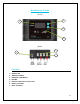
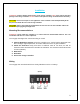
Identification of Parts (Front) 2 1 3 4 (Back) 5 6 7 Key Parts 1. 2. 3. 4. 5. 6. 7.
Installation WARNING: Connect battery terminal wires to the charge controller FIRST then connect the solar panel(s) to the charge controller. NEVER connect solar panel to charge controller before the battery. CAUTION: Do not over-torque or over tighten the screw terminals. This could potentially break the piece that holds the wire to the charge controller. CAUTION: Refer to the technical specifications for max wire sizes on the controller and for the maximum amperage going through wires.
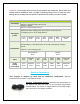
Distance Wiring Cable Total Length One-Way Distance < 10ft Cable Size (AWG) 14-12AWG 10ft-20ft 12-10AWG NOTE: The solar controller should be installed as near the battery as possible to avoid efficiency loss. NOTE: When the connections are completed correctly, the solar controller will turn on and begin working automatically. Operation When the controller powers on, the Voyager will run a self-quality check mode and automatically display the figures on LCD before going into auto work.
The Voyager provides 7 battery types for selection: Lithium-ion, LiFePO4, LTO, Gel, AGM, Flooded, and Calcium Battery. Press and hold the BATTERY TYPE Button for 3 seconds to go into battery selection mode. Press the BATTERY TYPE Button until the desired battery is displayed. After a few seconds, the highlighted battery type will automatically be selected.
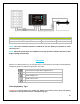
LED Behavior LED Indicators LED Color Soft-chargeing Bulk charging ( BV < 11.5V ) Bulk charging ( 11.5V < BV < 12.5V ) Bulk charging ( BV > 12.
System Status Troubleshooting Description Troubleshoot Battery over voltage Use a multi-meter to check the voltage of the battery. Make sure the battery voltage is not exceeding the rated specification of the charge controller. Disconnect battery. Charge controller does not charge during daytime when the sun is shining on the solar panels. Confirm that there is a tight and correct connection from the battery bank to the charge controller and the solar panels to the charge controller.
Technical Specifications Electrical Parameters Model Rating Normal Battery Voltage Maximum Solar Voltage(OCV) Maximum Battery Voltage Rated Charging Current Battery Start Charging Voltage Electrical Protection and Feature 20A 12V 26V 17V 20A 3V Spark-free protection.
Dimensions Renogy reserves the right to change the contents of this manual without notice. For the most up to date manual, visit our download page at www.renogy.