MTS-TMB Renogy Tilt Mount Bracket 2775 E Philadelphia St, Ontario, CA 91761 1-800-330-8678 1
Important Safety Instructions Please save these instructions. This manual contains important safety, installation, and operating instructions for the Renogy Tilt Mount Brackets hardware system. The following symbols are used throughout the manual to indicate potentially dangerous conditions or important safety information. WARNING: Indicates a potentially dangerous condition. Use extreme caution when performing this task. CAUTION: Indicates a critical procedure for safe and proper operation of the system.
Table of Contents General Information ......................................................................................................................................... 4 Identification of Parts ..................................................................................................................................... 5 Installation .............................................................................................................................................................
General Information The Renogy Tilt Mount Bracket is designed with intent on mounting to your RV. It is suitable for most Renogy panels and can be mounted on any flat surface. This mount optimizes performance by allowing tilting when the RV is parked, and flat mounting when the RV is in motion. The angle adjustability is dependent on the panels themselves, with bigger panel sizes decreasing angle adjustability.
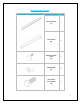
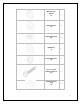
Identification of Parts Image Component Qty Fixed L-Bracket (A) 4 Tilt L-Bracket (B) 2 M8 Plastic Knob Screw (C) 6 M8 Wing Nut (D) 6 M6 x 16mm Hex Cap Bolt (E) 4 5
M6 Split Lock Washer (F) 4 M6 Flat Washer (G) 8 M6 Hexagonal Nut (H) 4 M8 Washer (I) 6 M8 Spring Washer (J) 6 #10 x 1¼ in SelfDrilling Cap Screw (K) 6 Plastic Retaining Ring (L) 6 6
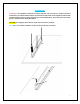
Installation WARNING: The equipment should be installed, adjusted, and serviced by a qualified electrical maintenance personnel familiar with the construction and operation of the equipment and hazards involved. Failure to observe this precaution may result in bodily injury. Protective gloves and safety glasses should be worn during installation. CAUTION: The stripping of the threads on the nuts and bolts is possible. Note: There are no bolts included to secure the bracket to your RV surface.
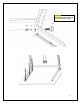
(H) (F) (G) (A) (E) 8
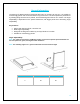
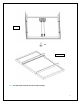
Portrait OR landscape Note: The RNG-100P should be installed using landscape.
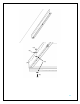
CAUTION: For your safety the following steps require at least two people to install.
(C) (I) (J) (D) 11
(B) (I) (J) (D) (C) 12
Dimensions Note: The following drawings utilize inches as their dimension units.
Compatibility RENOGY Solar Module Compatibility* RNG-10D RNG-10D-SS RNG-20D RNG-30D RNG-30D-SS RNG-50D RNG-50D-SS RNG-80D-SS RNG-100D RNG-100D-S RNG-100D-SS RNG-100D-SSP RNG-100MB RNG-100D-R RNG-160D-SS RNG-300D RNG-50P RNG-100P RNG-160P RNG-270P RNG-320P COMPATIBLE COMPATIBLE COMPATIBLE COMPATIBLE COMPATIBLE COMPATIBLE COMPATIBLE COMPATIBLE COMPATIBLE COMPATIBLE COMPATIBLE COMPATIBLE COMPATIBLE COMPATIBLE INCOMPATIBLE INCOMPATIBLE COMPATIBLE COMPATIBLE INCOMPATIBLE INCOMPATIBLE INCOMPATIBLE Renogy rese