A&E Bath & Shower Bain et Douche Owner Manual and Installation Guide Manuel du propriétaire et guide d’installation Faucet Kit Ensemble de robinetterie 23MA2013
INFORMATION / INFORMATION Avant d'entreprendre les travaux, lire attentivement les instructions de montage. Before you begin carefully read all instructions. Consult local building codes to ensure that installation complies with standards in your area. Inspect unit carefully to ensure there is no damage or defects. If you find a defect, contact your distributor. If damage has occured during transport, contact your carrier. Make sure you have received all the parts required to install the unit.
TOOLS AND MATERIAL REQUIRED / OUTILS ET MATÉRIAUX REQUIS Measuring Tape / Ruban à mesurer Level / Niveau Screwdriver / Tournevis Utility Knife / Couteau à lame rétractable Lead Pencil / Crayon à mine de plomb Adjustable Wrench / Clé à molette eflon t Teflon Tape / Ruban Téflon Hacksaw / Scie à métaux Drill / Perceuse Hole Saws / Scies emporte-pièce HARDWARE / QUINCAILLERIES A B Page 3
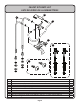
FAUCET KIT PARTS LIST LISTE DES PIÈCES DE LA ROBINETTERIE 2 1 3 4 5 7 6 ITEM 1 2 3 4 5 6 7 A B DESCRIPTION Pillar installation kit / Ensemble pour installation sur pilier Handheld shower / Douchette Flexible hose / Tuyau flexible Handheld shower support / Support de douchette Faucet / Robinet Wall mount150 installation kit / Ensemble pour installation mural mm ± 5 Floor mount installation kit / Ensemble pour installation au plancher #8 x 1¼" Countersunk head screw (M4x32) / #8 x 1¼" vis à tête fraisé
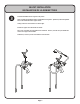
FAUCET INSTALLATION INSTALLATION DE LA ROBINETTERIE ❶ The faucet kit can be pillar or wall mounted. Make sure the water outlet pipes are installed to fit with the faucet kit. The distance between the water outlet pipes should be as shown below. Attach the faucet unit to the water outlets. La robinetterie peut être installée sur pillier ou mural. S'assurer que les tuyaux d'alimentation d'eau sont positionnés adéquatement pour la robinetterie.
FAUCET FLOOR INSTALLATION INSTALLATION DE LA ROBINETTERIE AU PLANCHER ❷ First, loosen the Allen screw from the finishing flange. Then, screw by hand the pillar coupling in the brass flange until stop without over tightening and slide the finishing flange on the pillar coupling. Tighten the Allen screw of the brass flange with the supplied Allen key and apply a thin coat of grease for plumbing on O-rings of the waterseal tube and slide in the brass threaded tube.
FAUCET INSTALLATION INSTALLATION DE LA ROBINETTERIE ❸ Install the handheld shower support to the faucet. Next, assemble the handheld shower and flexible hose together. Afterwards, attach the flexible hose to the handheld shower support outlet. Finally, make sure all connections are water tight. Installer le support de la douchette au robinet. Par la suite, assembler le tuyau flexible et la douchette. Ensuite, raccorder le tuyau flexible à la sortie sur le support de douchette.
A&E 9181 Boivin LaSalle, Québec Canada H8R 2E8 Bath & Shower Bain et Douche Tel. : 514.367.1741 800.667.9506 (Toll Free / Sans frais) Fax : 514.363.4753 @ : renwil@renwil.com Web : www.renwil.com WARRANTY / GARANTIE A&E Shower and Baths inc. (hereafter ‘‘ A&E ‘‘) offers the following express limited warranty on each of its products. This warranty extends only to the original owner/ end-user for personnal household use.