2.
Index CHAPTER 1 1.1 General Information ........................................................................................................ 1 1.1.1 Product Features ..................................................................................................................................1 1.1.2 System Requirements ..........................................................................................................................1 1.1.3 Package Contents ...............................
Chapter 1 INTRODUCTION This guide contains information of product features, 2.5” hard drive installation and device capability. Please read this manual thoroughly before using and retain it for future reference. 1.1 GENERAL INFORMATION EN261RF hard drive secure enclosure is the ultimate guard for your privacy and confidentiality. It can encrypt the entire disk content bit by bit including boot sector and operating system without performance degradation.
1.1.3 Package Contents Please check the following items are included in the package and in good condition. If any of items are short supplied or damage, please inform to our supporting center or your local dealer. y Hard drive enclosure (without hard drive) y USB Y cable y Two tags y Cushion foam y Setup driver and application utility disc with manual 1.1.4 Trademarks All names and products mentioned are registered trademarks of their respective companies.
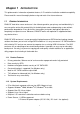
Chapter 2 USING THE HARD DRIVE ENCLOSURE 2.1 INSTALLING 2.5” HDD ENCLOSURE Before using hard drive enclosure, please read these instructions for reference. Electrostatic discharge can damage electronics components. Be sure you are properly grounded before being any procedure. You can touch a mental part of computer’s chassis or power supply unit to discharge any static charge that may have built up inside your body. Handle SATA PCB board by the edge to avoid touching the electronic components.
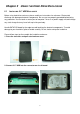
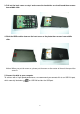
3. Pull out the back cover as step1 and screws the hard drive on circuit board then recover from middle slide. 4. Stick the HDD cushion foam on the front cover as the photo then recover from middle slide. Notice. When you put the cover on, please put the cover on the center of chassis then push the cover in. 5. Connect the disk to your computer. To achieve with a high-speed performance, we recommend you connect disk to an USB 2.0 port, which normally labeled as or USB 2.0 besides the USB port.
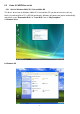
2.2 USING 2.5 HDD ENCLOSURE 2.2.1 Start in Windows 2000, XP, Vista and Mac OS This disk is driver-free for Windows 2000, XP, Vista and Mac OS, you do not have to install any driver, just connect disk to PC’s USB 2.0 port directly. Windows will detect your device automatically and reveal a new “Removable Disk” or “Local Disk” icon in “My Computer”. a. Windows Vista b.
2.2.2 Indicator Description There are two status icon indicators on disk for diagnosis. 1. Blue: Power on and data access status LED. The blue indicator will lights up when this device has been connected to your computer’s USB port and it turn off after system has shut down. If data is transmitting between PC and disk, the blue status LED will start to flash. 2. Red: RFID Hard disk encryption or decryption status LED Red on: Encryption hard drive status, you can not read or write any files in this moment.
Chapter 3 SECURITY TAG Protect data security and personal privacy. It is a solution with RFID technology. After authentic the Tag, system will automatic encrypt/decrypt to access data. Without correct Tags, the hard disk is like a brand-new in other enclosure, and it is unable to access the hard disk. y Simply installation: y Uses USB 2.0 high speed interface, and support hot plug. Do not need install any software. User can easily use without any computer skills.
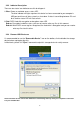
3) Select the partitions from the disk that you want to encrypt. And right click to delete all the partition (please make the disk you select, after delete the data will be loose). After delete all the partition of the disk, please replug USB cable. 2. Recognize and record the tags. Now the system is ready for recognize Tags (indicator red LED will blink). Please prepare two different Tags, recognize one by one. 3. Partition and format disk.
2) Then choose “Disk Management” from left side of window and right click to select “Initialize Disk”. 3) Create partition and format. 4. Finish encryption.
3.2 ENCRYPTED DISK 1. User insert encrypted disk 2. Authentic tag. 3. Access data with encryption.
Chapter 4 BACKUP UTILITY The HDD enclosure has an advantage of on button backup. It provides an easy way to make a backup task just by one touch. 4.1 BACKUP UTILITY PROGRAM INSTALL Before using one touch backup button, you need to install button-triggered backup utility software that came with bundle disc. Please follow below steps to complete the backup utility installation. 1. Insert software driver disc into your CD-ROM drive. 2. Double click “OTB” to install the program. 3. Click “Install” to go on.
4. Click “Next” to continue. 5. Click “Install” to continue. 6. Click “OK” to complete the backup utility program installation.
4.2 FAT32 FORMAT UTILITY For the current HDD capacity is getting bigger, the Fat32 Format Utility in Windows 2000 / XP is not able to support the HDD size exceeding 32GB; FNet recommends FNet Fat 32 Format Utility, which can format the large capacity to be FAT32 Format rapidly and fully, the size even maximums up to 4 TB (4000GB). (Attention: all data in USB HDD will be deleted if you use this function) 1. Please plug USB HDD, and turn on the computer. 2.
4. Tick “Quick Format” and click “Start” for executing. (Attention: all data in USB HDD will be deleted if you use this function) 5. Click “OK” to complete the process.
4.3 USING ONE TOUCH BACKUP UTILITY When you begin to use the touch backup utility, you have to preset a copying path and specifying a suitable attribute in the first time then save it to a file. Whenever you want to do a backup task, just press the backup button on the HDD enclosure, it will automatically cop files as you preset path from your computer to the hard drive enclosure.
4.4 QUICK FILE BACKUP 1. Please plug EN261RF into PC, and turn on the power. 2. Execute PCClone EX Lite. 3. Go on PCClone EX Lite /Quick Launch screen. 4. Click “File Backup”. (Users can also use the backup button they previously set to backup.) 5. Click “Start” to continue. 6. Click “OK” to finish.
4.5 FILE BACKUP AND RESTORE 4.5.1 File Backup 1. Please plug the EN261RF into the computer, and turn on the power. 2. Execute PCClone EX Lite and click “File backup”. 3. Select folders / drives from the fix device. 4. Set one of USB devices for backup. 5. Click “Backup”. 6. Click “Start” to backup then please press “OK” to complete the process.
4.5.2 File Restore 1. Please plug the USB HDD, and turn on the power. 2. Execute PCClone EX Lite and click “File Backup”. 3. Select folders/files of USB device you would like to restore. 4. Click “Restore”. 5. Click “Start” to restore then please press “OK” to complete.
4.5.3 Erase File Backup 1. Please plug USB HDD, and turn on the power. 2. Execute PCClone EX Lite. 3. Select the “File backup” of USB device, then, right click the mouse to click “Delete select Files”, all select files in the USB device will be deleted.
4.6 FILE MANAGER PCClone EX Lite Manager function is the same as Windows Explorer. PC users can directly drag the files forward and backward between the fixed device & USB device. It is convenient for users who manage or check their files without clicking the icon of “Windows Explorer” or “My Computer”.
4.7 SETUP After backup complete: User can choose the mode after backup complete. File Backup Type: Backup all files: If checked, all the subdirectory of the source directory will be copied to target directory. Otherwise only the files located on the source directory will be copied. Backup changed files: Only the changed files will be copied. System folder backup setting: User can choose the folder which you want to backup.
4.8 OTHER Concerning PCClone EX Lite spec, please click the icon of “PCClone EX Lite” on the right side of upper corner of the screen, or right click the icon of “PCClone EX Lite” in the notification area. Please click the icon of “PCClone EX Lite”on the right side of upper corner of screen,“About PCClone EX ”dialog will display and assist to recognize PCClone EX Lite.
Chapter 5 TROUBLESHOOTING This chapter includes some basic things you can do in the event that you encounter problem using this disk in your system. y Why computer does not recognize the hard drive enclosure? 1. If your device is connected to a laptop or a bus hub (non-self power hub), you may need to connect to auxiliary adapter to provide enough power for the device. See the “Appendix” section for detail information. 2.
y Why can not see any data after insert my encryption disk to other enclosure? After "Initial Encryption" flow, your disk has encrypted. The other enclosure can not support the same encryption. So anyone can not access data from encryption disk without correct Tags. y If my enclosure has broken, how can I get back the encryption data? You can buy the same security enclosure, and prepare the original two Tags. Insert the encryption disk to the new enclosure and plug USB cable into computer.
Chapter 6 APPENDIX 6.1 AUXILIARY POWER CORD AND POWER ADAPTER EN261RF 2.5” HDD enclosure allow you to install hard drive without auxiliary power, but if you use a higher capacity drive, it may cause shortage of power from your USB port and make device running unstable. In this situation, there are two solutions to get more power supply for your high-powered hard drive.
6.2 SPECIFICATIONS Chipset INNMAX IM7206X + IM6802 RFID Frequency 125KHZ ± 6% RFID Distance of Reaction 5mm ~ 10mm RFID Read Speed Less than 1 Sec Sound Prompt Busy delay Authentication Error Delay z System enters non-encryption with silent status. z System enters encryption and waiting authentication with a short beep. z System enters initial mode with four short beeps.