
Install Instructions

X-XX UL
INSTALLATION INSTRUCTIONS
Copyright © 1996 Honeywell Inc. • All Rights Reserved
69-0874-3
Definite Purpose (DP)
Contactors
APPLICATION
These electromagnetically-operated Definite Purpose
Contactors provide switching for starting induction motors.
See Table 1 for contact ratings.
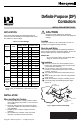
Table 1. Contact Ratings.
CAUTION
Disconnect power supply before beginning
installation to prevent electrical shock or equipment
damage.
Location
Locate the contactor on a flat, solid surface as close as
possible to the equipment being controlled.
Mounting and Wiring
Disconnect power supply before beginning installation to
prevent electrical shock or equipment damage. Be sure all
wiring complies with local codes and ordinances.
IMPORTANT
Do not exceed the contact and coil ratings when
wiring the contactor into the system.
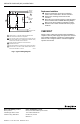
New Installation
쐃 Mount the contactor in a vertical position for best
performance. Horizontally-mounted contactors have
a 12 percent lower efficiency.
쐇 Use two screws to mount the contactor. Select
models use a shear formed panel tab to mount the
contactor. See Fig. 1.
쐋 See equipment manufacturer wiring instructions or
Fig. 2.
쐏 Attach the line wires to the contactor using terminal
clamp screws.
쐄 Attach the load wires using No. 10 binding screws.
쐂 Use pressure lugs for field wiring with wire larger
than No. 8.
SHEAR
FORMED TAB
SCREW
CONTACTOR
BASE
M5513
Fig. 1. Typical contactor mounting.
Model
Rating Line
Motor Load
Rating A/Pole
Resistive
Load Per Pole
(A) Volts
AFL ALR A kW
20 240/277 20.0 100 30 7.2/8.3
480 10.0 50 30 14.4
600 8.0 32 30 18.0
25 240/277 25.0 125 30 7.2/8.3
480 10.0 50 30 14.4
600 8.0 40 30 18.0
30
240/277 30.0 150 40 9.6/11.1
(1 pole)
480 15.0 75 40 19.2
600 12.5 50 40 24.0
30
240/277 30 125 40 9.6/11.1
(2 pole)
480 10 50 40 19.2
600 8 32 40 24.0
40
240/277 40.0 180 55 13.2/15.2
(1 pole)
40
240/277 40.0 150 55 13.2/15.2
(2 pole)
600
a
40.0 110 55 13.2/15.2
a
Device not tested for ARI-780 Standard at 600V;
rating shown is Underwriters Laboratories Inc. (UL)
rating.
INSTALLATION
When Installing this Product…
1. Read these instructions carefully. Failure to follow
them could damage the product or cause a hazard-
ous condition.
2. Check the ratings given in the instructions and on
the product to make sure the product is suitable for
your application.
3. Installer must be a trained, experienced service
technician.
4. After installation is complete, check out product
operation as provided in these instructions.