
Technical data

Time control
20
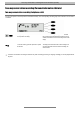
Programming the time control
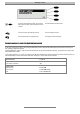
Press the menu button. The display shows the main menu.
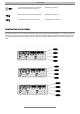
Press the select button next to the time control menu item. The entry field for the first switching time is shown in the display.
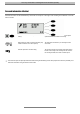
Use the arrow buttons (up/down) to view and set individ-
ual switching times.
The display switches between the 10
optional switching times.
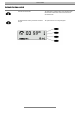
Press the select button next to the time control menu
item and use the arrow buttons (up/down) to make the
desired settings.
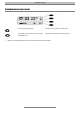
The cursor is positioned on the entry field for “hours”.
Use the arrow buttons (left/right) to switch between the
hours, minutes and the weekdays on which the switching
times shall be valid.
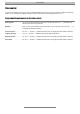
The cursor switches between hours, minutes and weekdays. A
hyphen “-” for “MO” means that the switching command shall
not be executed on Monday.
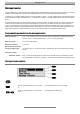
Use the two select buttons (bottom side) and the arrow
buttons (left/
right) to select the function to be executed.
The symbols stand for:
= Answering mode
= Outgoing message
= Message transfer
= Call transfer
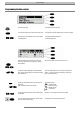
Use the arrow buttons (up/down) to set the desired state
or parameters.
A hyphen “-” means that the current status is retained
To erase a programmed switching time, press the select
button next to the “delete” symbol.
The display shows the empty entry field again.