
Use Instructions


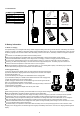


3 ccessory installation
3.1 Install/remove battery
Install battery
(1) Turn the volume switch to the off position.
(2) Align the battery with the battery mount on the back of the walkie-talkie, and insert the battery.
(3) Press the battery until the battery is pushed to the correct position and locked.
Remove the battery
(1) If you need to remove the battery, please turn off the walkie-talkie first.
(2) Slide the battery push button to make the battery pop up automatically.
(3) Remove the battery.
note:
Do not short-circuit the battery terminals or discard the battery in fire.
Do not disassemble the battery shell without authorization.
3.2 Install/remove back clip
Align the buckle on the back clip with the slot on the back of the battery and push
it in place along the bottom to fix it.When removing, press the push button of the back
clip and push it out in the opposite direction to remove the back clip.
3.3 Install the optional headset
When you need to use an external earphone to receive, first unscrew the fixing screw,
then open the earphone cover to the outside, and align the plug of the earphone cable
with the interface, finally, turn the fixing screw clockwise to use the headset
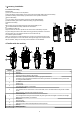
4 Familiar with the machine
1
2
3
4
8
7
6
5
9
11
10
Antenna
PTT button
Press PTT button to initiate a call and talk
Side button 1 (above) & Side button 2 (below) (programmable button)
This button can be programmed to different functions by the dealer. For detailed functions, please refer
to "5 Programmable Buttons".
Speaker
Output voice.
Channel knob
Turn this knob to select 1-30 channels.
Power/volume knob
Turn clockwise to turn on the radio. To turn off the radio, turn it counterclockwise until you hear a "kada"
sound.
When turned on, turn this knob to adjust the volume.
LED indicate light
The red light means the signal is transmitted; the green light means the signal is received; the red light
flashing means the battery is insufficient.
Microphone
Enter the voice.
External interface
Open the cover to insert external speakers and microphones.
Belt Clip
Battery push button
Number Part Name
1
2
3
4
5
6
7
8
9
10
11
3