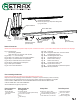
Passenger Side Rail NOTE: RH (passenger side) Rail is designated by a green sticker Spiral Canister Driver Side Rail Front Cover Cansiter Mounting Screws (10-32 x 7/16”) Front Cover Mounting Screws (10-24 x 3/4”) 1/8”Allen Wrench 6mm Allen Wrench Clamps (6x for 8’ beds) Drain Tubes Table of Contents NOTE: Some models require specific steps and parts. Please check below. If your model is listed, follow the instructions on that page! Pg.
STEP 1: Remove Shipping Materials Remove the screws and shipping brackets and the white shipping tubes from both sides. Retain a shipping bracket for later use as a shim. STEP 2: Install the rails to the canister 2a. Pull cover out of the canister 6 to 8 inches, holding it from rolling back in, guide the cover into the rail channel while positioning the rails into the canister spirals. Align the front and rear rail attachment tabs and holes to the inside of the corresponding canister holes. 2b.
STEP 4: Position the cover assembly onto the truck and position the rails. NOTE: Prior to installing the cover, some drop-in style bed liners may need to be notched in the front/cab end corners to provide clearance for the cover canister. Approximately 3” wide x 10” deep Cab 4a. With two people, lift the cover and place it onto the truck bed starting with the bulkhead. The font seal of the cover should lay forward and lay flat. 4b.
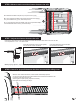
STEP 6: Measure and record the distance between the rails. 6a. Measure the distance at point A (on top of the front cover). 6b. Then measure the distance at points B & C (above each clamp). They must measure the,+ -1/16”, same as at point A. 6c. It is important the rails are parallel, if they are not proceed to step 7. If the measurements are correct, proceed to step 9. A B C STEP 7: Adjust the distance between the rails.
STEP 9: Remove the protective film & assemble and install the drain tubes. 9A- Remove all of the protective plastic film from the canister. 9B- Insert the drain tube into the canister on both sides, rotate to the right, clockwise, the fitting will click twice when secure. 9C- Generally the drain tubes will be routed out through a hole drilled in the factory bed plug. Otherwise a suitable existing hole must be utilized.
STEP 5b: Install the front and rear Adjustable-back Rack System rail clamps 5a. The adjustable-back clamp is designed and tested for the extra loads for the retractable cover with the rail system. The adjustable-back clamps must be positioned correctly under the truck bed rail to properly carry the extra loads. 5c. If the jaw does not contact firmly into the corner of the bed flange, remove the clamp and loosen the screws to adjust the jaw. 5b.
Rack System Installation Information Be sure to refer to the truck owners manual for load ratings for the truck. When calculating weight of cargo, be sure to include occupants and the Retrax cover. Retrax cover with rack system= 125lbs. For installation instructions and load ratings for the rack system, refer to the rack system’s manual. To prevent damage or loss of cargo when driving, check to make sure cross bars and cargo are securely fastened.
Cover Use and Maintenance The cover has superior quality rail weatherstrips seals. These seals help to minimize water intrusion into the truck bed. The initial break-in period for the rail weatherstrip is approximately 48 hours while in the fully closed position. Your cover may be slightly harder to open and close during this break-in period. USE Opening and using the cover To use your cover, open the lock cover and press the button at the center of the latch to pop open the handle.
PowerTrax Installation IMPORTANT: Follow these instructions BEFORE installing the RETRAX RETRAX cover. Use caution when cutting the wire ties holding the wire harness together so you do not cut wires. Inspect wiring. Do not install damaged wires as they could become a hazard.
PowerTrax Installation Proceed with the RETRAX standard instructions steps 1-8. Then refer back to this page for connection wiring. Disregard all references to 'lock'- Not applicable for POWERTRAX. NOTE: The electric cover has no lock assembly. Cover will not move out of the canister at this point of installation. STEP 5: Connect the wiring harness to electronics box and battery A. There is a white label wrapped with “Power” on it to ensure proper connections are made.
Dodge Ram Box 2009 - 2018 and Classic Installation Check the parts shown here, this model has different requirements than the standard parts. Continue with standard instructions through step 3 (pg. 2), then return back to this guide on how to install the mounting hardware. (6) 5/16-8 x 1” bolts A (6) 5/16” lock washers B (6) mounting blocks C (6) 1/4” flat washers D (6) 1/4-28 x 1” bolts E (6) t-slot nuts F 0.
Dodge Ram Box 2009 - 2018 and Classic Installation NOTE: The front cover weather-strip must lay flat across the truck bed. Make certain it is pointed towards the cab. If it extends past the bed rail cap, cut to fit right up to the cap on the truck bed. STEP 4: Position and bolt RETRAX rails to mounting blocks. Center the threaded holes in the mounting blocks behind the openings of the RETRAX rail. Install 1/4” - 28 x 1” bolt and flat washer in all 6 holes. Use a 7/16” wrench to fasten.
Dodge Ram Box 2009 - 2010-up Installation Check the parts shown here, this model has different requirements than the standard parts. Continue with standard instructions through step 3 (pg. 2), then return back to this guide on how to install the mounting hardware. (1) Ram Box Rail LH (driver side) (1) Ram Box Rail RH (passenger side) (4) Bracket Assembly (2) Foam Blocks A B C D B A D STEP 1: Remove cargo rail end caps and cleats Remove the cargo rail and caps (1) and tie-down cleats (2) from the rails.
Honda Ridgeline 2006 - 2015 Installation Check the parts shown here, this model has different requirements than the standard parts. (4) M6 x 40mm (metric) Allen head mounting bolts A (2) 1/4” lock washers B (2) 1/4” flat washers C B (2) nylon spacers D D (4) 10-24 x 1” stainless screws with black caps E A C E Continue with standard instructions instructions through stepthrough 3 (pg. 2), step then return back 3 (pg.
Honda Ridgeline 2006 - 2015 Installation STEP 5: Install front mount brackets STEP 6: Insert plastic plugs Driver side front corner Install front mount brackets as shown. Slide lock washer onto M6 x 40mm bolt, push bolt through hole in mount bracket and start threading into front holes in the bed. Hold mount bracket level and tighten using the 4 mm Allen wrench. (included) Repeat on passenger side.
Honda Ridgeline 2006 - 2015 Installation STEP 10: Select proper mounting hole location Passenger rear mount holes STEP 11: Add rubber spacer On the passenger rear mount plate, the hole used depends on if the rubber spacer is needed (see step 11). Most 2008 and older beds use the upper holes without the spacer. During the 2008 model year the passenger side of the Honda tailgate was raised slightly. The late 2008 and newer models use the lower hole and the rubber spacer.
Honda Ridgeline 2017-up Installation The 2017 Ridgeline requires a rail mount to be installed before the installation of the RETRAX cover. Check the parts included in the rail box (shown below). (4) Small rail bracket A (4) Large rail brackets B (8) Rail mount screws C (2) Rails D A C B D Follow the mounting instructions on the insert for the kit (included in rail box).
Nissan Frontier 2005-up Installation Check the parts shown here, this model has different requirements than the standard parts. WITH Utili-track: WITHOUT Utili-track: (4) bracket bolts A (4) rail bolts B (4) 1/4” lock washers C (4) nylon washers D (8) 1/4” flat washers E (4) rail brackets F C A The Frontier with no Utili-track uses the clamps below. D B E F Continue with the standard instructions on Page 2. Follow standard instructions through step 3, (pg.
Check the parts shown here, this model has different requirements than the standard parts. Check the parts shown here, this model has different requirements than the standard parts. Nissan Titan 2004-up Nissan Titan 2004-up Nissan Titan 2004-up WITHOUT Utili-track: Nissan Titan 2004-up WITH Utili-track: WITHOUT Utili-track: Nissan Titan 2004-up Nissan Titan 2004-up Nissan Titan 2004-up Nissan Titan 2004-up parts shown here, this model has different requirements than requirements the standard parts.
Toyota Tacoma 2005 -2015 Installation Check the part shown here, this model has different requirements than the standard parts. (8) rubber rail adjustment spacers A (4) cleats B (4) rail spacer blocks C A Follow standard instructions through step 3, (pg. 2) then refer C B back to this guide on how to install mounting hardware. STEP 1: Install front rail gasket Be sure foam is added to front bed rail, not the C-Channel rail. Trim to fit.
Toyota Tacoma 2016-up Installation Check the parts shown here, this model has different requirements than the standard parts. Tools Required: T-30 torx driver 6’ MODEL PARTS 5’ MODEL PARTS (4) 1/4” flat washers A (4) 1/4-28 x .75 fastener B (4) 3/8-16 x 1.5 fastener C (4) 3/8” split washer D (4) cleats E (4) 0.050 adjustment shim F C B A D E F (4) 1/4” flat washers A (4) 1/4-28 x 1.5 fastener B (4) 3/8-16 x 1.5 fastener C (4) 3/8” split washer D (4) cleats E (4) 0.
Toyota Tacoma 2016-up Installation STEP 1: Install seal FOR BOTH MODELS: TO TOOLS NEEDED: T-30 Torx driver, 3/8” drive short extension, ratchet 1 Remove factory cab header rail 2 Use T-30 Torx driver to remove 5 fasteners securing header rail to front bulkhead below cab rear window 3 Peel backing paper off of foam seal and adhere to header rail endcaps 4 Reposition factory cab header rail on truck bed 5 Install and and torque all mounting bolts to 7.5Nm (66.
Toyota Tacoma 2016-up Installation Continue with standard instructions through step 6 (pg. 4) DISREGARD STEP 5, then refer back to this guide on how to install and adjust the mounting hardware. STEP 4: Bolt rails to pickup bed rails Passenger side rail 5’ model 6’ model Passenger side rail Bed rail cap Bed rail cap 3/8-16 x 1.50L fastener, 9/16” wrench required 3/8-16 x 1.
Toyota Tundra 2007-up w/Deck rail system Installation Check the parts shown here, this model has different requirements than the standard parts. Follow standard instructions through step 3, (pg. 2) then refer back to this guide on how to install mounting hardware. STEP 1: Remove plastic caps Remove and save the black plastic cap at the rear of the Deck Rail track system on both sides of the truck.
Warranty Statement Retrax Warranty Statement Retrax (referred to as manufacturer) warrants each new Retrax retractable pickup bed cover to the original owner (nontransferable) as follows: The RetraxONE, RetraxONE MX, RetraxONE XR, PowertraxONE, PowertraxONE MX, PowertraxPRO and PowertraxPRO MX have a limited lifetime warranty for the failure of materials and workmanship.
Warranty Statement Helpful Hints For Keeping Your Cover Looking And Working Like New Automotive (nonabrasive) wax can be applied to the cover and rails for extra protection against the elements and scratches. (RetraxONE / RetraxPRO / PowertraxONE / PowertraxPRO covers only.) The Retrax bed cover should slide open and closed easily. Do not force the cover open or closed. Please call Retrax (800) 206-4070 before attempting any maintenance or repairs. Care should be taken when setting any items on the cover.
This page intentionally left blank.
This page intentionally left blank.
5400 32nd Ave. S. Grand Forks, ND 58201 P: (701) 746-5596 F: 746-5598 www.retrax.com retrax@retrax.