
User`s manual

Section 2 Installation
2.1 Operating Environment
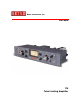
Mount the 176 in a standard 19” equipment rack. Always install the bottom rack screws
first to support the unit. Please allow room above the top ventilation holes and above the
tubes. Additionally, there are ventilation holes on the sides to draw in cool air. Be aware
of the heat sources in your rack to allow proper cooling. Heat will shorten the life of
your equipment.
Audio equipment is sensitive to magnetic fields caused by nearby power supply
transformers. If you experience 60 Hz. hum in any of your gear, try unplugging adjacent
gear first.
If you purchased a matched pair with the link panel, mount the panel between the two
units and connect the RCA cables to the Couple jack on each 176.
2.2 Power Connections
2.21 AC Line Voltage Selection
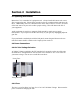
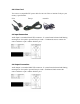
AC Mains Voltage is applied to the IEC standard AC receptacle on the rear of the unit.
Set the Red AC Voltage Selector switch on the rear of the unit to 115 or 230 Volts for
your mains voltage. You can use a small flat screwdriver.
Power Fuse
Voltage Selector
2.2.2 Fuse
The fuse is a 1A fast blow 3AG type for 115 or 230 Volt Mains Voltage. Disconnect the
power cord before changing the fuse.