
Owner's Manual


Introduction
),;:
Dear Customer,
Congratulations
on
your purchase. At Retro Manufacturing, we are obsessed with
musical
reproduction at its best, and are
pleased
you chose our product.Through years of
engineering expertise, and
critical
testing procedures, we have created a wide range of
products that reproduce music with
all
the clarity
and richness you deserve.
Please
read your warranty and retain your receipt and
original
carton for possible
future
use.
Great product and comp.etent
installations
are
only
a piece of the
puzzle
when it comes to
your system.
If,
after reading your manual,
you
still
have questions regarding this product, we
recommend that you
email
us
at: support@retrosoundusa.com or
call us at 909-364-1372.
Be sure to have your
model
number and date of purchase
available
when you
call.
INSTALLATION CONSIDERATIONS
The
following
is
a
list of
tools
needed for installation:
#2 Phillips
screwdriver
I
Battery post wrench /Hand
held drill
w/assorted bits/ Wire strippers/Wire crimpers/
Wire cutters
Since
some
of
these RetroMod™
Full Range Speakers are most often used as direct replacements
for stock speakers and are shipped without
grilles.
For custom
installations
see a professional
installer
for help with your install.
CAUTION If
you
feel
unsure about installing
this system
yourself,
have it installed by a
qualified professional installer.
CAUTION
Before
installation,
disconnect the battery negative (-)
terminal to prevent
damage to the unit, fire and/or
possible
injury.
Before beginning any
installation, follow
these simple rules:
1.
Be sure to
car~Jfully
read and understand the instructions before attempting to install the unit.
2.
For safety, disconnect the negative lead
from the battery prior to beginning the installation.
3.
For easier assembly, we suggest you
run
all
wires prior to mounting your unit
in
place.
4.
Use high quality connectors for a reliable installation and to minimize signal or power loss.
5.
Think before you
drill!
Be careful not to cut or
drill
into gas tanks,
fuel
lines, brake or hydraulic lines,
vacuum
lines
or
electrical
wiring when working
on
any vehicle.
6.
Never
run
wires underneath the vehicle. Running the wires inside the vehicle provides the best
protection.
7.
Avoid running wires over or through sharp edges. Use rubber or plastic grommets to protect any
wires routed through metal,
especially
the firewall.
MOUNTING
1.
Determine where the speakers
will
be
mounted. Ensure
an
area
large
enough for the speaker to
mount evenly.
Be
sure that the
mounting location
is
deep enough for the speaker to fit; if mounting
in
a door, operate
all
functions (windows, locks, etc.) through their entire operating range to ensure
there
is
no obstruction.
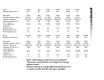
2.
Refer to the specification chart to determine the proper diameter
hole
to
cut for your speaker
model.
3.
Using the
grille
(not included
in
most models) as a template, mark the locations for the mounting screws.
Drill
the
holes
with a 1/8" bit.
4.
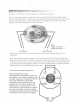
Feed the speaker wires through the cutout and connect to the speaker terminals.
Be
sure to observe
proper polarity when connecting the wires. The speaker's positive terminal
is
indicated with
a"+"
.
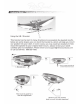
5.
Fit the speaker to the cutout. Fit the
grille
over the speaker (Where
applicable). Mount them using the
enclosed
screws.
6.
Tighten the screws
until
the speaker and
is
snug
in
place
to prevent
rattling.
Do
not
overtighten the screws.