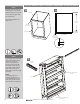
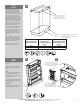
2400 Earl Jones Way Louisville, KY 40299 rev-a-shelf.com Customer Service: 800-626-1126 VANITY/BASE CABINET FILLER TOOLS REQUIRED: UNIT DESIGNED TO BE INSTALLED IN NEW CABINET CONSTRUCTION 3 16 #2 #2 ESTIMATED ASSEMBLY TIME: 20 MIN CARE AND MAINTENANCE: Clean with a damp cloth and wipe parts dry. For video instruction visit: rev-a-shelf.
DO NOT REMOVE FRONT SHIPPING STRAP PRIOR TO INSTALLATION! STEP 1 Measure scribe rail thickness and length per your specific cabinetry. (See Fig 1a and 1b) FIG. FIG. 1B 1A Cabinet Wall Cut 4 totals rails (2 per side, top and bottom). Recommended Scribe rail height: 3/4” Scribe Rail Length Scribe rail measurements Front of Cabinet Scribe Rail width dimension (furniture offset) STEP 2 Install upper and lower scribe rails to filler pullouts being careful not to split the wood.
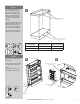
STEP 3 Pre-drill holes using your 3/16” drill bit. See the table below for measurements specific to your filler height. After pre-drilling has been completed on one cabinet side, repeat with adjacent cabinet. FIG. 3 Screw 432 to cabinet top from above adjacent cabinet Mount filler cabinet pullout to adjacent cabinets. Make sure filler is flush with the top of the cabinet wall and behind the face-frame if applicable. Mount filler cabinet pullout to remaining adjacent cabinet.
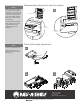
STEP 1 Disassembling the pullout from the chassis FIG. Note: Your pullout unit does not need to be removed for installation. If you encounter an issue that requires the unit to be removed, the release levers for the Blum Tandem slides are located as shown. (See Fig 6a-b). 6B Back of pullout To release the Blum Tandem Slides, squeeze the release triggers and hold while pulling filler away from cabinet run. Top slide release lever Bottom slide release lever STEP 1 Press up on adjustment tab.
12400 Earl Jones Way Louisville, KY 40299 rev-a-shelf.
PASO 1 ÉTAPE 1 Mida el grosor y el largo del carril original en función de su sistema de gabinete (vea la figura 1a y 1b). NO REMUEVA LA CINTA FRONTAL DE ENVÍO ANTES DE LA INSTALACIÓN! NE PAS RETIRER LA SANGLE AVANT D’EXPÉDITION AVANT L’INSTALLATION! FIG. FIG. 1B 1A Corte un total de cuatro carriles (dos por lado, parte superior e inferior). Pared del gabinete Paroi de l’Armoire La altura recomendada para el carril original es de 3/4”.
FIG. PASO 3 ÉTAPE 3 3 Pre taladre orificios utilizando una broca de 3/16”. Vea la tabla inferior para medidas específicas dependiendo la altura del relleno. Después de que acabe de pre taladrar en el lado de un gabinete, repita con el gabinete adyacente. Monte el relleno del gabinete para sacar, a los gabinetes adyacentes. Asegúrese de que el relleno esté al ras con la parte superior de la pared del gabinete y detrás del marco en su caso.
PASO 5 ÉTAPE 5 NOTA La unidad para sacar no se necesita quitar para su instalación. Si usted encuentra un problema en el que requiera que la unidad se remueva, las palancas de liberación para los rieles tipo Blum Tandem se encuentran localizadas como se muestra en las figuras 6a y 6b. Desensamblando el sistema para jalar del chasis. Démontage du système coulissant du châssis FIG. FIG.