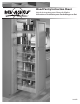
Wood Pantry Instruction Sheet Hoja de Instrucciones para Alacena de Madera Instructions d’Installation pour Garde-Manger en Bois I-448TP
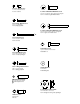
#6 x 1/2 Wood Screw #6 x 1/2 tornillo de madera #6 x 1/2 vis à bois 1/4-20 x 1 Flat Head Machine Screw 1/4-20 x 1 tornillo de cabeza plana de la máquina 1/4-20 x 1 tournevis plat Machine Head #8 x 1 Deep Thread Screw #8 x 1 rosca profunda #8 x 1 filetage profonde 1/4-20 x 2 Pan Head Machine Screw 1/4-20 x 2 pan tornillo cabeza de la máquina 1/4-20 x 2 pan vis à métaux à tête #8 x 2 Wood Screw #8 x 2 Tornillo de madera #8 x 2 Vis à bois Tilt Adjust Screw #8 x 1 Pan Head Screw Ajuste la inclinación de
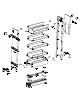
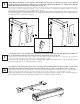
Wood Frame Assembly Madera del marco de la Asamblea Assemblée à ossature de bois 1 (5 inch pantry refer to step 1a) Insert (8) dowels into Bottom Shelf assembly and (8) dowels into wood rails. (127 mm despensa consulte el paso 1 bis) Insertar (8) espigas en la parte inferior de montaje del estante y (8) las clavijas en los rieles de madera. (127 mm cellier se référer à l’étape 1a) Insérer (8) des goujons dans la tablette inférieure de montage et (8) chevilles dans les rails de bois.
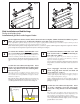
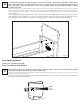
3 Attach floating back plate to rear of pantry while making sure the plate is in it’s lowest position. Insert Tapered Barrel nut into slot of floating back plate and secure with ¼-20 x 1 flat head machine screws. (NOTE: the barrel nut should float freely in slot) See Fig. 3 (5 inch pantry see Fig. 3a) Fije la placa posterior flotante a la parte posterior de la despensa, mientras que asegurarse de que la placa está en su posición más baja.
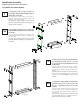
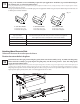
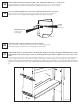
Fig. 4a Fig. 4b Slide Installation and Rub Bushings Deslice instalación y bujes Installation de glissières et des bagues frotter 5 6 7 Insert template into cabinet, mark (6) hole locations and remove template. (NOTE: If cabinet floor thikness is greater than 1-1/2” proceed to step 6. If cabinet floor thickness is less than 1-1/2” proceed to step 8) Inserte la plantilla en el gabinete, marque (6) posiciones de los agujeros y quitar plantilla. (NOTA: Si el piso del armario es mayor de 38 mm.
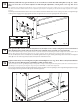
11 See fig. 11 to determine correct rub bushing required for your application. Install the (2) provided rub bushing inline with top-rails, see chart for height locations. Ver fig. 11, para determinar frote correcta buje necesarios para su aplicación. Instale los dos (2), siempre frote buje en línea con la parte superior-carriles, vea la tabla de ubicaciones de altura. Voir fig. 11 pour déterminer frotter correcte douille requis pour votre application.
13 Pull Pantry half of the way open and insert (2) set screws thru access holes into slide and tighten (see fig. 13). (Note: these set screws also act as micro-adjusters for left and right adjustment.) Insert plastic cover caps into access holes. Tire de la despensa de la mitad de la forma abierta e inserte (2) tornillos de fijación a través de los orificios de acceso en la corredera y apretar (ver fig. 13).
16 Loosen floating back plate and adjust height to ¼” below top of cabinet. (Floating plate should be resting against back of cabinet face frame.) Re-tighten plate. Insert (2) #8 x 1 deep thread screws into counter sunk holes near top of pantry and tighten. Use provided sticker to cover screws. (optional) Attach (2) provided rubber bumpers to inside of cabinet face frame. Afloje flotantes placa posterior y ajuste la altura de 6mm por debajo de la parte superior de gabinete.
18 19 Measure hole locations and transfer to cabinet door. Attach door with (6) #6 x ½ wood screws. Lugares Medida agujero y traslado a la puerta del gabinete. Coloque la puerta con (6) # 6 x ½ tornillos para madera. Emplacements des trous de Mesure et transfert à la porte du placard. Fixez la porte avec (6) # 6 x ½ vis à bois. Loosen or tighten adjustment screws to micro adjust the tilt of the door. (See fig 19) Aflojar o apretar los tornillos de ajuste para ajustar la inclinación de micro de la puerta.
22 Place plastic sleeve with allen wrench and Pantry Removal Guide into desired location. (Note: this is important to retain if the unit ever needs to be removed.) Coloque el manguito de plástico con una llave allen y despensa eliminación Guía en la posición deseada. (Nota: esto es importante para mantener la unidad, si alguna vez tiene que ser eliminado.) Placez le manchon en plastique avec une clé allen et Pantry Enlèvement Guide l ‘endroit désiré.
2409 Plantside Dr. Jeffersontown, KY 40299 (800) 626-1126 www.rev-a-shelf.