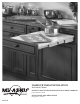
TAMBOUR TABLE INSTALLATION For Framed Cabinets Instructions d’Installation pour la Table Tambour pour les Armoires à Cadre Instalación para mesa hueca Para gabinetes con marco i-4TT-R
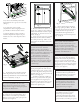
Fig. 1 1. Lay unit on side and fully extend table. Apply furniture wax to grooves of wood slides. (see fig. 1) 1. Lay unité sur le côté et étendre complètement le tableau. Appliquez la cire pour meubles à rainures des lames de bois. 1. Ponga la unidad en el lado de la tabla y extienda completamente. Aplicar cera para muebles a los surcos de las diapositivas de la madera. Fig. 4 Fig. 3 3. Measure from floor of cabinet to top of rail (“A”).
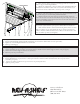
7. Pull table top out, adjust AMB brackets to desired width, install drawer face with (2) #6 x ½” flat head screws and close unit. 8. Press back brackets firmly against back wall and install (4) wood screws into back brackets (2 screws per bracket). 8. Pousser fermement les supports arrière contre le mur arrière et installer 4 vis bois dans les supports arrière (2 vis par support). 7.
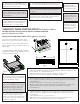
SCREW HOLES 6. Place table into cabinet and place positioning legs under the 4 corners of frame to support unit during installation. 7. Align front of table frame to front of cabinet. Insert shims flush with front and bottom of unit. Pull out table a little to access holes and install (4) wood screws in holes on side of table frame. (2 screws per side) (see fig. 8) 6.