
Installation Sheet


3INSTALLATION INSTRUCTIONS:WOOD TWO–TIERED DRAWER
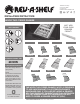
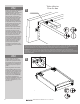
Secure a Figure 8 fastener on
each side of the drawer box
front using the pre-drilled pilot
hole as a locator.
Once the (2) Figure 8 fasteners
have been secured to the
drawer box place the drawer
box on the back of the drawer
front from Step one.
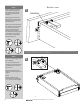
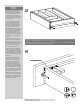
Align the bottom (2) corners
of the drawer box with the
pencil marks. Drill a 7/64” dia.
X 3/8” deep pilot hole through
the middle of each fasterner
and into the back of the front.
Be careful to not drill through
the drawer front. Secure the
drawer box to the drawer
front with the (2) Phillips head
screws using remaining smaller
diameter holes in the Figure 8
fasteners. See Fig. 3b.
Please refer to your “How to
install Blum Slides” instruction
sheet if you purchased the
WCTD with Blum
®
slides.
Otherwise proceed on to step
four.
STEP 3
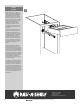
Place the WTCD with drawer
front attached into the cabinet
by sliding the box onto the
hardware until the hooks
engage the holes drilled in
the back of the drawer box.
You will hear a click” when
the drawer box and hardware
is fully engaged. You may
need to squeeze the locking
device releases and push back
to ensure the hardware is
engaged.
The drawer box can be
removed by squeezing the
arms on the locking devices
and pulling forward. Once the
drawer is installed the corners
can be raised/lowered by up
to 1/8” by sliding the vertical
adjustment lever forward/
backward. Adjust as necessary
to ensure the drawer front
aligns with the adjacent
cabinets. See Fig.4
STEP 4
Vertical Adjacent
Lever
FIG.
3a
FIG.
3b
FIG.
4
Note: The larger diameter portion of Figure 8 fastener should be oriented towards the center of the drawer box with the
counter sunk side visible and facing outward. See Fig. 3a.
3
32
#2
“