
Installation & Assembly
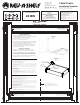

T-WDB-TRI-0216
Installation Template
PARTS LIST:
WOOD BOTTOM MOUNT PULLOUT DRAWER BOX
BLUM SLIDE SET WITH HARDWARE
PEG BOARD DIVIDERS (TALL PROFILE ONLY)
TEMPLATE AND INSTRUCTIONS
ESTIMATED ASSEMBLY TIME:
TIEMPO ESTIMADO DE ENSAMBLADO:
DURÉE DE L’INSTALLATION:
20 MIN
CARE AND MAINTENANCE:
CUIDADO:
ENTRETIEN:
CLEAN WITH A DAMP CLOTH AND
WIPE PARTS DRY
LIMPIE CON UN PAÑO HÚMEDO Y
SEQUE LAS PARTES.
NETTOYER AVEC UN CHIFFON HUMIDE ET
ESSUYER POUR SÉCHER COMPLÈTEMENT.
12400 Earl Jones Way
Louisville, KY 40299
rev-a-shelf.com
Customer Service: 800-626-1126
TOOLS REQUIRED:
LISTA DE PARTES:
LISTE DES PIÈCES:
#2
#2
24” Version
T-WDB-TRI-0216
Many of our products feature installation videos. Visit Rev-A-Shelf.com for more details.
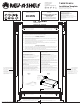
Installing the Slide Set
1) Measure the cabinet opening and mark the centerline
2) Align this template center line with your marked centerline. (See Fig 1)
Orientation differs based on cabinet construction:
2a. Inset door = set back the thickness of your face frame
2b. Overlay = place at the front edge of cabinet
3) After using the tape to hold this template in place, use an awl & rubber
mallet, or a pencil, to mark through the 4 bold dotted screw locations
onto your cabinet oor. Remove template when done
4) Lay your assembled slide set over the top of the marked holes and
using the provided 4 screws, attach the slides to the cabinet oor
through the grey slide feet holes
Drawer Box Preparation
5) With the wood box upside down, locate the front of the box by
identifying the 4 (2 on each side) pre-drilled holes. (See Fig 2)
6) Attach the included BLUM triggers to the wood box with the screws
provided using the pre-drilled holes. The triggers are side sensitive, so
the screw holes will not align if the trigger is on the incorrect side.
7) Place your wood box with attached triggers on top of the slides and
push the box back until you hear the “click” sound.
Center line of cabinet opening
Centrar línea de la abertura del armario
Ligne centrale de l’ouverture de l’armoire
Figure 2
Figure 1
Version de 24” (6,096mm)
Versión de 24”
Pre-drilled holes
Front of box
BLUM Triggers
Mark through template here
Mark through template here
Mark through template here
Mark through template here
Orientate your template to the front of the cabinet (as described in steps 2a & 2b) along this line.
Figura 1
Illustration 1
Figura 2
Oricios pre taladrados
Trous pré-percés
Illustration 2
Gâchettes BLUM
Gatillos tipo BLUM
Frente del cajón
Avant de la boîte
Installer l’Ensemble de la Coulisse
1) Mida la apertura del gabinete y marque la línea central.
2) Alineeestalíneacentraldelaplantillaconlalíneacentralqueustedmarcó(verlagura1).Laorientacióndiere
de acuerdo con la construcción del gabinete.
2a. Inserto de la puerta= ponga hacia atrás el grueso de su puerta.
2b. Plantilla = colóquela en la orilla frontal del gabinete
3) Después de usar cinta para sostener esta plantilla en su lugar, use una lenza y un martillo de goma, o un lápiz para
marcar a través de las cuatro ubicaciones con puntos negros para los tornillos, dentro del piso del gabinete. Quite
la plantilla cuando termine.
4) Coloqueeljuegodeldeslizanteensambladoencimadelapartesuperiordelosoriciosmarcadosyutilizando
loscuatrotornillosqueseproveen,sujetelosdeslizantesalpisodelgabineteatravésdelpiedelosoriciosde
deslizante gris.
Preparación del cajón
5) Conelcajóndemaderabocaarriba,localiceelfrentedelcajónidenticandoloscuatrooriciospretaladrados
(dosencadalado).Verlagura2.
6) Sujete los gatillos tipo BLUM que se incluyen en el cajón de madera con los tornillos que se proveen, utilizando
losoriciospretaladrados.Losgatillossonpartessensibles,porlotanto,losoriciosparalostornillosnose
alinearán si el gatillo está colocado en el lado incorrecto.
7) Coloque el cajón de madera con los gatillos adjuntos encima de los deslizantes y empuje el cajón hacia atrás hasta
que escuche un chasquido.
Installer l’Ensemble de la Coulisse
1) Mesurez l’ouverture du placard et marquez la ligne centrale
2) Alignez cette ligne centrale du modèle avec votre ligne centrale marquée. (Voir l’Illustration 1) L’orientation est
différente suivant la construction de l’armoire:
2a. Porte encastrée = placez en retrait de l’équivalent de l’épaisseur de votre porte
2b. Porte avec appliqué = placez au bord de l’avant de l’armoire
3) Après avoir utilisé le ruban pour maintenir ce modèle en place, utilisez un poinçon et un maillet en caoutchouc, ou
un crayon, pour marquer à travers les 4 emplacements des vis en pointillés gras sur le plancher de votre armoire.
Enlevez le modèle quand vous avez terminé
4) Posezvotrecoulisseassembléesurledessusdestrousmarquésetenutilisantles4visfournies,xezlescoulisses
sur le plancher de l’armoire à travers les trous des pieds gris de la coulisse
Préparation de la Boîte du Tiroir
5) Aveclaboîtedeboisàl’envers,repérezl’avantdelaboîteenidentiantles4(2dechaquecôté)trouspré-
percés. (Voir l’Illustration 2)
6) FixezlesgâchettesBLUMincluesàlaboîtedeboisaveclesvisfourniesenutilisantlestrouspré-percés.Les
gâchettesdoiventêtreinstalléessurleboncôté,donclestrousdevisnes’alignerontpassilagâchetteestsurle
mauvaiscôté.
7) Placezvotreboîtedeboisaveclesgâchettesattachéessurledessusdescoulissesetpoussezlaboîtevers
l’arrière jusqu’à ce que vous entendiez le son «clic».
Marquez ici à travers le modèle
Marquez ici à travers le modèle
Marquez ici à travers le modèle
Marquez ici à travers le modèle
Marque aquí a través de la plantilla.
Marque aquí a través de la plantilla.
Marque aquí a través de la plantilla.
Marque aquí a través de la plantilla.
Oriente la plantilla al frente del gabinete (como se describe en los pasos 2a y 2b) a lo largo de esta línea.
Orientez votre modèle vers l’avant de l’armoire (comme décrit dans les étapes 2a et 2b) le long de cette ligne.
Varios de nuestros productos tienen videos de instalación. Visite la página de internet de Rev-A-Shelf.com para mayores detalles.
Beaucoup de nos produits disposent de vidéos d’installation. Visitez Rev-A-Shelf.com pour plus de détails.
BOÎTE DU TIROIR DE L’ÉLÉMENT COULISSANT EN BOIS AVEC MONTAGE PAR LE BAS
COULISSE BLUM AVEC MATÉRIEL
DIVISEURS POUR LE PANNEAU PERFORÉ (PROFIL HAUT UNIQUEMENT)
MODÈLE ET INSTRUCTIONS
FONDO DE MADERA DEL CAJÓN SEPARABLE.
DESLIZANTE TIPO BLUM CON HERRAMIENTAS.
SEPARADORES DE TABLERO DE CLAVIJAS (SOLO PARA PERFILES ALTOS).
PLANTILLA E INSTRUCCIONES.
Modelo de instrucción T-WDB-TRI-0216
Modèle pour l’Installation T-WDB-TRI-0216