
Installation & Assembly
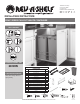


Customer Service: 800-626-1126 | rev-a-shelf.com
2
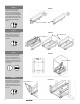
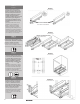
Install the wall sides to the
slides as shown in gure 1.
Be sure to securely engage
the rear of the slide under the
metal tab before installing the
pan head screws at the front
of the slides. Be sure the slide
feet are pointed inward as
shown.
STEP 1
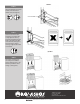
Install the main chassis to the
slides as shown using the 4
machine screws provided.
Install the connecting rod at
this time.
STEP 2
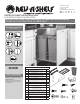
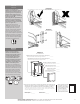
Using the template provided,
mount the waste container
frame to the cabinet oor.
NOTE: If installing in an inset
application, the template must
be moved back the thickness
of the door.
STEP 3
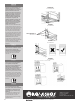
Attach the door brackets to
the outside of the L-brackets
using the (4) provided 5/8”
bolts (part number 11). The
screw with the washer goes at
the top.
STEP 4A
FIGURE 1
FIGURE 2
FIGURE 3
FIGURE 4A
PART NUMBER 9
PART NUMBER 14
PART NUMBER 8
PART NUMBER 12
PART NUMBER 10