
Installation Guide

I-RV-09©2009Rev•A•Shelf,Inc.•2409PlantsideDrive•Jeersontown,KY40299•1-800-626-1126•FAX502-491-2215
VotreSérieRVaétélivréecomplètementmontéepourfacilitersoninstallation.
•D’abord,enleverla(les)poubelle(s)duchâssisenld’acier.
•Placerlechâssisàl’intérieurdevotrecabinet.
•Vérierqu’ilyasusammentdeplacepourfermerlaporteetpouraccommoderla
poubelle.
SuSerieRVhasidocompletamentemontadodeantemanoparafacilitarsuinstalación.
•Primero,hayquesacarelcubooloscubosdelchasisenhilodeacero.
•Colocarelchasisalinteriordesugabinete.
•Vericarquehayespaciosucienteparacerrarlapuertayparaelcubodebasura.
Aveclechâssisenpositionfermée,installezlesdeuxvisdedevant,prenantsoindepositionner
lechâssisenéquerreparrapportaudevantducabinet.
Conelchasisenlaposicióncerrada,instalarlosdostornillosdedelante,cuidandodecolocarel
chasis bien cuadrado con respecto al borde delantero del gabinete.
S’ilyasusammentdeplace,installezlesvisdederrière.
Aucasoùlechâssisnepermettraitpasl’accèsauxvisdel’arrière,enleverlechâssisenle
soulevantpourlesortirdesglissières.
Note: si votre unité est équipée de glissières complètement extensibles, il faut d’abord dégager les
dispositifs de fermeture avant d’enlever le châssis (Figure A). Pressez un levier vers le haut et l'autre levier
vers le bas.
Finalement,placerlapoubelledanslechâssisenld’acieretvotreinstallationestterminée.
Sihayespaciosuciente,instalarlostornillostraseros.
En el caso de que el chasis no deje acceso a los tornillos traseros, remover el chasis con jalarlo
hacia arriba para sacarlo de los rieles.
Nota: si su unidad está equipada de rieles completamente extensibles, primero hay que soltar los
dispositivos de cierre antes de sacar el chasis (Figura A). Presione la una palanca para arriba y la otra
palanca abajo. Finalmente,colocarelcubodebasuraenelchasisenhilodeaceroysuinstalaciónyaestá
terminada.
Aucasoùvousauriezdesquestionsouvousvoudriezrecevoirdesrenseignementssupplémentairessurnosautresproduitspourcuisine,placardsousalle
debains,veuillezappelernosSpécialistesauServiceClientsau1-800-626-1126ouallerànotresitewww.rev-a-shelf.com.Aussi,nepasoubliernotrekitpour
montersurportequipermetd’attachervotreportedecabinetpoubellesdedèchetsetpaniersàlingeàglissièresextensiblesdelaSérieRVàlaPoubelleRV.
SiUstedtienecualquierpreguntaosiquiererecibirmásdetallessobrenuestrosotrosproductosparalacocina,
losarmariosoelcuartodebaños,porfavorllameanuestrosEspecialistasalServiciodelosClientesal1-800-626-
1126ovisitarnuestrositioenlaredalwww.rev-a-shelf.com.También,nohayqueolvidarnuestrokitparamontar
enlapuertaquepermitejarsupuertadegabinetecubodebasuraycestaspararopamontadosobrerieles
extensiblesdelaSerieRValcubodebasuraRV.
I
nstructionsd’Installationpour:PoubellesdedèchetsetpaniersàlingeàglissièresextensiblesdelaSérieRV
InstruccionesdeInstalaciónpara:
CubodebasuraycestaspararopamontadosobrerielesextensiblesdelaSerieRV
1
2
3
FIGURE A
1
1
2
3
3
Note:LePanierHPRVcomprenduneattachedesoutienquis’attacheàl’arrièredupanier.Ilfautjusteglissercette
attachesurlepaniersurlarangéedetrousdubas.
Nota:LacestaHPRVincluyeunclipderetenciónelcualsesujetaalaparteposteriordelacesta.Simplementedeslice
esteclipenlacestaenlaparteinferiordelalaconagujeros.
Installation Instructions for:
RV-Series
Pull-Out Waste Containers and Hampers
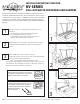
With the frame in a closed position, insert the front two
screws, making sure that the framework is square to the
front of the cabinet.
If there is suffi cient clearance, install rear screws.
If framework prevents access to rear screws, remove
framework by pulling out and lifting frame from slides.
Note: if your product features full extension slides
remove frame by disengaging release triggers (Fig. A).
Finally, place your waste container in the wire frame and the
installation is complete.
Your RV series has been shipped fully assembled for ease
of installation.
• First Remove the container(s) from the wire frame.
• Place the frame inside of your cabinet.
• Look to make sure that there is plenty of clearance to
shut the door and for the waste container.
I-RV-05
©2005 Rev•A•Shelf, Inc. • 2409 Plantside Drive • Jeffersontown, KY 40299 • 1-800-626-1126 • FAX 502-491-2215
If you have any questions or would like additional information
ro ,tesolc ,nehctik eht rof stcu dorp ruo fo tser eht no
bathroom, please contact a Customer Service Specialist at:
1-800-626-1126 or visit us on the web at www.rev-a-shelf.com.
Also, don't forget about our door mount kit
that will attach your current cabinet door to your RV Waste
Container or Hamper.
1
2
3
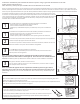
NOTE: The HPRV Hamper includes a
retaining clip which attaches to the rear of
the hamper. Simply slide this clip onto the
hamper on the bottom row of holes.
NOTE: The HURV Utility basket includes
a retaining clip which attaches to the rear
of the basket. Simply center this clip on
the third row from the bottom and bend
retaining clips down to
keep clip in place.
Retaining Clip
Retaining Clip
Installation Instructions for:
RV-Series
Pull-Out Waste Containers and Hampers
With the frame in a closed position, insert the front two
screws, making sure that the framework is square to the
front of the cabinet.
If there is suffi cient clearance, install rear screws.
If framework prevents access to rear screws, remove
framework by pulling out and lifting frame from slides.
Note: if your product features full extension slides
remove frame by disengaging release triggers (Fig. A).
Finally, place your waste container in the wire frame and the
installation is complete.
Your RV series has been shipped fully assembled for ease
of installation.
• First Remove the container(s) from the wire frame.
• Place the frame inside of your cabinet.
• Look to make sure that there is plenty of clearance to
shut the door and for the waste container.
I-RV-05
©2005 Rev•A•Shelf, Inc. • 2409 Plantside Drive • Jeffersontown, KY 40299 • 1-800-626-1126 • FAX 502-491-2215
If you have any questions or would like additional information
ro ,tesolc ,nehctik eht rof stcu dorp ruo fo tser eht no
bathroom, please contact a Customer Service Specialist at:
1-800-626-1126 or visit us on the web at www.rev-a-shelf.com.
Also, don't forget about our door mount kit
that will attach your current cabinet door to your RV Waste
Container or Hamper.
1
2
3
NOTE: The HPRV Hamper includes a
retaining clip which attaches to the rear of
the hamper. Simply slide this clip onto the
hamper on the bottom row of holes.
NOTE: The HURV Utility basket includes
a retaining clip which attaches to the rear
of the basket. Simply center this clip on
the third row from the bottom and bend
retaining clips down to
keep clip in place.
Retaining Clip
Retaining Clip
Nota:LacestadeutensiliosHURVincluyeunclipderetenciónelcualsesujetaalapartetrasera
delacesta.Simplementecentreesteclipenlaterceraladelaparteinferiorydobleelclipde
retenciónhaciaabajoparamantenerloenposición.
Note:LePanierUtilitaireHURVcomprenduneattachedesoutienquis’attacheàl’arrièredupanier.
Ilfautjustecentrercetteattachesurlatroisièmerangéeàpartirdubasetplierlesattachesde
soutien pour les maintenir en place.
AttachedeSoutien
Clipderetención
AttachedeSoutien
Clipderetención