2400 Earl Jones Way, Louisville, KY 40299 1-800-626-1126 • rev-a-shelf.com TOOLS REQUIRED: Drip Tray Installation Instructions ESTIMATED ASSEMBLY TIME: 25 MIN This product is designed for both new and existing cabinet installation. If no plumbing is present or your plumbing comes in from the rear of the cabinet, proceed to the ‘New Construction” section.
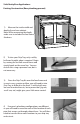
Sink/Vanity Base applications New Construction (No plumbing present) 1) Measure the inside width and depth of your base cabinet. Note: When measuring the depth, make sure to include the face frame thickness. 2) To trim your Drip Tray, only a utility knife and straight edge is required. Begin by scoring the cut line several times and simply break on the score line. You can also do this using a powered saw, but is not necessary.
Sink/Vanity Base Applications Existing Construction (floor plumbing present) 1) Measure the inside width and depth of your base cabinet. Note: When measuring the depth, make sure to include the face frame thickness. 2) To trim your Drip Tray, only a utility knife and straight edge is required. Begin by scoring the cut line several times and simply break on the score line. You can also do this using a powered saw, but is not necessary.
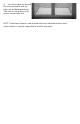
5) Use silicon adhesive around the entire perimeter and any holes you made for plumbing. Take care to seal all the cuts to ensure a water tight seal. NOTE: If your base cabinet is constructed with recessed bottom doors and a center mullion, it may be impossible to install as one piece.
12400 Earl Jones Way, Louisville, KY 40299 1-800-626-1126 • rev-a-shelf.com OUTILS REQUIS: HERRAMIENTAS NECESARIAS: 5 Bandeja de goteo Lèchefrite TEMPS D’ASSEMBLAGE ESTIMÉ: TIEMPO ESTIMADO PARA EL ARMADO: 25 MIN Este producto está diseñado para la instalación de gabinetes nuevos y ya existentes. Ce produit est conçu pour une installation dans des armoires nouvelles et existantes.
Aplicaciones para base el fregadero/vanidad Applications pour armoire sous l’évier /vanité Construcción Nueva (tubería no presente). Construction Nouvelle (Pas de robinetterie) 1) Mida el ancho y la profundidad interior de la base del gabinete. 1) Mesurer la largeur et la profondeur à l’intérieur de l’armoire sous. Note: Lors de la mesure de la profondeur, veillez à inclure l’épaisseur du cadrage avant.
4) Una vez que la bandeja sea ajustada dentro del gabinete, utilice silicón adhesivo alrededor de todo el perímetro y cualquier orificio que usted haya hecho para la tubería. Tenga cuidado de sellar todos los cortes para evitar cualquier fuga de agua. 4) Une fois que le bac est adapté à l’intérieur de l’armoire, utilisez un silicone adhésif dans le périmètre et tous les trous que vous avez fait pour la robinetterie. Prenez soin de sceller toutes les coupes et d’assurer un joint étanche.
3) Como la bandeja de derrames cabe encima del marco de la cara y en la mayoría de los casos en la columna central, usted necesitará recortar la bandeja de goteo para ajustar la cadena al frente. Puede utilizarse un cuchillo para uso general para hacer los cortes, pero una herramienta eléctrica (segueta, sierra, etc.) podría darle un poco de mejor control.