
Use and Care Manual


Digital Video Recorder
5
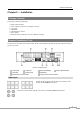
NOTE: Connect the monitor before the DVR boots so that video can be displayed on the monitor with the
resolution you have set during system setup. If you want to use both the HDMI and VGA Monitor
connectors, one of the monitors should be connected before the DVR boots, and the other monitor
should be connected after the DVR boots.
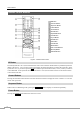
Network Port
CAUTION: The network connector is not designed to be connected directly with cable or wire
intended for outdoor use.
RS485 Port
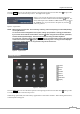
Connector Pin Outs:
Master Unit Slave Unit
+ → To → TX+/RX+
– → To → TX–/RX–
Power Cord Connector
The CAMERA power connector is provided to supply power to the observation cameras. Connect the
connector of the adaptor to the DVR, and connect the AC power cord to the adaptor and then to the wall
outlet.
WARNING: ROUTE POWER CORDS SO THAT THEY ARE NOT A TRIPPING HAZARD. MAKE
CERTAIN THE POWER CORD WILL NOT BE PINCHED OR ABRADED BY FURNITURE.
DO NOT INSTALL POWER CORDS UNDER RUGS OR CARPET.
THE POWER CORD HAS A GROUNDING PIN. IF YOUR POWER OUTLET DOES NOT
HAVE A GROUNDING PIN RECEPTACLE, DO NOT MODIFY THE PLUG. DO NOT
OVERLOAD THE CIRCUIT BY PLUGGING TOO MANY DEVICES IN TO ONE CIRCUIT.
Your DVR is now ready to operate. Refer to Chapter 3 ─ Configuration and Chapter 4 ─ Operation.
The DVR can be networked using the 10Mb/100Mb/1Gb Ethernet connector. Connect a Cat5 cable
with an RJ-45 jack to the DVR connector. The DVR can be networked with a computer for remote
monitoring, searching, configuration and software upgrades. See Chapter 3 ─ Configuration for
configuring the Ethernet connections.
The DVR can be controlled remotely by an external device or control system, such as a suitable control
keyboard, using RS485 half-duplex serial communications signals. The RS485 connector can also be
used to control PTZ (pan, tilt, zoom) cameras. Connect RX+/TX+ and RX–/TX– of the control system to
the + and – (respectively) of the DVR. See Chapter 3 ─ Configuration and the PTZ camera or remote
controller manufacture’s manual for configuring the RS485 connection.
Connect the connector of the adaptor to the DVR, and connect the AC power cord to the adaptor and then
to the wall outlet.