
Use and Care Manual


Digital Video Recorder
43
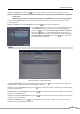
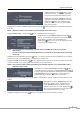
Highlight the Check box and press the
button to check whether or not the name you entered can be used.
NOTE: The DVR Name you entered should be checked by selecting Check, otherwise the EZLink changes will
not be saved.
When entering no name or a name already registered on the DVRNS server, an error message displays.
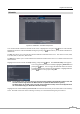
The box beside Status displays the current information of the Rendezvous server and NAT (Network Address
Translation) device.
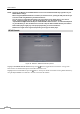
Highlight the Setup box beside Dashboard and press the button to set up the Dashboard.
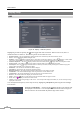
Select New account if you want to create a new Dashboard account, and
select Existing account if you want to use your existing Dashboard
account. Highlight the box beside User ID/New Password (Confirm)
and press the button. A virtual keyboard appears allowing you to
enter the user ID and password for your Dashboard account. Highlighting
the Register/Add a new DVR and pressing the
button registers the
DVR on the REVO Dashboards.
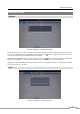
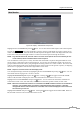
RTSP
Figure 28: Network – RTSP setup screen.
Highlight Enable RTSP (Real-Time Streaming Protocol) and press the button to toggle between On and Off.
You will be able to change the settings if Enable RTSP is enabled.
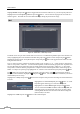
Highlight the box beside RTSP Port and press the button. Set the port number of the RTSP server obtained from
your system administrator.
Highlight the box beside RTP Start Port and press the button. Set the start port number of the RTP server obtained
from your system administrator.
Highlight the box beside RTP End Port and press the button. Set the end port number of the RTP server obtained
from your system administrator.
Highlight Use Mobile and press the button to toggle between On and Off. When set to on, you can access a
remote DVR using compatible mobile devices.